

You notice water pooling in your yard after rain, but you’re unsure what’s causing it. Poor soil drainage, improper grading, or clogged gutters could be the culprits. Before calling professionals, you can tackle several DIY solutions. Testing your soil’s drainage rate helps determine the best approach. Simple fixes like regrading or installing perforated pipes might solve your standing water issues without expensive contractor visits.
What’s Wrong With My Yard After Rain?
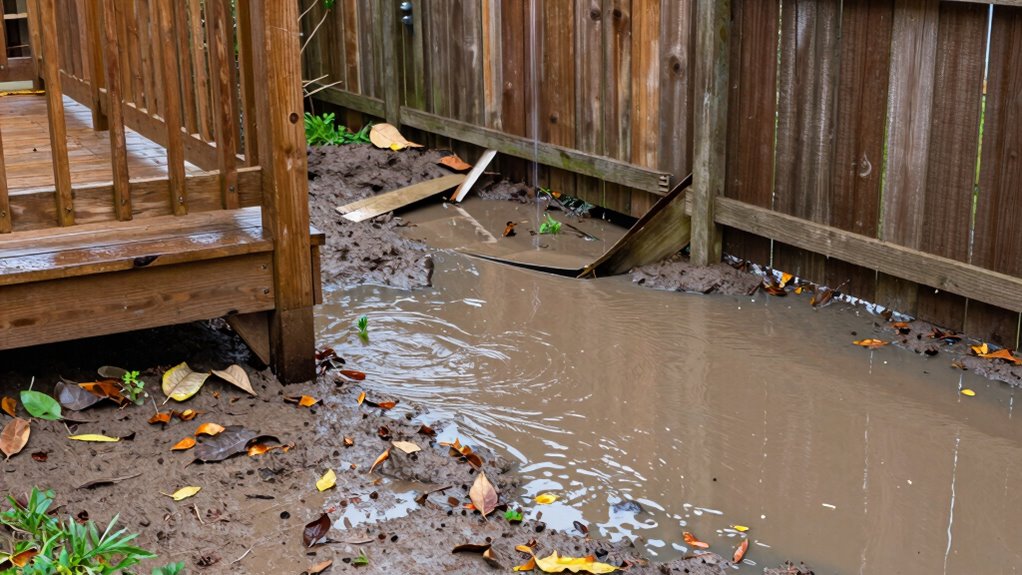
Why does your yard transform into a miniature swamp every time it rains? You’re not alone in this frustrating battle with poor drainage.
Your soil’s composition, slope grade, and existing drainage patterns determine how water moves across your property. Clay soils swell when wet, blocking water absorption. Flat areas lack proper pitch for runoff. Compacted earth prevents natural percolation.
You need targeted solutions. Install French drains in low-lying problem areas. Create gentle slopes directing water away from structures. Add organic matter to improve soil permeability. Consider permeable pavers instead of solid surfaces.
These modifications work with natural water flow rather than against it.
Your neighborhood likely faces similar issues. Talk to neighbors about collaborative drainage planning. You’ll discover shared experiences and potential joint solutions that benefit everyone’s property values and peace of mind.
Causes Behind Backyard Flooding and Standing Water
You’ll often find standing water in your backyard when soil drainage properties are inadequate, preventing proper percolation of excess rainwater.
Improper grading creates low spots where water collects instead of flowing away from your property’s foundation.
These fundamental issues require immediate attention because they’ll continue causing flooding problems until you address the underlying drainage deficiencies.
Poor Soil Drainage
Poor soil drainage creates persistent flooding and standing water issues in backyards by preventing rainwater from permeating through the soil profile effectively.
You’ll notice water pooling in low spots for days after rainfall, indicating your soil can’t absorb moisture quickly enough.
Your soil’s composition directly impacts drainage performance:
- Clay content – Clay particles are too fine and compact easily, creating impermeable layers that block water flow.
- Organic matter deficiency – Lack of decomposed plant material reduces soil porosity and water retention capacity.
- Compaction layers – Heavy foot traffic or construction equipment compresses soil particles, eliminating air pockets necessary for water infiltration.
These factors combine to create waterlogged conditions that harm plant roots and create breeding grounds for pests.
Understanding your soil’s specific drainage limitations helps you choose targeted improvement strategies that actually work for your yard’s unique conditions.
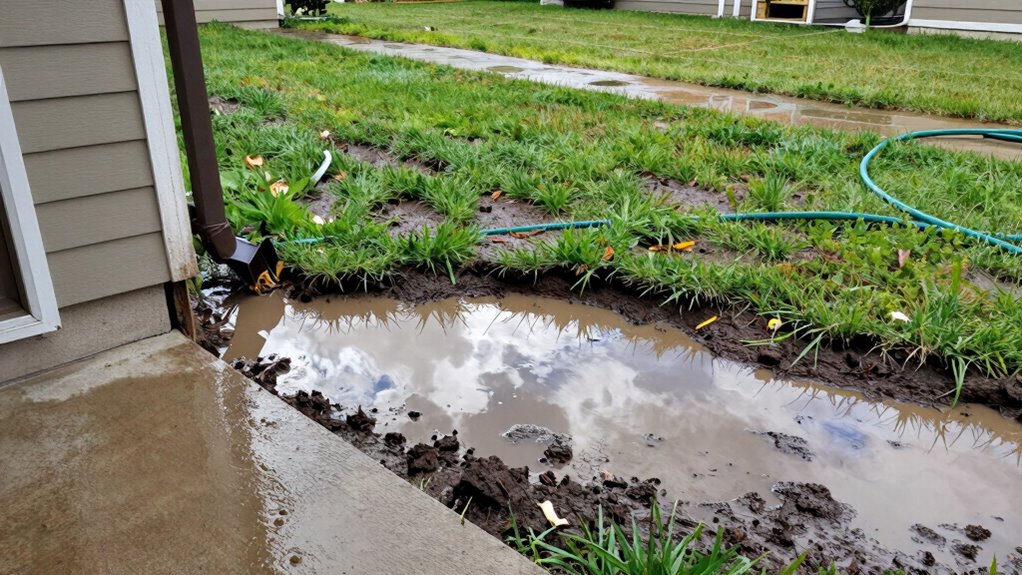
Improper Grading Issues
When your yard’s surface slopes incorrectly or lacks proper grade changes, water accumulates in unwanted areas because gravity directs runoff toward your home’s foundation instead of away from it.
You’ll notice pooling near downspouts, walkways, and patio areas where positive drainage doesn’t exist. Soil compaction from heavy foot traffic creates depressions that trap water longer than necessary.
Fix grading problems by establishing a minimum 2% slope away from your foundation for at least ten feet.
Remove existing vegetation carefully before reshaping terrain with clean fill dirt. Create swales or French drains channel water toward street gutters properly.
Consider installing retaining walls where significant elevation changes occur.
Test your corrections during rainfall events ensuring water flows correctly without erosion concerns affecting neighboring properties consistently.
Test How Fast Your Soil Drains
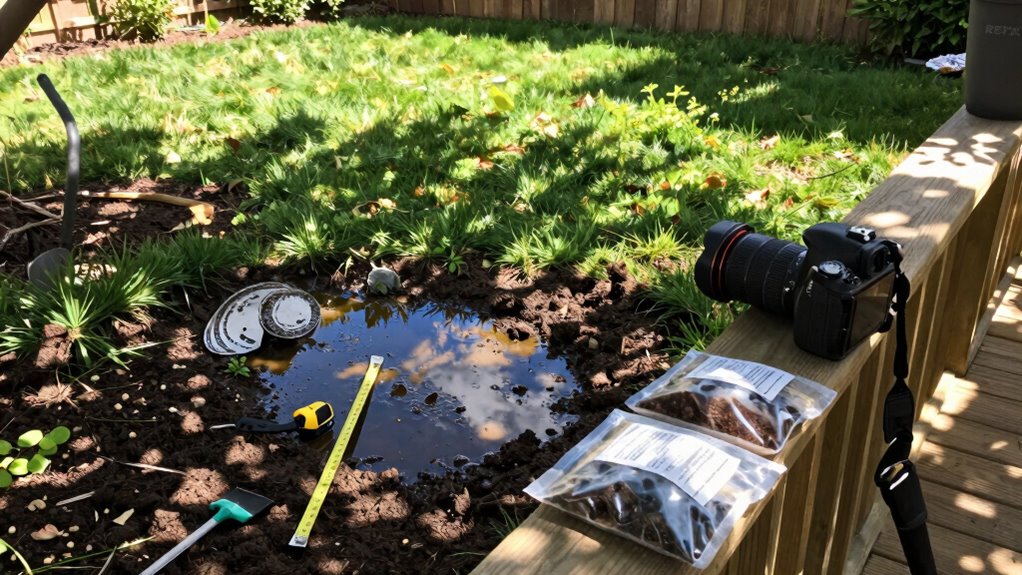
How quickly does water disappear from your backyard after a heavy rain? You need to determine your soil’s drainage rate before fixing pooling issues.
Perform a simple percolation test: dig a 12-inch hole, fill it with water, then measure how long it takes to drain completely.
Poor drainage affects your landscape’s health and your home’s foundation. Understanding your soil’s absorption capacity helps you choose effective solutions that work with your yard’s natural conditions.
- Fast drainage (under 1 hour) indicates sandy soil needing organic matter
- Moderate drainage (1-4 hours) works well for most plants and grass
- Slow drainage (over 4 hours) requires immediate attention to prevent water damage
Test multiple areas since drainage varies across your property.
Record results to identify problem zones needing targeted improvements.
Try These Easy, Low-Cost Drain Fixes First
Now that you understand your soil’s drainage capacity, you can implement targeted solutions without expensive professional help.
Start by regrading problem areas, ensuring water flows away from structures at a minimum 2% slope.
Install perforated pipes in existing swales to redirect surface water.
Create shallow trenches filled with coarse gravel to channel runoff naturally.
Aerate compacted zones using a garden fork, then top-dress with compost to improve infiltration rates.
Redirect downspouts onto permeable surfaces like gravel pads or rain gardens.
Install simple catch basins where water pools consistently.
These modifications work best when matched to your specific soil conditions.
You’re joining countless homeowners who’ve successfully solved drainage issues through these proven, cost-effective methods that require minimal tools and maximum impact.
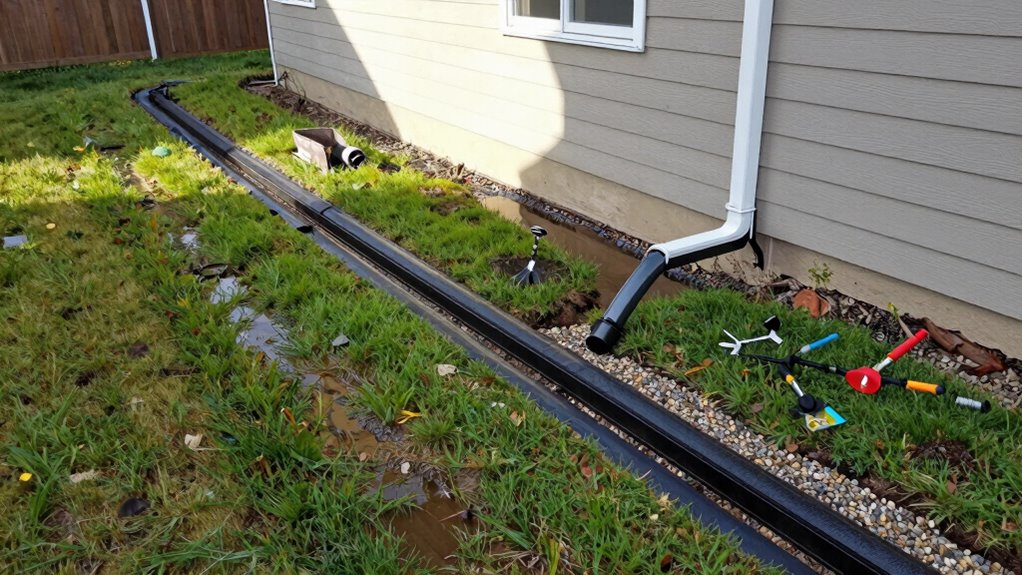
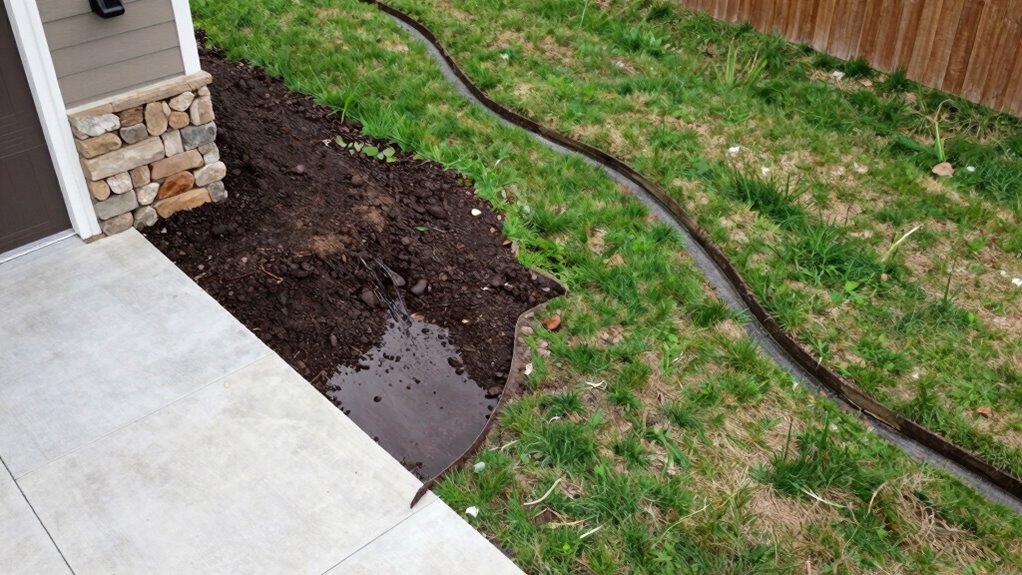
Install a Simple French Drain Without a Contractor
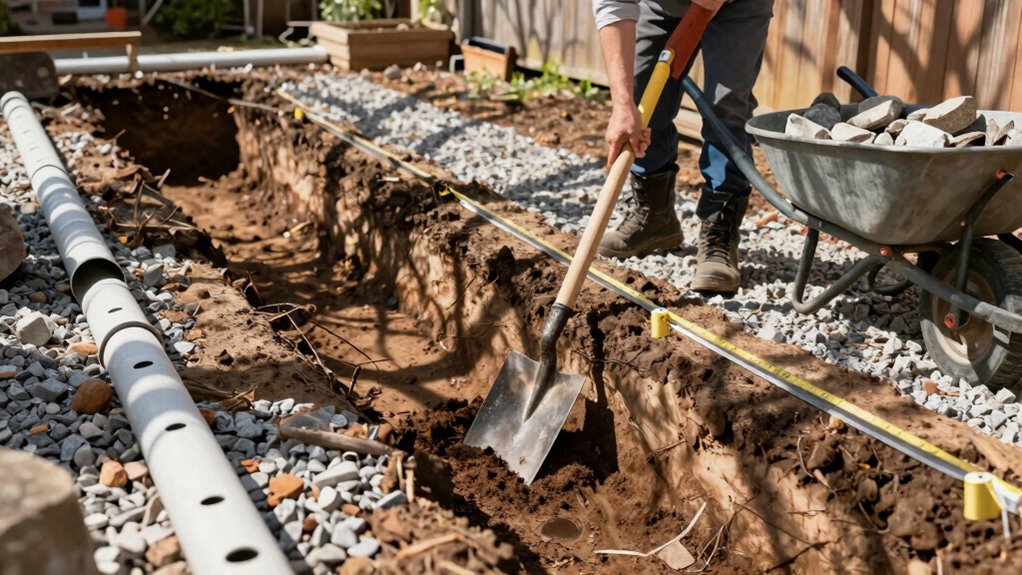
A single French drain can eliminate persistent water pooling in your yard with proper planning and execution.
You’ll need to dig a trench 12-24 inches deep along the water’s path, ensuring it slopes 1 inch per 8 feet toward your desired outlet.
- Perforated pipe: Use 4-inch PVC with holes drilled every 6 inches on the bottom half
- Gravel base: Line the trench with landscape fabric, add 2 inches of coarse gravel before placing the pipe
- Proper backfill: Cover the pipe with 6 inches of gravel, then fold fabric over the top and backfill with soil
Test your drain’s slope with a level before finalizing installation.
This system channels excess water away from problem areas effectively.
Set Up a Dry Well in Hard-to-Drain Areas
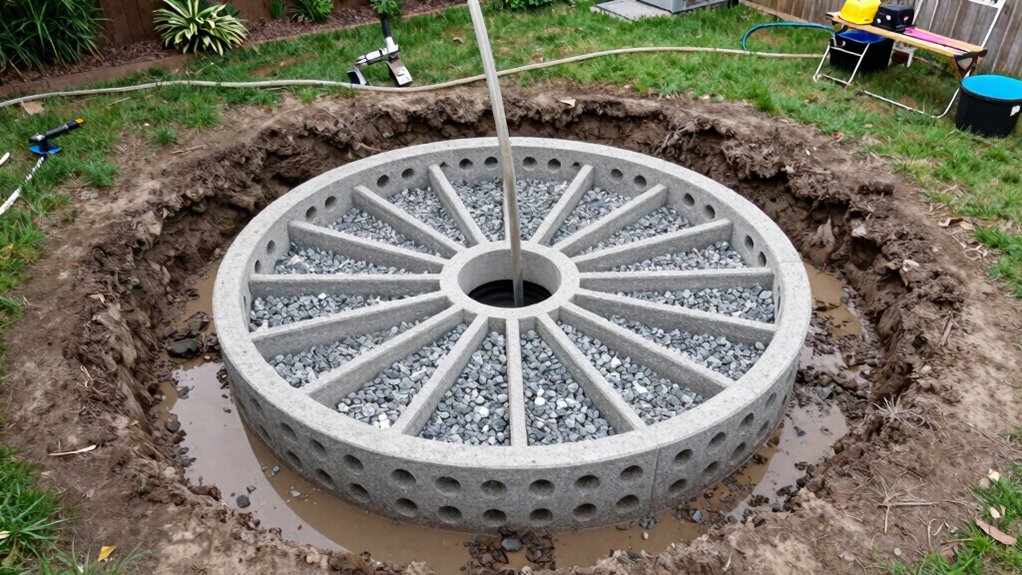
When surface water has nowhere to drain naturally, a dry well provides an effective underground solution by collecting and slowly dispersing excess water into the surrounding soil.
You’ll need to dig a hole at least three feet deep and wide enough to accommodate a perforated container. Line the pit with landscape fabric to prevent sediment intrusion. Place your dry well container – typically a plastic barrel with holes drilled throughout – at the bottom.
Surround it with gravel, ensuring proper drainage gaps. Backfill with soil, but avoid compacting near the well. Connect your French drain pipe directly to the dry well’s inlet.
This system handles concentrated water flow better than surface drainage alone, making it ideal for low-lying areas where standing water persists.
Use Swales to Guide Rainwater Away From Landscaping
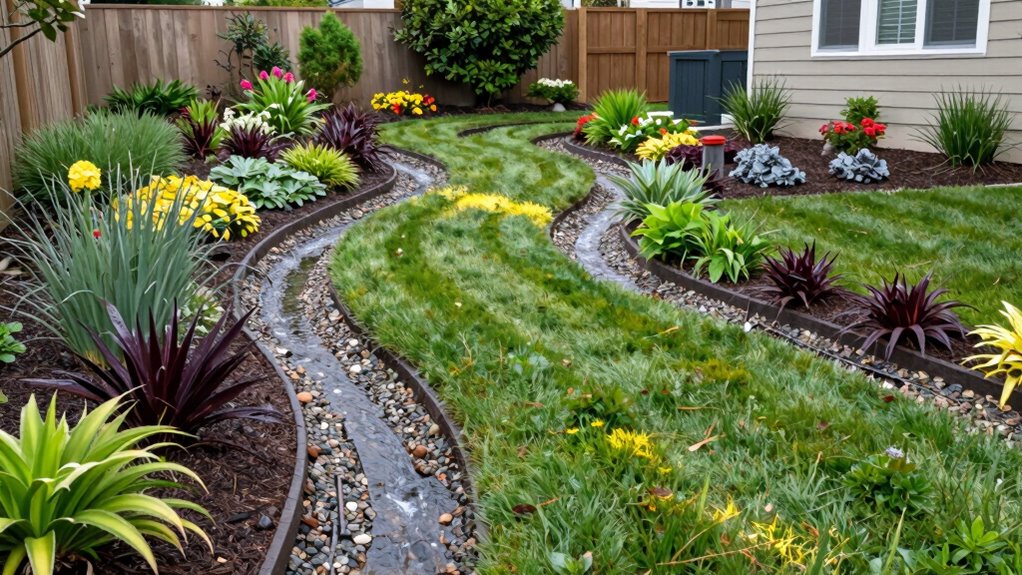
While dry wells effectively manage concentrated water flow in problematic areas, swales offer a complementary approach that works best for redirecting rainwater across broader landscaping zones.
You’ll create shallow, vegetated channels that slow runoff and prevent erosion.
- Design graded slopes between 1-3% to guarantee proper water flow without causing erosion issues.
- Plant native grasses or groundcover in swales to stabilize soil and enhance water absorption naturally.
- Position swales strategically to intercept surface runoff before it damages foundations or floods planting beds.
Swales integrate seamlessly into existing landscapes while solving drainage problems.
You don’t need expensive equipment – just proper planning and excavation techniques.
These systems work passively, requiring minimal maintenance once established.
Measure your yard’s natural water flow patterns first.
Calculate the swale’s depth and width based on expected rainfall volume.
Line the channel with permeable fabric if soil conditions demand it.
Your swale becomes an attractive landscape feature that solves functional drainage needs effectively.
Fix Gutters and Downspouts to Stop Overflow
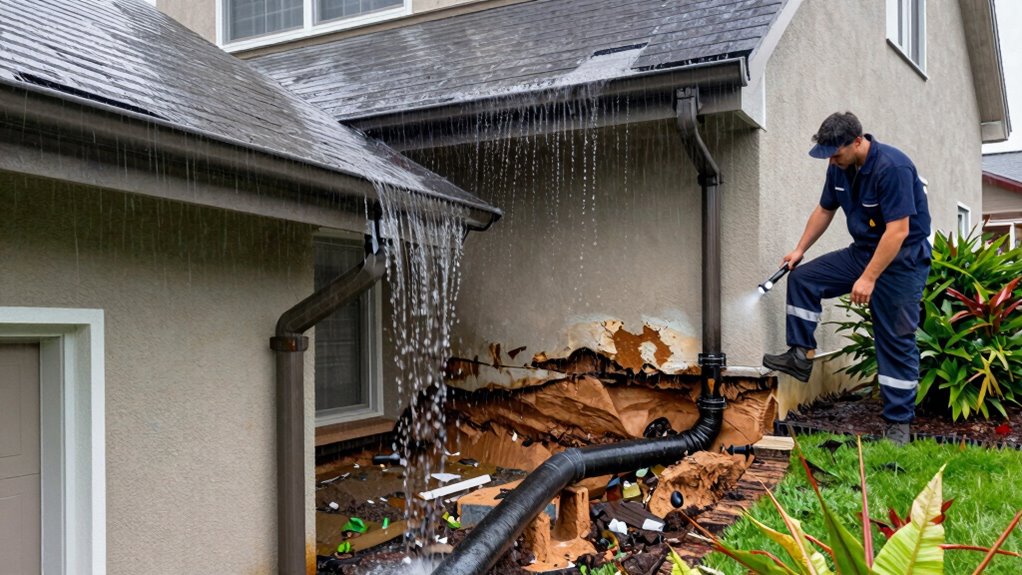
You’ll need to clean gutters regularly to prevent debris buildup that causes overflow during heavy rains.
Install proper downspout extensions that direct water at least three feet away from your foundation to avoid pooling near your home’s base.
Repair any loose gutter sections immediately to maintain consistent water flow and prevent damage to your roofline and siding.
Clean Gutters Regularly
Because gutters clog with debris over time, they require regular cleaning to maintain proper drainage function. You should remove leaves, twigs, and sediment that accumulate during fall and spring seasons.
Clogged gutters cause water backup that damages your roof and foundation while creating backyard flooding issues.
Plan these maintenance tasks for effective results:
- Clear gutters quarterly using a small garden trowel and bucket system
- Flush remaining debris with a garden hose after hand cleaning
- Install gutter guards to reduce future cleaning frequency while maintaining flow
Regular gutter maintenance prevents expensive water damage repairs and keeps your drainage system operating efficiently year-round.
You’ll notice immediate improvements in water flow during heavy rain events when gutters remain clean and functional.
Install Proper Downspout Extensions
Installing proper downspout extensions requires extending discharge points at least 3-5 feet away from your home’s foundation.
You’ll need rigid extensions that maintain consistent water flow without sagging or detaching. Measure precisely from your downspout outlet to determine extension length, accounting for ground slope and drainage patterns. Secure connections with metal bands or couplers, ensuring watertight seals at all joints.
Choose materials matching your existing downspouts – aluminum, vinyl, or copper – for seamless integration. Direct extensions toward areas where water can safely disperse, avoiding neighboring properties or walkways.
Consider adding splash blocks beneath outlets to prevent soil erosion. Properly installed extensions eliminate foundation seepage while protecting your landscaping investment.
You’re creating functional drainage that complies with local building codes and prevents costly basement flooding issues effectively.
Repair Loose Gutter Sections
Repair loose gutter sections by tightening hangers, replacing damaged brackets, and sealing joints to prevent overflow. Loose gutters cause water backup that leads to foundation issues and basement flooding. You’ll need a ladder, screwdriver, and gutter sealant for this repair job.
Focus on these critical areas:
- Hanger inspection: Check every 2 feet for loose or missing fasteners
- Bracket replacement: Remove rusted brackets and install new galvanized ones
- Seal all joints: Apply silicone sealant where sections connect
Test your repairs during the next rainfall. Water should flow smoothly without spilling over edges. Properly secured gutters protect your home’s foundation while directing water away from your basement.
Don’t ignore loose sections – they compromise your entire drainage system’s effectiveness.
Reroute Water With Strategic Yard Grading
Strategic yard grading redirects water away from problem areas by manipulating the soil’s slope and contour.
You’ll want to create a minimum 2% grade slope directing water away from your home’s foundation. Start by identifying low spots where water pools after rainfall. Remove existing sod and topsoil from high areas, then redistribute this material to fill depressed zones.
Use a rake and shovel for small areas, or rent a bobcat for larger projects. Compact the soil firmly to prevent future settling. Guarantee proper drainage pathways lead water toward street gutters or designated drainage areas.
Check your work with a level and measuring tape to verify adequate slope angles. This systematic approach prevents basement flooding and foundation damage.
Plant These Water-Loving Shrubs and Grasses
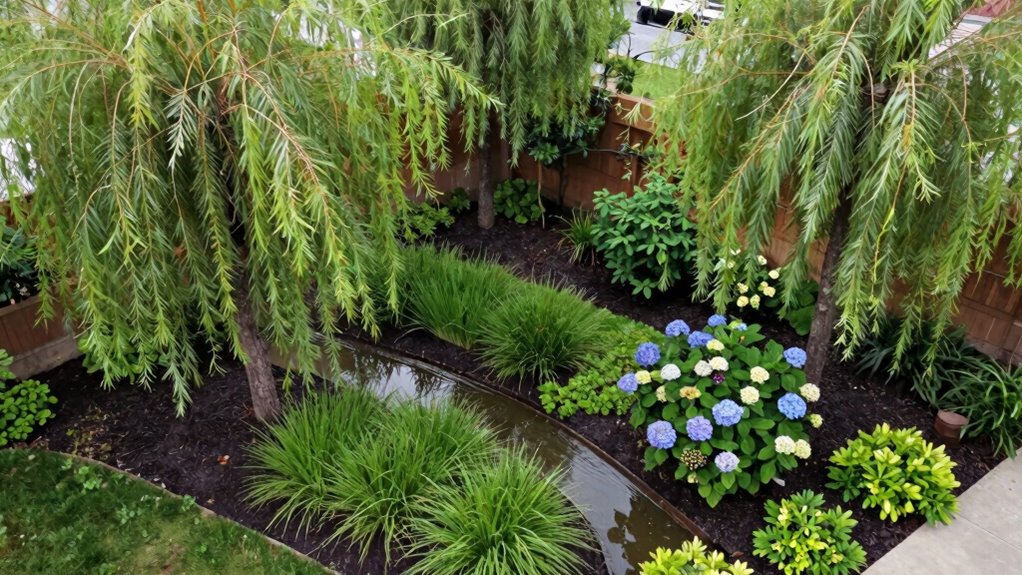
While strategic grading redirects water flow, incorporating water-loving plants into your landscape provides an additional layer of drainage support that works naturally with your yard’s hydrology.
These plants absorb excess moisture while stabilizing soil conditions.
Choose plants that thrive in wet conditions:
- River Birch – Handles saturated soil better than most trees while providing attractive peeling bark
- Swamp Milkweed – Perennial that tolerates standing water and attracts beneficial pollinators
- Blue Flag Iris – Rhizomatous plant that filters runoff while creating natural borders
Position these species in low-lying areas where water collects naturally.
Their root systems create channels that improve soil permeability while their foliage transpires excess moisture back into the atmosphere.
You’re fundamentally installing a living drainage system that enhances both function and aesthetics.
These plants become integral components working alongside your grading efforts.
Mulch Right to Prevent Soggy Soil Spots
Although proper grading and water-loving plants considerably improve drainage, mulching incorrectly can undermine these efforts by creating soggy soil conditions that promote root rot and fungal growth.
You should apply mulch in thin layers, maintaining 2-3 inches maximum depth around plants. Choose coarse-textured mulches like shredded bark or wood chips that allow water penetration while preventing surface compaction.
Avoid fine mulches that mat together, blocking air circulation and water flow. Keep mulch away from plant stems and tree trunks, creating a 6-inch gap to prevent moisture accumulation.
You must monitor mulch decomposition regularly, replenishing as needed to maintain proper thickness. Consider using permeable landscape fabric beneath organic mulches to enhance drainage while suppressing weeds.
Proper mulching technique guarantees your drainage improvements remain effective long-term.
Install Permeable Pavers to Stop Erosion
You’ll prevent erosion effectively by installing permeable pavers that allow water to infiltrate through the joints and into the underlying soil.
Proper installation requires a compacted base layer, level bedding course, and precise joint filling with angular aggregate that won’t wash away.
These pavers handle runoff while maintaining structural integrity, eliminating the guesswork from your drainage improvements.
Permeable Pavers Prevent Erosion
Permeable pavers provide an effective solution for preventing soil erosion in problematic drainage areas. You’ll discover how these specialized paving materials work by allowing water to 渗透 through their surface while maintaining structural integrity. Your backyard’s stability improves markedly when you install permeable pavers correctly.
- Water infiltration occurs through joints and voids, reducing surface runoff that causes erosion.
- Subsurface drainage channels excess water away from vulnerable areas using engineered base layers.
- Soil stabilization happens as pavers distribute weight evenly, preventing washouts during heavy rainfall.
These systems protect your landscape investment while solving persistent drainage issues. You’re not just installing pavers; you’re implementing a thorough erosion control strategy that neighbors will admire.
Permeable pavers transform problematic areas into functional, attractive spaces that resist weather damage effectively.
Install Permeable Pavers Correctly
When installing permeable pavers to address erosion issues, proper base preparation and layer installation are critical for long-term performance.
You’ll need to excavate adequately, typically removing 6-8 inches of soil. Install a compacted gravel base layer, guaranteeing proper slope for drainage.
Add a geotextile fabric barrier to prevent fines from migrating upward. Spread coarse sand evenly, creating a stable bedding layer for your pavers.
Place permeable pavers carefully, maintaining consistent joints. Fill joints with polymeric sand that’ll lock together when wet.
Compact everything properly using a plate compactor. Ascertain your installation allows water infiltration while providing structural support.
This prevents surface runoff that causes erosion. You’re creating a system that manages stormwater naturally while stopping soil displacement effectively.
Keep Water Off Your Home’s Foundation
While proper grading directs water away from your foundation, guaranteeing adequate slope requires careful measurement and strategic soil placement. You should maintain a minimum 6-inch drop within the first 10 feet from your foundation perimeter.
Soil compaction and settling can compromise this critical drainage plane over time.
Focus on these essential foundation protection strategies:
- Extend downspouts at least 4 feet from foundation walls using splash blocks or underground extensions
- Install French drains around perimeter footing when surface grading isn’t sufficient for water diversion
- Apply waterproof sealant coatings to basement walls and guarantee weeping tile systems remain unclogged
These targeted modifications create reliable barriers between standing water and your home’s structural integrity.
Don’t overlook proper backfill installation during any foundation work. You’re protecting your investment while preventing costly water damage claims that insurance mightn’t cover.
Check These Parts Regularly to Avoid Backup
You should inspect your drainage pipes monthly for blockages and clear debris from gutters regularly to maintain ideal water flow.
These routine checks prevent sediment buildup and guarantee your drainage system operates efficiently during heavy rainfall.
Regular maintenance of these components stops water backup before it becomes a costly foundation or landscaping issue.
Inspect Drainage Pipes Monthly
Monthly inspection of your drainage pipes prevents costly backups that can flood your basement or damage your foundation.
You should check these critical components regularly to maintain proper water flow away from your home.
Focus your attention on these key areas during monthly inspections:
- Pipe joints and connections – Look for cracks, separations, or loose fittings that allow water infiltration.
- Pipe interior surfaces – Check for root intrusion, debris buildup, or mineral deposits that restrict water flow.
- Outlet positioning – Verify discharge points direct water away from your foundation and aren’t blocked by soil or vegetation.
Don’t wait for flooding or foundation damage to discover problems.
Regular inspection helps you identify issues before they escalate into expensive repairs.
You’ll maintain system efficiency and protect your property investment effectively.
Clear Debris From Gutters Regularly
Regular pipe inspection connects directly to gutter maintenance since backup in either system creates cascading drainage problems.
You should clean gutters every three months, focusing on downspout connections where debris accumulates fastest. Use a garden trowel to remove leaves, twigs, and sediment buildup. Check that water flows freely through downspouts by running a hose through the system.
Clogged gutters force water overflow, saturating soil around your foundation and overwhelming drainage pipes. Install gutter guards to reduce maintenance frequency. Trim overhanging branches that contribute debris. Monitor seams and joints for leaks during heavy rains.
Proper gutter maintenance prevents costly basement flooding and yard erosion. You’re part of the solution when you stay consistent with these checks.
Know When Only a Pro Can Save Your Yard
When backyard drainage problems become too complex for DIY solutions, professional intervention becomes essential. You’ll know it’s time to call experts when water damage threatens your home’s foundation or creates persistent pooling that doesn’t respond to basic fixes.
You need professional help if you’re experiencing:
- Basement flooding or structural water damage after rainfall
- Erosion that’s washing away significant portions of your yard
- Municipal code violations requiring engineered drainage solutions
Professional drainage contractors bring specialized equipment like French drain installation tools, grading lasers, and soil analysis instruments.
They understand local building codes and can design extensive systems that integrate with existing infrastructure.
Don’t risk inadequate repairs that could worsen problems.
When water threatens your property investment and family safety, expert intervention isn’t just recommended—it’s necessary for protecting your home and maintaining community standards.
Conclusion
While standing water transforms your yard into a muddy mess, proper drainage converts it into a functional landscape. Your soil’s absorption rate determines whether you need simple fixes or professional intervention. Don’t let minor issues become major problems—address grading, install French drains, and maintain gutter systems before flooding wreaks havoc. Regular inspection prevents costly repairs, but sometimes only expert solutions can handle severe drainage challenges effectively.
