

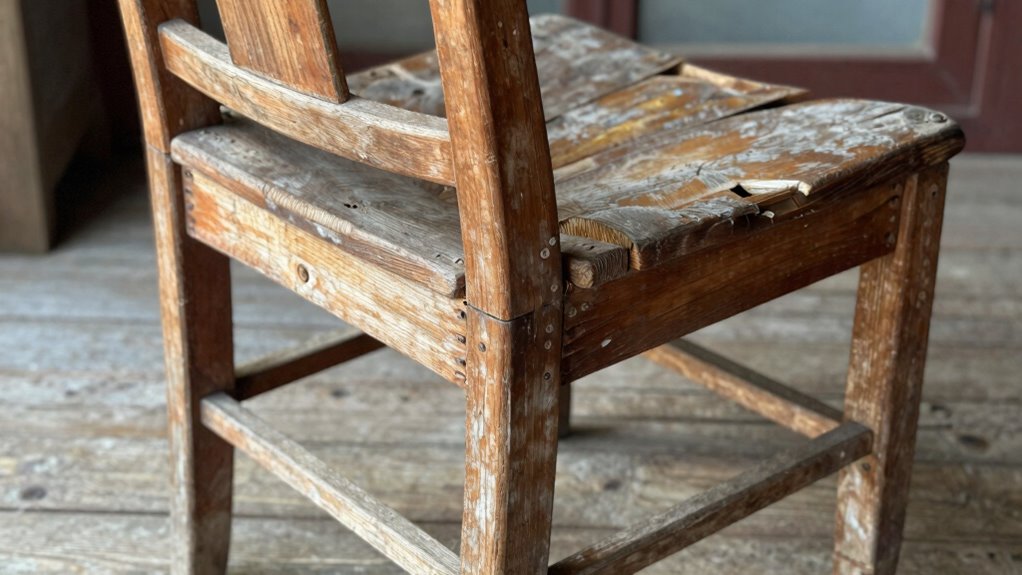
You’ll want to start by identifying which joints have loosened over time. Don’t just tighten everything blindly—some movement is normal. Focus on the areas that wiggle when you apply pressure. Once you’ve pinpointed the problem spots, you can begin disassembling those joints carefully. This initial assessment saves you from unnecessary work and helps you understand exactly what needs attention before moving forward with repairs.
What Causes Wooden Chairs to Become Unstable Over Time?
Wooden chairs become unstable over time because repeated stress and environmental factors gradually weaken their structural integrity.
You’ll notice joints loosening first, especially where seat rails meet legs. Temperature fluctuations cause wood to expand and contract, creating gaps. Humidity changes make glue bonds fail, while dry conditions cause cracking. Daily use wears down contact points between pieces.
You probably see this happening in your own dining room or kitchen chairs.
Heavy sitting creates pressure that works joints loose. Arms and backs often sag because their attachment points weaken. Corner blocks shift, braces come unglued, and dowels work themselves out. These issues compound over months and years.
Understanding these causes helps you identify problems early.
You’ll develop confidence recognizing when simple tightening won’t fix stability issues. Regular inspection prevents small problems from becoming major repairs.
What Tools and Materials Do You Need for Basic Repairs?
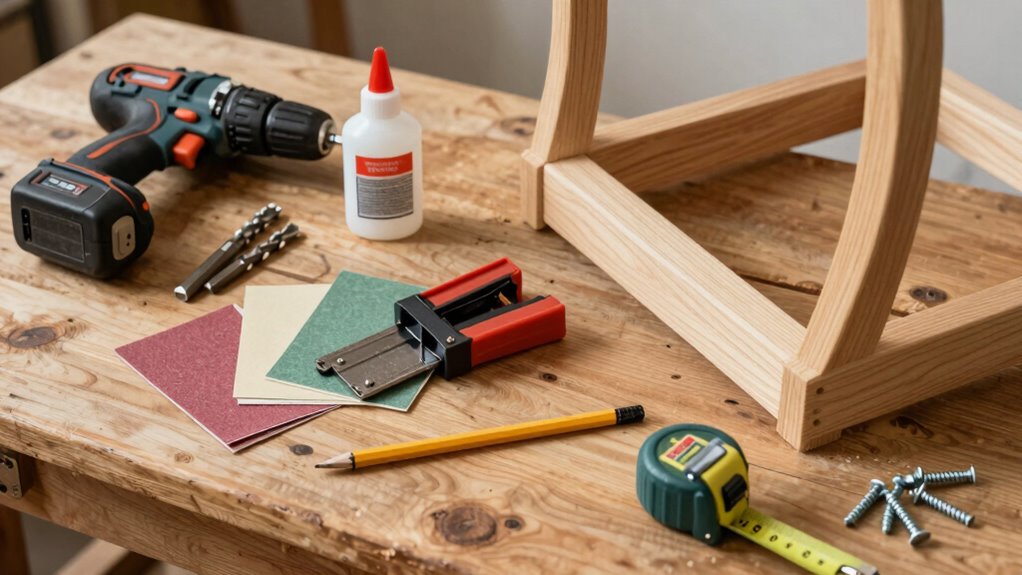
You’ll need specific tools and materials to properly repair loose wooden chairs.
Essential items include wood glue, sandpaper, clamps, and basic hand tools like screwdrivers and hammers.
Having the right supplies ready before starting your repair work makes the process much smoother and more effective.
Essential Tools Required
Having the right tools makes quick work of loose chair joints. You’ll need a few essential items to tackle most repairs effectively.
Don’t skip gathering these basics before starting your project.
- Wooden wedges and clamps – These hold joints together while repairs set, ensuring tight connections that last.
- Sandpaper or steel wool – Clean surfaces properly for better adhesion and remove old finish that prevents proper bonding.
- Small brush or cloth – Apply glue evenly and remove excess material during the repair process.
Keep these tools organized and within reach. You’ll work more efficiently and achieve professional results.
Quality tools make the difference between temporary fixes and permanent solutions. Take pride in your repair work by using proper equipment from the start.
Types Of Wood Glue
While selecting the right wood glue seems straightforward, choosing incorrectly can compromise your chair’s structural integrity.
You need to understand the main types available for chair repairs.
PVA glue works best for indoor furniture and creates strong bonds when clamped properly.
Hide glue offers traditional joinery repair and reversibility for future fixes.
Epoxy glue handles gaps and provides maximum strength for heavy-use chairs.
Polyurethane glue expands slightly, filling small voids while creating durable joints.
Always check your chair’s wood type and intended use before choosing.
Yellow PVA glue suits most household chairs, while epoxy works better for outdoor or high-stress joints.
Read manufacturer specifications carefully.
Your choice determines lasting repair success, so don’t rush this decision.
Sandpaper Grit Selection
Selecting the proper sandpaper grits makes a significant difference in achieving smooth, professional results when preparing wooden chair surfaces for repair.
You need different grits for specific tasks.
- Start with 80-120 grit for removing old finish, paint, or rough spots – this aggressive grit cuts through damaged surfaces quickly.
- Use 150-180 grit for smoothing surfaces between coats of glue or finish – it removes scratches left by coarser grits while creating proper adhesion.
- Finish with 220-320 grit for final smoothing before applying new finish – this ultra-fine grit creates glass-smooth surfaces.
Always sand with the wood grain to avoid cross-scratching.
Progress through grits systematically, cleaning debris between each pass.
Proper grit selection guarantees your repaired chairs look professionally restored.
How to Tighten Loose Wooden Chair Joints With Wood Glue?
You’ll start by identifying all loose joints in your wooden chair, checking each connection point carefully.
Apply wood glue directly into the loose joints, making sure to coat the surfaces evenly.
Clamp the joints tightly and allow the glue to dry completely according to the manufacturer’s instructions.
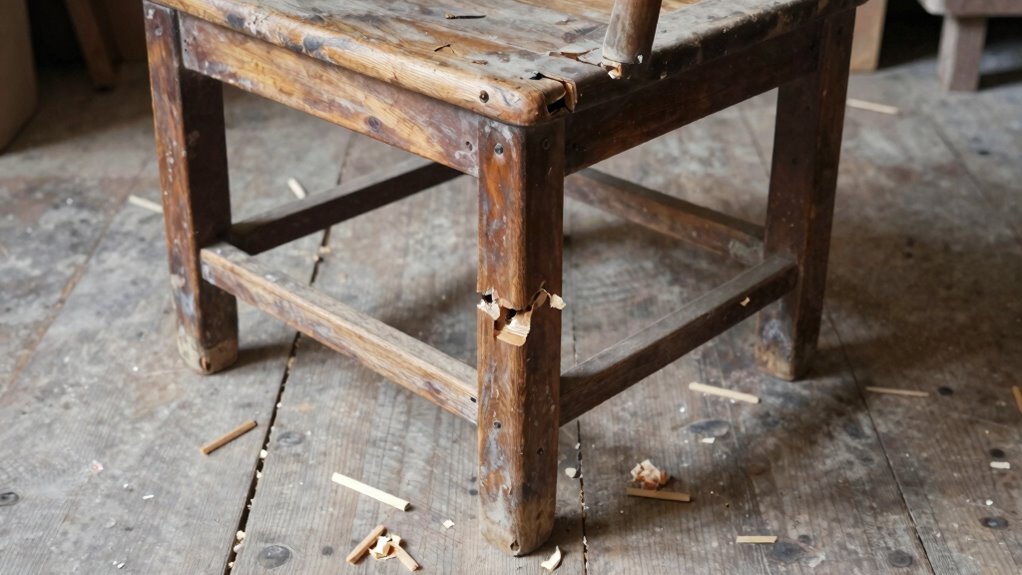
Identify Loose Joints
When you gently rock or wiggle your wooden chair, loose joints become immediately apparent through unwanted movement or creaking sounds.
You’ll notice instability where the seat meets the legs, or where armrests connect to the frame. These problem areas need your attention before they worsen.
To properly identify all loose joints, examine your chair systematically:
- Check corner joints where rails meet legs – these bear the most stress
- Inspect mortise and tenon connections for visible gaps or movement
- Test every screw connection, including those hidden under seat padding
Pay special attention to joints that feel spongy or produce cracking noises.
Mark these spots lightly with a pencil so you won’t forget them during repair.
Take your time with this inspection – missing a loose joint means your chair will continue deteriorating.
You’re not just fixing furniture; you’re preserving a piece that deserves restoration.
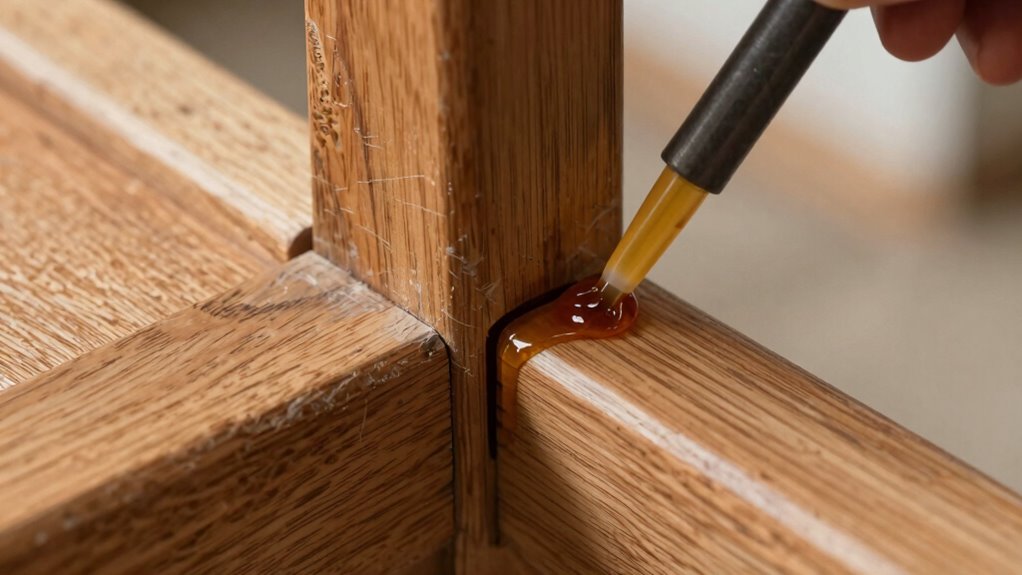
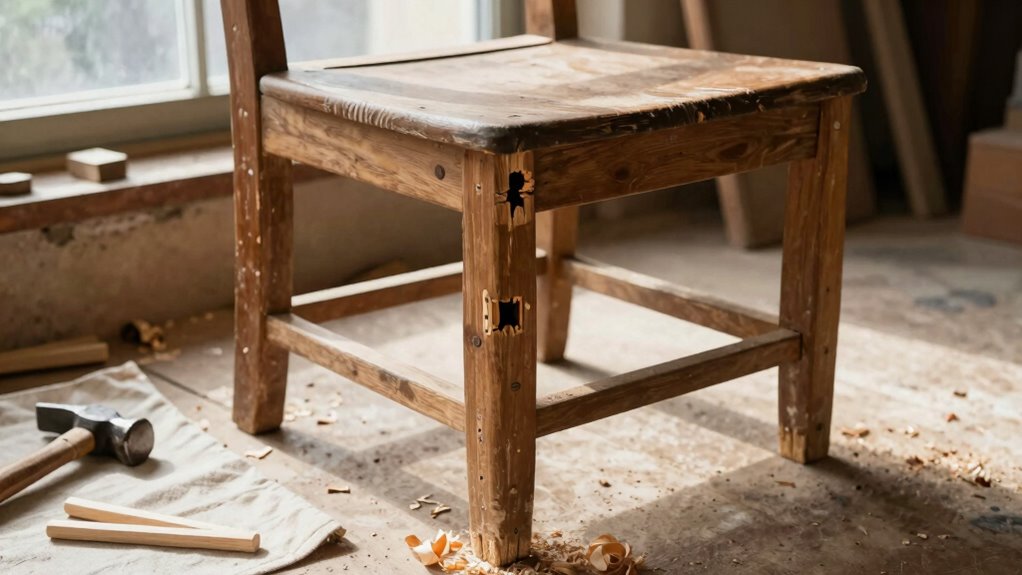
Apply Wood Glue
Wood glue provides an effective solution for tightening loose joints once you’ve identified them. You’ll need to disassemble the joint completely, removing any old glue or debris first.
Apply a thin, even layer of wood glue directly onto both surfaces that meet at the joint. Don’t overapply – you want sufficient coverage without excess squeeze-out. Work the glue into the wood fibers using a small brush or your finger. Make sure every contact point receives adequate adhesive. Pay special attention to end grain, which absorbs more glue.
Check that you’re using the right type of glue for your wood species. Yellow glue works well for most hardwoods, while epoxy might be better for outdoor furniture. Wipe away any excess immediately with a damp cloth before it dries.
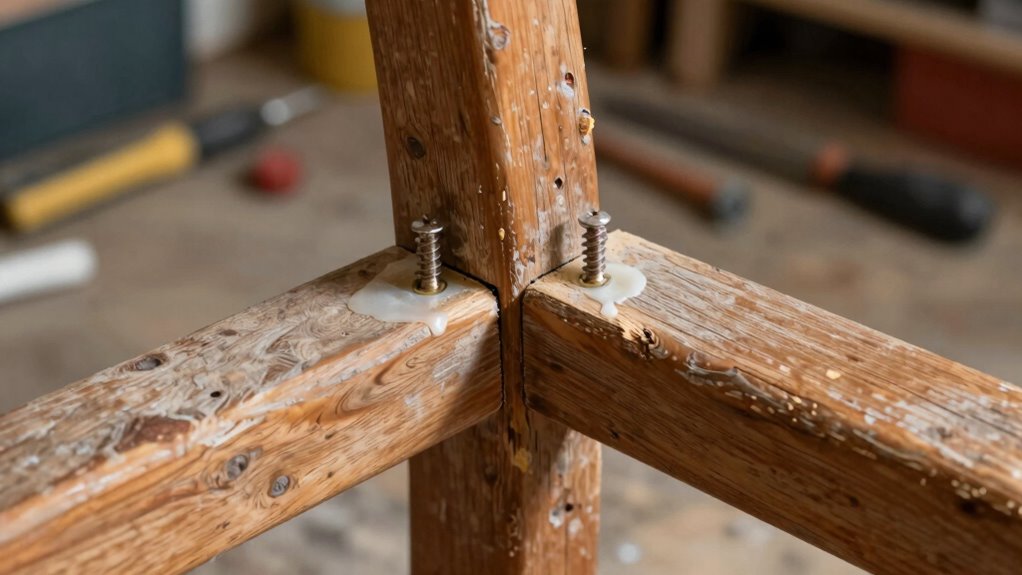
Clamp And Dry
After applying wood glue to the joint surfaces, clamp the pieces together firmly to guarantee proper adhesion. You’ll want to apply consistent pressure across all joints for best results.
- Use bar clamps or C-clamps to maintain steady pressure for at least 24 hours.
- Wipe away excess glue immediately with a damp cloth before it dries completely.
- Check that joints feel solid and secure after clamping.
Don’t rush this drying process. The glue needs adequate time to cure properly.
You’re not just fixing a chair; you’re restoring something that belongs in your home. Keep the clamps tight and wait patiently.
After 24 hours, remove clamps carefully and test each joint. They should feel sturdy and permanent. This method works every time when done correctly.
When Should You Use Wood Screws Instead of Glue?
While glue provides excellent bonding strength for many wooden chair repairs, you should opt for wood screws when you need immediate structural support or plan to disassemble the joint later.
You’ll want screws for high-stress areas like chair legs or arm joints that承受 constant weight and movement.
Screws work better when wood fibers are stripped or damaged, since glue won’t penetrate properly.
Consider accessibility too – if you can’t clamp pieces tightly while glue dries, screws give you instant security.
Use screws when repairing outdoor chairs exposed to moisture that might compromise glued joints.
They’re also ideal for temporary fixes or when you’re unsure about permanent bonding.
Remember that screws create holes that weaken wood over time, so choose wisely based on your specific repair needs and long-term plans.
How to Reinforce Wobbly Chair Legs Without Replacement?
Because wobbly chair legs often result from loose joints rather than broken wood, you can usually reinforce them without replacing the entire leg.
Start by identifying which joint feels loose when you rock the chair gently.
- Tighten existing screws – Check for loose screws in the joint and tighten them with appropriate tools. Add extra screws if needed in nearby areas.
- Apply wood glue to joints – Disassemble the joint if possible, clean old glue residue, then apply fresh wood glue before reassembling tightly.
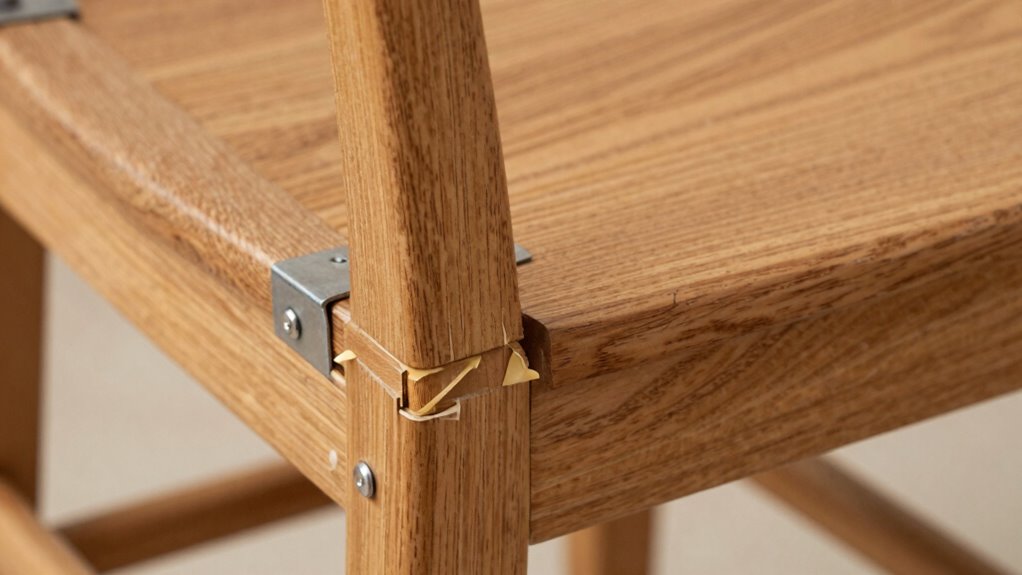
- Install reinforcement brackets – Use corner braces or metal L-brackets on the inside corners where legs meet the seat frame for extra support.
These methods restore stability while maintaining your chair’s original character and avoiding costly replacements.
Can You Fix Broken Chair Spindles on Wooden Chairs?
How exactly do you approach fixing broken chair spindles when they snap or crack? You’ll need wood glue, clamps, and matching wood for reinforcement.
Start by cleaning broken surfaces thoroughly. Apply generous amounts of wood glue to both sides of the break. Align the pieces carefully and clamp them tightly.
For extra strength, drill small holes through the joint and insert wooden dowels. If the spindle’s completely split, cut a matching wood piece slightly longer than the break.
Glue it into place, ensuring proper alignment. Clamp everything securely and let it dry overnight.
Sand any excess glue smooth. You’ve successfully restored your chair’s structural integrity and craftsmanship.
How to Repair Loose Seat Rails or Apron Joints?
You’ll need to examine each joint carefully to determine if tightening or replacement is necessary.
Start by removing the chair seat to access the loose connections between the rails and apron.
Tighten loose joints with wood glue and clamps, but replace any broken or severely damaged rails entirely.
Tightening Loose Joints
Several methods exist for tightening loose joints in wooden chairs, and the approach you choose depends on the specific type of joint that’s failing.
You’ll want to assess the looseness before selecting your repair method.
- Wood glue injection – Apply glue directly into the joint gap using a syringe, then clamp tightly until dry
- Wooden dowel reinforcement – Drill small holes across the joint and insert wooden dowels with glue for extra grip
- Joint tightening with moisture – Dampen the wood slightly to swell fibers, then clamp while drying
Each method requires careful preparation and proper clamping pressure.
You should always clean old glue residue first and verify surfaces are dry before applying new adhesive.
These techniques work best on solid wood chairs where the joints have simply worked loose over time.
Replacing Broken Rails
When seat rails or apron joints break completely, replacing them becomes necessary to restore the chair’s structural integrity.
You’ll need to remove the old broken pieces first. Use a chisel and hammer to carefully pry out remaining wood fragments from the mortises. Clean out any debris and old glue with a small brush.
Measure the dimensions of the original rail to cut your replacement piece. Your new rail should fit snugly into the mortises with slight pressure.
Apply wood glue to the ends before inserting them into the holes. Clamp everything tightly while the glue dries for several hours.
Sand any rough edges smooth once cured. This repair method brings your chair back to its former strength and stability.
What to Do About Recurring Loose Joints?
If wooden chairs keep coming loose after repair attempts, the problem often lies in worn-out joint sockets that no longer grip tightly.
You’ll need to address the root cause rather than just tightening loose connections repeatedly.
- Enlarge and refill sockets: Remove old glue residue and sawdust, then inject wood glue into the socket before inserting a slightly larger wooden plug that you’ve coated with glue.
- Use wooden sleeves: Cut thin wooden sleeves from scrap wood to fit inside worn sockets, creating a tighter fit for dowels or rails.
- Apply socket reinforcement: Mix wood glue with sawdust to create a paste, pack it into worn sockets, let it cure completely, then reassemble joints for improved grip.
How to Replace Missing or Damaged Wooden Dowels?
Replacing missing or damaged wooden dowels requires careful attention to sizing and proper installation techniques.
You’ll need to measure the dowel diameter precisely using calipers or a ruler. Remove old dowels by drilling them out with a bit slightly larger than the dowel diameter. Clean debris from the holes thoroughly.
Select new dowels that match the original size exactly. Apply wood glue to the dowel and hole before insertion. Tap dowels in gently with a hammer until flush. Wipe away excess glue immediately. Allow twenty-four hours for curing.
If you’re unsure about measurements, remove an intact dowel from another joint as reference. Sand any rough edges after installation.
Proper dowel replacement restores structural integrity and guarantees your chair repairs last longer.
Why Is Your Chair Squeaking and How to Stop It?
Chair squeaking often stems from loose joints where wooden components meet, creating friction that produces that annoying sound every time you move. You can identify the problem areas by gently rocking the chair and listening for where the noise originates.
- Check joint connections – Look for gaps between wooden pieces that should fit snugly together.
- Examine dowel joints – Wiggle components to find loose dowel connections that need tightening.
- Inspect wood condition – Feel for rough spots or splinters that create grinding friction.
Don’t ignore squeaking chairs because they won’t fix themselves. The constant friction wears down wood fibers, making joints progressively looser.
You’ll need basic tools like a hammer, wood glue, and clamps to stop the noise permanently. Apply glue directly into loose joints, clamp securely, and let dry completely before use.
How to Fix Loose Chair Back Joints Safely?
When chair back joints become loose, they compromise both stability and safety, so addressing them promptly prevents accidents and extends your furniture’s lifespan.
You’ll need wood glue, clamps, and possibly a drill. Start by cleaning dirt and debris from the joints.
Apply wood glue generously into each loose joint, ensuring full coverage. Use clamps to hold the joints tightly together while the glue dries completely.
Check that your chair sits evenly and doesn’t wobble. If clamping isn’t possible, brace the chair against a wall overnight.
Test the repaired joints by gently rocking the chair. Replace any severely damaged joints rather than attempting repairs.
Work methodically through each joint systematically. Your repaired chair will feel solid and secure again.
How to Use Wooden Shims for Extra Stability?
While loose joints can often be fixed with glue and clamps, sometimes you’ll need additional support to eliminate wobbling completely. Wooden shims provide that extra stability when standard repairs aren’t enough.
You’ll want to choose thin, flexible shims that fit snugly into gaps without forcing joints apart. Birch or maple shims work best because they’re dimensionally stable and easy to sand smooth.
- Cut shims to length using a utility knife or fine saw
- Apply wood glue to shim edges before inserting them into joints
- Sand excess shim material flush with seat surfaces after glue dries
Insert shims into loose joints where wobbling occurs most noticeably. Tap them gently with a hammer until they’re fully seated. Wipe away excess glue immediately with a damp cloth. Let everything dry completely before testing chair stability.
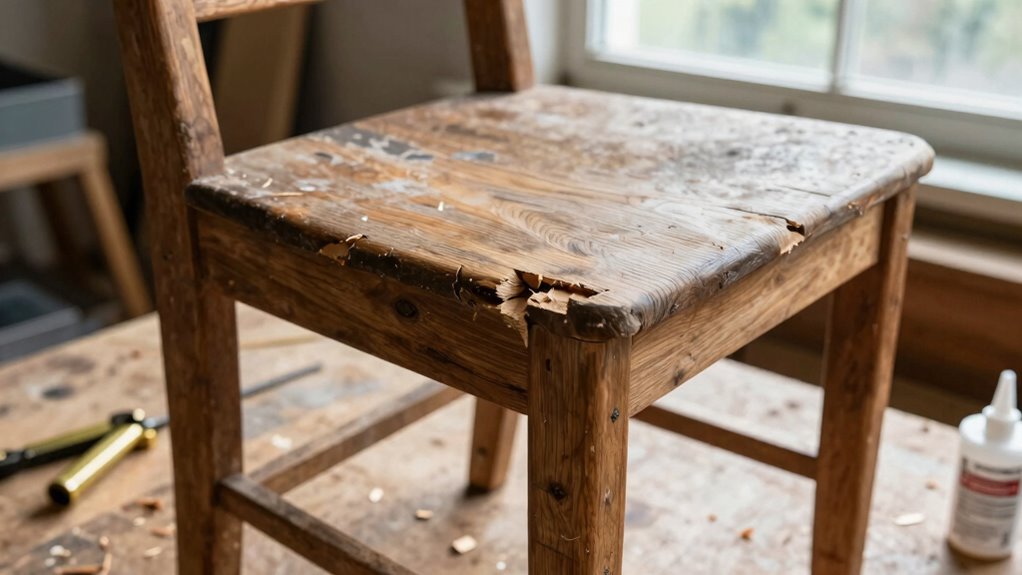
Can You Restain or Refinish After Chair Repairs?
You can restain or refinish your repaired chairs, but you’ll need to ponder whether you’re staining over existing finish or sanding before refinishing.
If your chair has an existing stain, you might be able to apply new stain directly over it, though this approach works best when changing to a darker color.
However, if you want to lighten the wood or achieve an even finish, you’ll need to sand away the old finish first before applying your new stain or refinish.
Staining Over Existing Finish
If your wooden chair has an existing finish that’s worn or discolored, you might wonder whether you can apply new stain directly over it. You can restain, but preparation is essential for success. Don’t skip evaluating the current finish condition first.
- Clean thoroughly – Remove dirt, grime, and wax buildup with appropriate solvents.
- Test adhesion – Scratch a small area to see if new stain will bond properly.
- Choose compatible products – Use oil-based stains over oil finishes, water-based over latex.
Apply stain in thin, even coats following manufacturer directions. Work in small sections for best results.
Remember that existing finish color affects final appearance, so test stain samples first. You’re joining a community of DIYers who’ve revived countless chairs this way.
Sanding Before Refinishing
Consider sanding as your vital first step before applying any new finish to a repaired wooden chair.
You’ll need to remove the existing finish completely for proper adhesion. Start with 80-grit sandpaper to strip old stain and varnish, then work up to 120-grit for smoothing. Sand with the wood grain to avoid scratches. Pay special attention to joints and crevices where finish tends to accumulate.
Wipe away all dust with a tack cloth after sanding. You can restain or refinish after repairs, but only if you’ve properly prepared the surface through thorough sanding.
Without this crucial step, your new finish won’t bond correctly, leading to peeling and uneven results that compromise your chair’s appearance and durability.
How to Strengthen Traditional Chair Joints?
Traditional chair joints rely on mortise-and-tenon or dovetail connections that can loosen over time from regular use and environmental changes.
You should address these issues before they worsen.
Here’s how to strengthen traditional joints effectively:
- Apply wood glue: Disassemble loose joints carefully, clean old glue residue, then apply fresh wood glue before reassembling. Clamp securely until dry.
- Use wooden dowels: Drill aligned holes through both pieces, insert glued dowels, then reassemble. This creates additional mechanical strength.
- Add reinforcement blocks: Attach small wooden blocks diagonally across corner joints using screws and glue for extra support.
Work systematically through each joint, checking for play or movement.
Tighten loose connections promptly to prevent further damage and restore your chair’s structural integrity.
Are Hairpin Legs or Metal Brackets Right for Repairs?
Metal brackets and hairpin legs offer straightforward solutions when wooden chair joints become too damaged for simple glue repairs.
You’ll want to assess your chair’s specific needs before choosing between these options.
Metal brackets work best for reinforcing wobbly corners where traditional mortise-and-tenon joints have failed. They’re discreet and maintain the chair’s original appearance while providing solid support.
Hairpin legs make sense when entire legs need replacement or reinforcement at the base. They’re particularly useful for mid-century modern pieces where you want to preserve the aesthetic.
Consider your chair’s age, style, and intended use. If you’re part of a community that values maintaining original craftsmanship, metal brackets often provide the invisible support needed.
For chairs where functionality trumps tradition, hairpin legs offer reliable stability.
How to Fix Loose Joints in Antique Chairs Carefully?
You’ll want to carefully inspect each joint to identify exactly where the looseness occurs before applying wood glue.
Apply a small amount of glue directly into the loose joint, making sure it penetrates well between the mating surfaces.
Use clamps to hold the joint tightly together while the glue dries completely.
Identify Loose Joints
One key aspect of chair repair involves carefully examining each joint to pinpoint exactly where movement occurs. You should gently wiggle each connection point while observing for any play or cracking sounds that indicate separation.
- Check mortise and tenon joints – These traditional connections often loosen over time and require careful inspection where the wooden pegs meet.
- Examine corner block attachments – Small triangular braces frequently work loose at their attachment points, causing structural instability.
- Test seat rail connections – Where chair seats attach to vertical supports, movement often indicates worn or failed joints needing attention.
Focus your attention systematically, starting from the seat downward, then examine backrest connections.
Mark problematic areas lightly with pencil for easy identification during repair.
This methodical approach guarantees you won’t miss critical loose joints that compromise chair safety and longevity.
Apply Wood Glue
After identifying all loose joints in your chair, the next step involves carefully applying wood glue to restore structural integrity.
You’ll want to disassemble the joint completely, removing any old glue or debris first. Apply a thin, even layer of high-quality wood glue to both surfaces that meet at the joint. Don’t over-apply – you should see a thin film when pressed together, not globs squeezing out.
Work quickly, as most wood glues have a limited working time. Make sure you’re applying glue directly where the wood meets wood, avoiding any finish or paint. Pay special attention to mortise and tenon joints, which require thorough coverage.
Wipe away any excess glue immediately with a damp cloth before it dries.
Clamp And Dry
Once the glue has been applied to all loose joints, secure the pieces with clamps to guarantee proper adhesion while drying. You’ll want to apply consistent pressure without crushing the wood fibers.
- Choose appropriate clamps – Use wooden blocks between metal clamps and delicate antique surfaces to prevent damage marks.
- Maintain steady pressure – Check clamps periodically during drying time and re-tighten if pressure decreases.
- Allow adequate drying time – Let glue cure for 24 hours minimum before removing clamps.
Position clamps perpendicular to joint lines for maximum effectiveness.
Monitor the drying process closely, ensuring glue doesn’t squeeze out excessively. Proper clamping prevents future loosening and maintains your chair’s structural integrity.
This careful approach preserves both function and aesthetic value.
Should You Choose Epoxy or Hide Glue for Heavy-Duty Repairs?
Why should you care about choosing between epoxy and hide glue for heavy-duty chair repairs? Your chair’s longevity depends on this decision.
Epoxy offers superior strength and waterproof properties, making it ideal for outdoor chairs or high-moisture environments. You’ll appreciate its gap-filling capabilities when dealing with worn joints.
Hide glue works better for traditional furniture restoration, creating reversible bonds that future craftsmen can easily disassemble. It’s perfect for antique chairs where preserving original construction methods matters.
Consider your chair’s usage patterns: epoxy handles constant stress better, while hide glue excels in temperature-stable indoor settings.
Test both on scrap wood first. Your choice reflects your commitment to either permanent reinforcement or maintaining historical authenticity.
Pick based on your specific repair needs and desired outcome.
How to Prevent Future Problems in Repaired Chairs?
How can you guarantee your repaired wooden chairs don’t develop loose joints again? Prevention requires consistent maintenance and mindful usage habits that protect your investment.
Focus on these key strategies:
- Regular tightening schedules – Check all joints monthly and snug loose connections before they worsen.
- Proper environmental control – Maintain stable humidity levels between 40-50% to prevent wood expansion and contraction stress.
- Mindful usage patterns – Avoid rocking or leaning back excessively, which creates unnecessary joint strain.
Apply wood conditioner annually to maintain moisture balance.
Use furniture pads under legs to prevent floor-induced stress.
Don’t place chairs near heating vents or direct sunlight.
These simple habits preserve structural integrity and extend your chair’s lifespan considerably.
When Should You Replace Rather Than Repair a Chair?
While preventive maintenance can extend a chair’s life considerably, there comes a point where repairs are no longer practical or safe.
You should replace your chair when structural damage compromises safety, like severe cracks running through load-bearing joints. Extensive rot or pest damage that weakens multiple components indicates replacement is better than repeated fixes.
When repair costs exceed fifty percent of a new chair’s price, you’re better off buying fresh. Chairs with broken frames, missing structural elements, or unsafe wobbles despite multiple repair attempts need replacing.
Don’t risk injury using unstable furniture. Your family’s safety matters more than saving a few dollars.
Sometimes letting go of damaged pieces creates space for better, safer options that’ll last longer.
What Are the Most Common Chair Repair Mistakes to Avoid?
Although loose joints might seem like simple fixes, improper repair techniques can actually worsen the problem or create new structural weaknesses.
You’ll want to avoid these common mistakes that many DIY enthusiasts make when attempting chair repairs.
- Using too much glue: You’re not building a fortress. Excess glue creates messy joints and doesn’t make repairs stronger. Wipe away surplus glue immediately with a damp cloth before it dries.
- Skipping proper clamping time: Rushing the drying process compromises joint integrity. Allow adequate clamping time – typically 24 hours – for glue to cure completely.
- Ignoring joint preparation: Dirty, dusty, or poorly fitted joints won’t hold regardless of glue quality. Clean and properly align joints before applying adhesive.
Conclusion
You’ve now mastered the art of chair repair. Don’t let wobbly joints shake your confidence—tighten them up with glue, clamps, and maybe a few dowels. Keep your tools handy and remember that prevention beats replacement every time. Your chairs will thank you with years of sturdy service.
