

Like a ship’s hull that’s taken on water, your wooden fence demands attention before small issues become major failures. You’ve noticed the warning signs—warped boards, rusted fasteners, or posts that wiggle when bumped. Before you grab your tools, consider whether you’re facing a simple repair or a complete rebuild. The difference between a quick fix and a weekend project hinges on one essential factor: accurate assessment of your fence’s condition.
Signs It’s Time to Repair Your Wood Fence
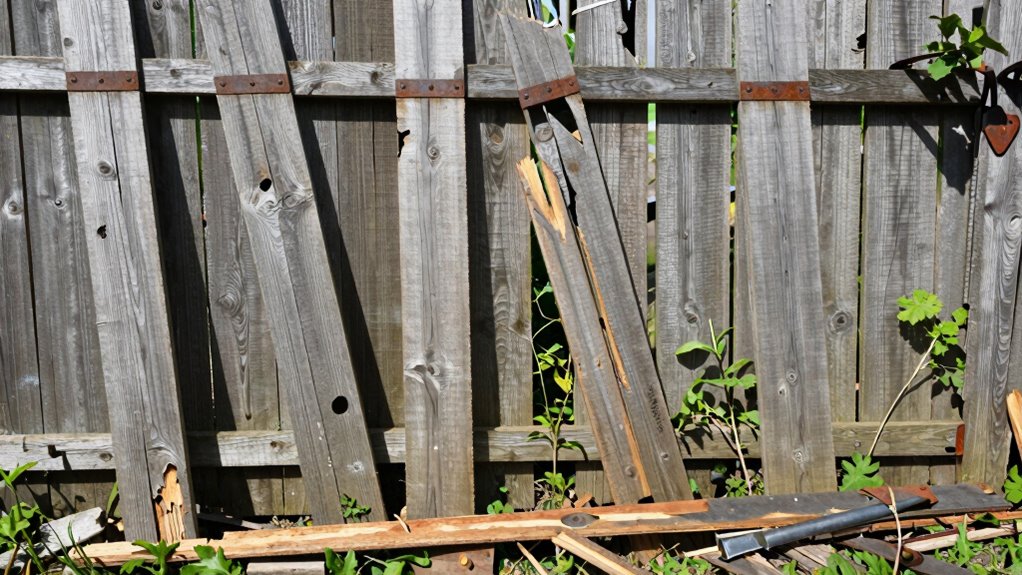
Wooden fences deteriorate gradually, and recognizing early warning signs prevents costly replacements.
You should inspect your fence regularly for soft, crumbling wood that yields under pressure. Check for visible cracks, splits, or warping that compromise structural integrity. Peeling paint or stain indicates moisture penetration has begun breaking down the wood fibers.
You’ll notice discoloration, dark streaks, or mildew growth where water accumulates. Rotting posts create instability at ground level, often hidden beneath soil or mulch. Loose or missing fasteners weaken panel connections.
You might observe leaning sections or gaps between boards. These symptoms signal immediate attention rather than replacement. Early detection allows you to address specific problem areas before they spread.
Your fence deserves proper maintenance to maintain neighborhood standards. Don’t wait until minor issues become major failures requiring extensive reconstruction efforts.
Can You Repair or Should You Replace?
When should you opt for repairs instead of replacement? You should repair when damage affects less than thirty percent of your fence’s structure. Check if posts remain solid and panels show minor warping or cracking.
You can handle loose boards, missing screws, or superficial decay with basic techniques. However, you shouldn’t repair when posts rot at the base, concrete footings fail, or extensive sections sag beyond correction.
Structural integrity matters most for safety and longevity. You’ll save money with targeted repairs, but complete replacement becomes cost-effective when repair costs exceed fifty percent of replacement value.
Assess damage systematically, considering both immediate fixes and long-term performance. Your fence deserves proper evaluation before committing to either approach.
Do I Need Tools or Help From a Friend?
You’ll need basic tools like a hammer, drill, level, and measuring tape for most wooden fence repairs.
Having a friend assist you becomes essential when handling heavy fence panels or posts that require precise alignment.
Assess your specific repair needs to determine whether you can manage alone or require additional help and specialized equipment.
Tool Requirements
While repairing wooden fences might seem straightforward, having the right tools and possibly assistance can greatly impact both efficiency and safety.
You’ll need a circular saw or handsaw for cutting damaged sections, a drill with various bits for securing new boards, and a level to guarantee proper alignment.
A reciprocating saw helps remove old nails quickly. Grab a hammer for driving nails when screws aren’t practical.
You’ll require measuring tape, pencil, and safety glasses for accurate work. A pry bar assists with removing warped planks. Adjustable wrench handles hardware adjustments.
Keep sandpaper handy for smoothing rough edges. Consider renting a post-hole digger if replacing entire posts. Quality clamps hold pieces steady during repairs.
These tools streamline your project considerably. Proper equipment prevents frustration and guarantees professional results every time.
Friend Assistance
Having the right tools makes fence repair more manageable, but you’ll often benefit from an extra pair of hands. Two people working together complete repairs faster and more safely than solo efforts.
- Material handling – Heavy fence panels, concrete bags, and lumber require lifting assistance to prevent injury and guarantee precise placement during installation.
- Measurement accuracy – While you hold components steady, a friend can verify measurements, check levelness, and confirm proper alignment before securing permanent fixes.
- Safety support – Working at height or handling power tools becomes considerably safer with someone spotting you and watching for potential hazards.
Don’t underestimate how much quicker and easier repairs become with reliable assistance.
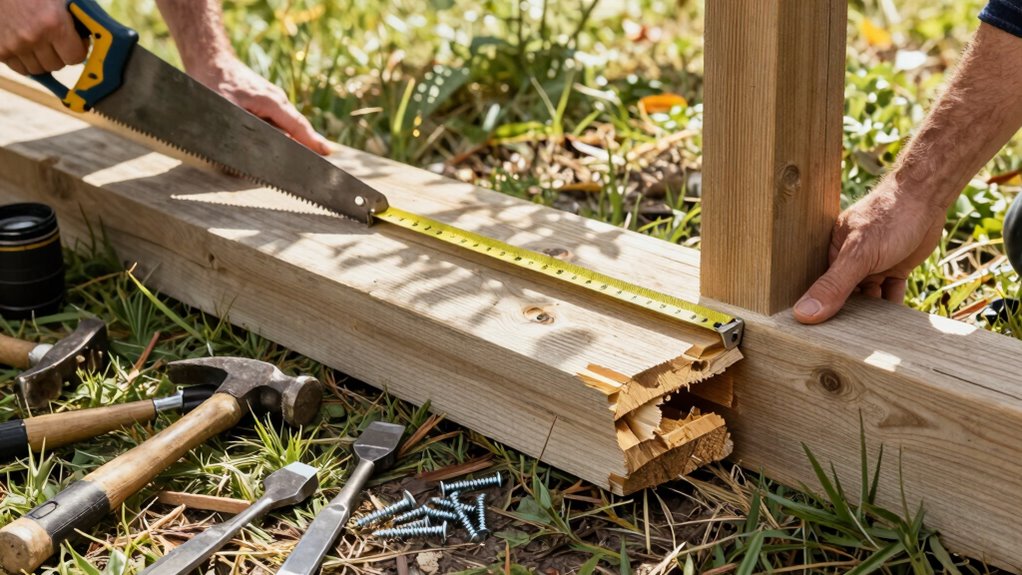
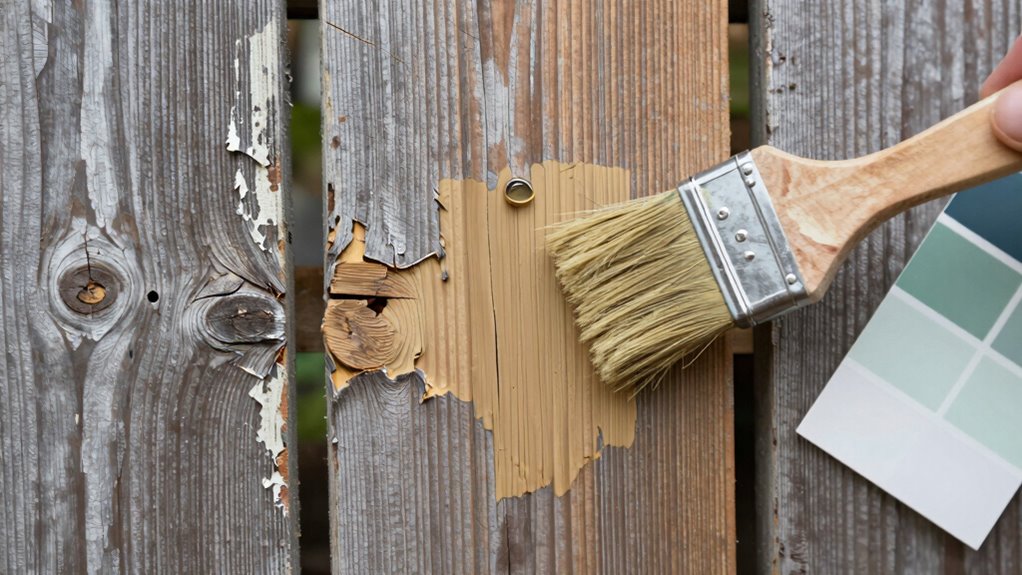
Step-by-Step Guide to Replace Damaged Boards
Replacing damaged fence boards requires careful preparation and the right tools for a successful repair. You’ll need a reciprocating saw, drill, level, measuring tape, and replacement boards that match your existing fence dimensions.
Start by removing nails or screws securing the damaged board using your drill or saw. Carefully extract the old board without damaging adjacent panels. Measure the opening precisely and cut your replacement board to size, ensuring proper fit.
Position the new board vertically, checking alignment with a level. Secure it using galvanized nails or screws, driving fasteners through pre-drilled pilot holes to prevent splitting. Match the original nailing pattern for consistency.
Apply wood preservative to exposed ends and surfaces. Finally, stain or paint the replacement board to match surrounding fencing, ensuring seamless integration with your existing structure.
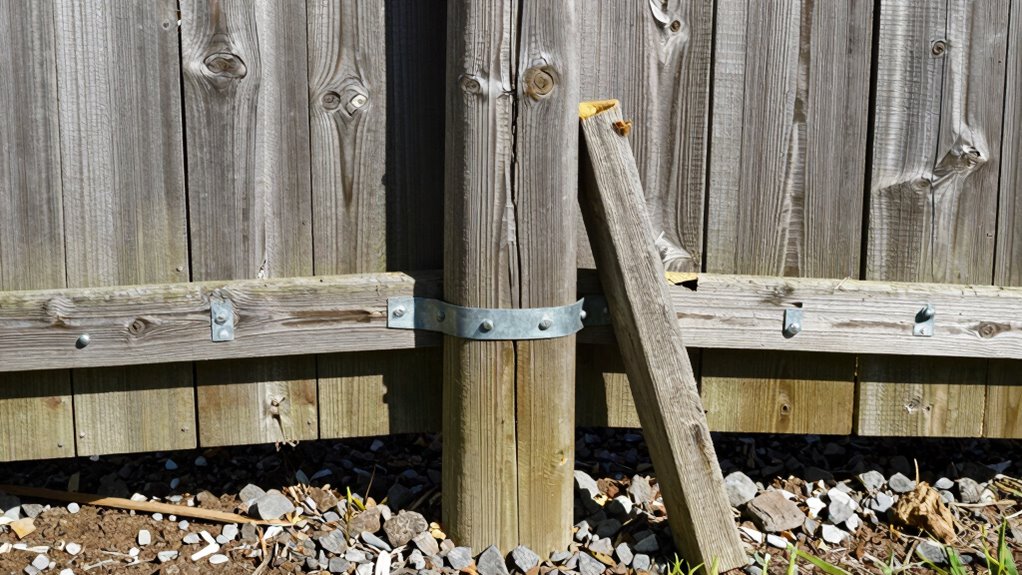
How to Fix a Wobbly Fence Post Without Removing It
You’ll need to identify what’s causing your post to wobble before applying the right fix.
If the foundation has deteriorated, you can pour fresh concrete mix around the base to stabilize it.
For immediate reinforcement, install support brackets that anchor the post to adjacent structures or ground anchors.
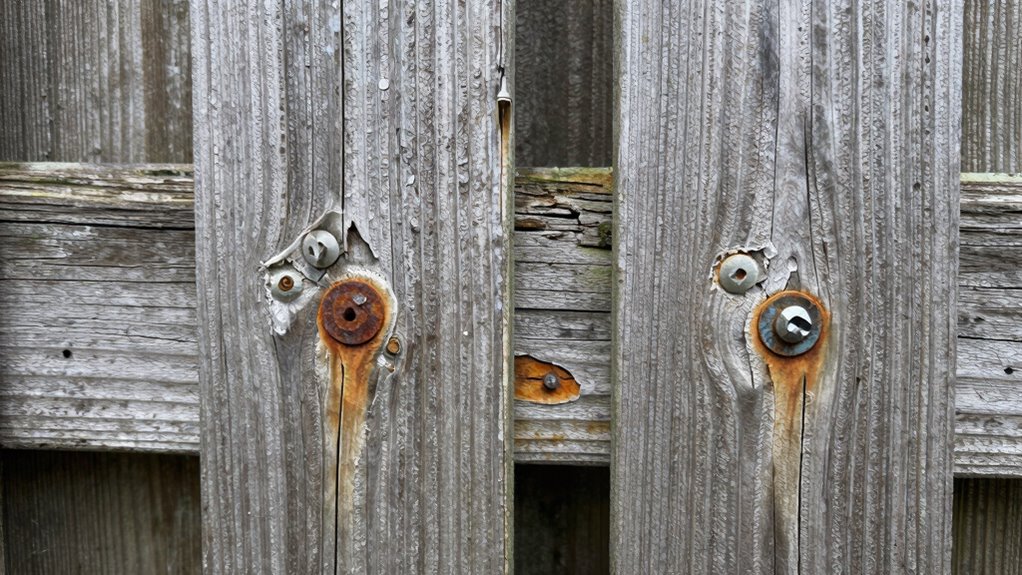
Identify Loose Post Causes
When a fence post becomes loose, identifying the underlying cause is essential before attempting any repair. You need to understand why the post failed to choose the correct fixing method.
Three primary causes create loose posts:
- Soil settling or erosion around the post base compromises foundational support, requiring immediate attention.
- Wood rot or insect damage at ground level weakens structural integrity, often invisible until significant movement occurs.
- Improper initial installation including insufficient concrete depth or poor soil compaction leads to premature failure.
You must examine the post movement pattern carefully.
Check for lateral shifting, vertical sinking, or twisting motions.
Soil conditions around the base reveal erosion patterns.
Inspect the wood grain for soft spots or discoloration indicating decay.
These diagnostic steps determine your repair approach and prevent wasted effort on ineffective solutions.
Apply Concrete Mix Solution
Once you’ve identified the cause of post movement, fixing a wobbly fence post without removal becomes straightforward with the right concrete approach.
You’ll need to excavate soil around the loose post until you reach below the frost line. Remove any debris or loose material from the hole’s base.
Mix quick-setting concrete according to package directions, aiming for thick, creamy consistency. Pour concrete mixture directly into the void around the post, ensuring complete gap filling without air pockets.
Use a pry bar or helper to stabilize the post vertically while concrete sets. Maintain proper post alignment throughout curing process.
Wait twenty-four hours before applying pressure. This technique restores structural integrity effectively when executed properly.
Your repaired fence will regain stability and longevity through this proven method.
Use Support Brackets Method
Support brackets offer an efficient solution for stabilizing wobbly fence posts without excavation or concrete work. You’ll need metal brackets, lag screws, and a drill to complete this repair.
- Quick Installation: Fix unstable posts in under an hour without disturbing surrounding landscaping
- Cost-Effective: Save money compared to full post replacement and concrete removal
- Minimal Disruption: Avoid digging up established fence lines and damaging nearby plants
Position the bracket against the wobbly post and mark screw holes. Pre-drill holes to prevent wood splitting. Attach brackets using galvanized lag screws for maximum holding power.
Angle brackets provide superior support when installed at forty-five-degree angles. Tighten all connections securely. Test post stability by applying gentle pressure. Add additional brackets if movement persists.
This method works best on posts with intact wood structure and minor settling issues.
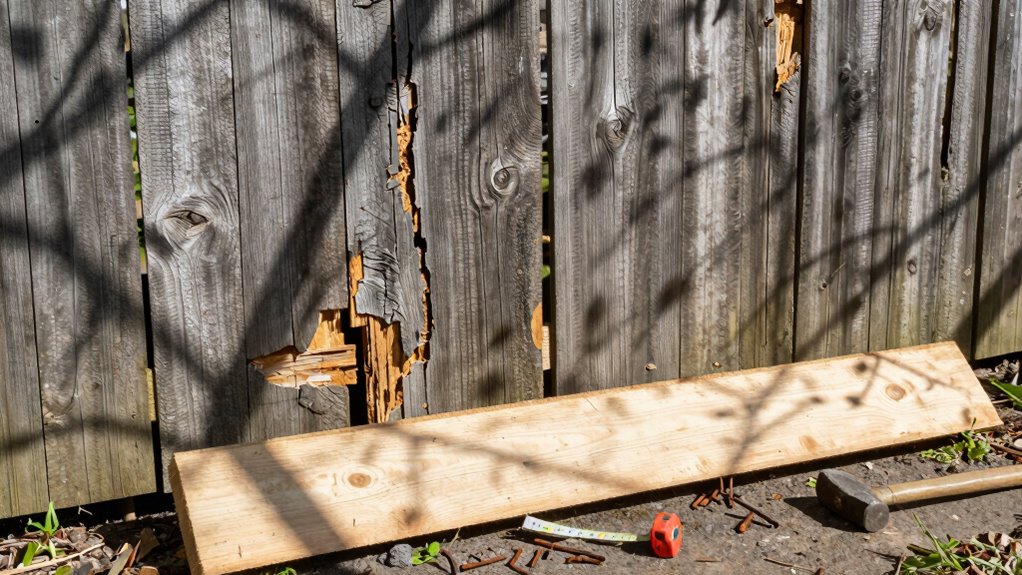
Repair Weather-Worn or Split Fence Rails
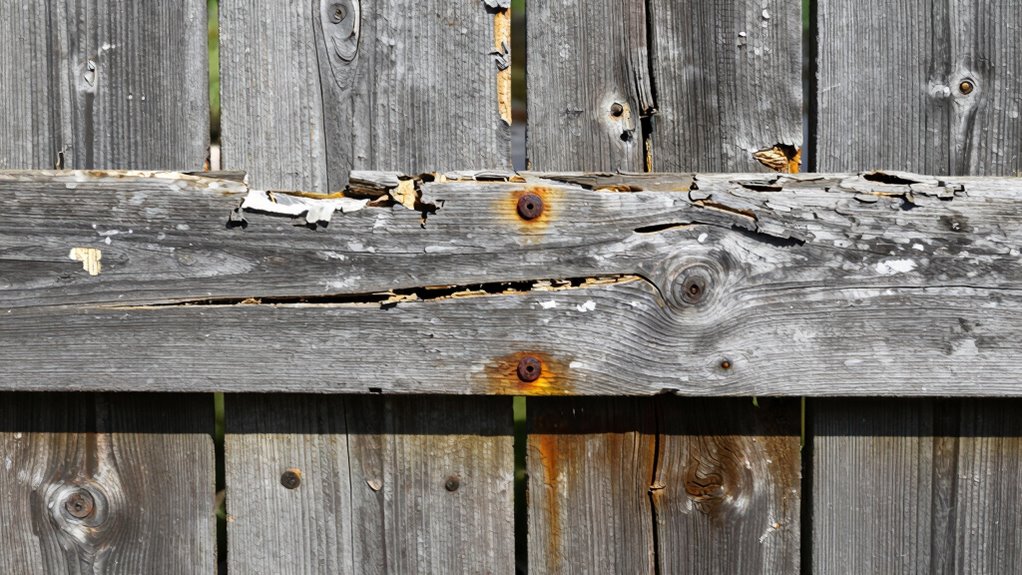
Weather-worn or split fence rails compromise structural integrity and should be addressed immediately before deterioration worsens.
You’ll need to assess damage extent first – minor cracks require wood filler, while deep splits demand reinforcement. Clean affected areas thoroughly, removing loose debris and moisture.
For small cracks, apply exterior wood filler with a putty knife, allow drying, then sand smooth. Larger splits need bolt reinforcement – drill pilot holes through the rail and adjacent posts, insert carriage bolts with washers, and tighten securely.
Severely weathered sections require partial rail replacement. Measure damaged portions, cut new wood to match, and attach using galvanized fasteners. Always pre-drill holes to prevent further splitting and guarantee proper alignment during installation.
What Wood Resists Rot Best in Repairs?
You’ll want to choose rot-resistant species like cedar, redwood, or pressure-treated pine for fence repairs.
Chemical treatments such as copper azole or micronized copper quaternary provide excellent protection against fungal decay.
These materials maintain structural integrity longer than untreated woods in outdoor conditions.
Best Rot-Resistant Wood Species
Several wood species demonstrate superior rot resistance when repairing wooden fences, with cedar, redwood, and teak leading the pack.
You’ll want to choose these naturally durable options for long-lasting repairs that withstand moisture and decay.
When selecting rot-resistant wood, consider these key factors:
- Cedar’s natural oils provide excellent moisture resistance and insect protection, making it ideal for ground-contact repairs.
- Redwood’s heartwood contains tannins and chemicals that resist fungal decay and termite damage naturally.
- Teak’s dense grain structure and natural oil content create superior water resistance, though it’s more expensive.
You should prioritize heartwood over sapwood, as it contains more protective extractives.
These species perform best when properly maintained and protected from excessive moisture exposure during installation.
Chemical Treatments For Wood Preservation
While naturally rot-resistant species like cedar, redwood, and teak provide excellent durability, chemical treatments offer an economical alternative for extending the life of less resistant wood species in fence repairs.
You should consider copper-based preservatives, which penetrate deep into wood fibers and create toxic barriers against fungi and insects. Borate treatments work well for existing structures but require protection from moisture exposure.
Apply preservatives using pressure treatment methods or brush-on applications for maximum penetration. Always choose ACQ (alkaline copper quaternary) or micronized copper azole treatments over older CCA formulations. These modern chemicals resist leaching and maintain effectiveness longer.
Treat all cut ends and exposed surfaces during repairs. Properly treated pine or fir can match the longevity of naturally resistant woods while costing considerably less.
Prep Wood Surfaces Before Repair Begins
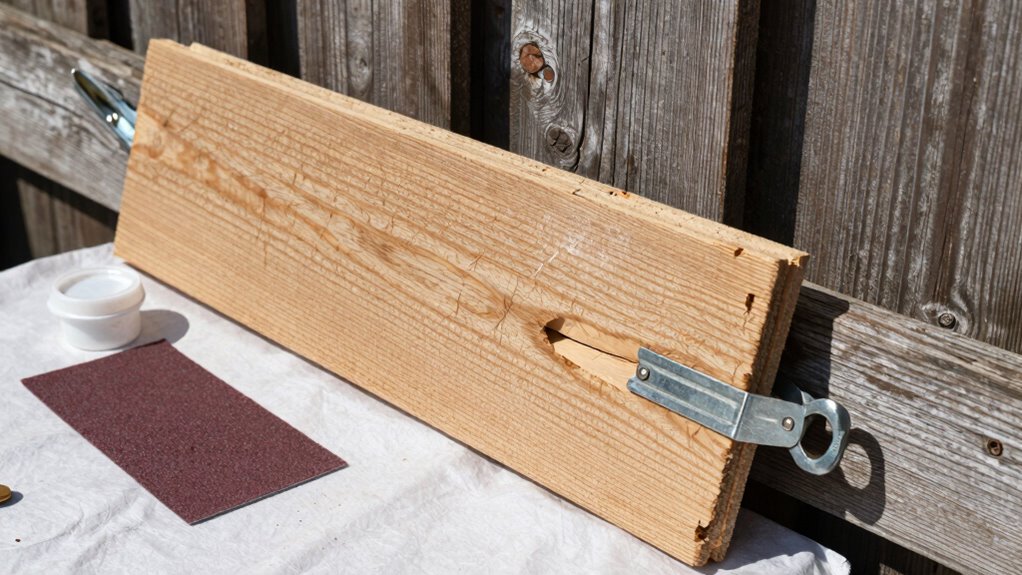
Before applying any repair materials, properly preparing wood surfaces guarantees ideal adhesion and long-term durability of your fence repairs. You should remove all loose paint, stain, and weathered wood using a scraper or wire brush. Sand rough areas smooth and clean surfaces thoroughly.
- Clean thoroughly: Remove dirt, mildew, and debris using appropriate cleaners and let dry completely before proceeding.
- Sand properly: Use 80-120 grit sandpaper to smooth surfaces and remove any remaining finish for better material bonding.
- Inspect carefully: Check for hidden damage, rot, or insect holes that need additional attention before surface preparation completes.
Proper surface preparation prevents future peeling, cracking, and premature failure. Your repaired fence sections will seamlessly blend with existing wood when you take time for thorough preparation work.
Match Your Existing Stain Effortlessly
Matching your existing fence stain requires careful analysis of the current color, wood type, and finish condition to achieve seamless results.
You’ll need to identify whether your fence uses oil-based or water-based stain, as this affects compatibility. Sand a small, inconspicuous area to expose raw wood, then take this sample to your supplier for color matching.
Consider the wood’s age and sun exposure, which alter stain appearance over time. Test your matched stain on scrap wood or an inconspicuous fence section first.
Apply thin coats and allow proper drying time between applications. Remember that newer stain may appear slightly different initially but will blend naturally within a few months.
Don’t rush this step – accurate color matching prevents costly mistakes and guarantees professional-looking repairs that belong seamlessly with your existing fence.
Nails or Screws: Which Last Longer?
Why does fastener choice matter so much for fence longevity? Your fence’s structural integrity depends entirely on how well fasteners hold under constant weather stress.
You need to understand that nails and screws perform differently:
- Corrosion resistance varies markedly – Galvanized nails often fail faster than stainless steel screws in moist conditions
- Withdrawal strength differs dramatically – Screws provide superior holding power against wood movement and seasonal expansion
- Installation technique impacts long-term performance – Pre-drilling holes prevents wood splitting while ensuring proper screw penetration depth
Nails work loose over time due to wood’s natural movement. Screws maintain tighter connections longer. For fence repairs, you should always choose screws rated for outdoor use. They cost more initially but save replacement labor later.
Your fence deserves reliable fasteners that won’t compromise its lifespan.
Reinforce Weak Spots Like Gate Hinges
Gate hinges bear tremendous stress from daily use and weather exposure, making them critical failure points that require immediate attention when loose or damaged.
You’ll want to inspect hinge screws quarterly, tightening any that’ve worked loose. Replace rusted hinges entirely rather than attempting repairs. Upgrade to heavy-duty strap hinges for maximum support.
Reinforce mounting points by adding longer screws or metal brackets behind the hinge. Don’t overlook the gate frame itself—rotting wood around hinge areas needs immediate replacement.
Use galvanized or stainless steel hardware to prevent future corrosion. Consider adding a third hinge to three-foot gates for better weight distribution.
Proper reinforcement guarantees your gate operates smoothly while extending your fence’s lifespan considerably.
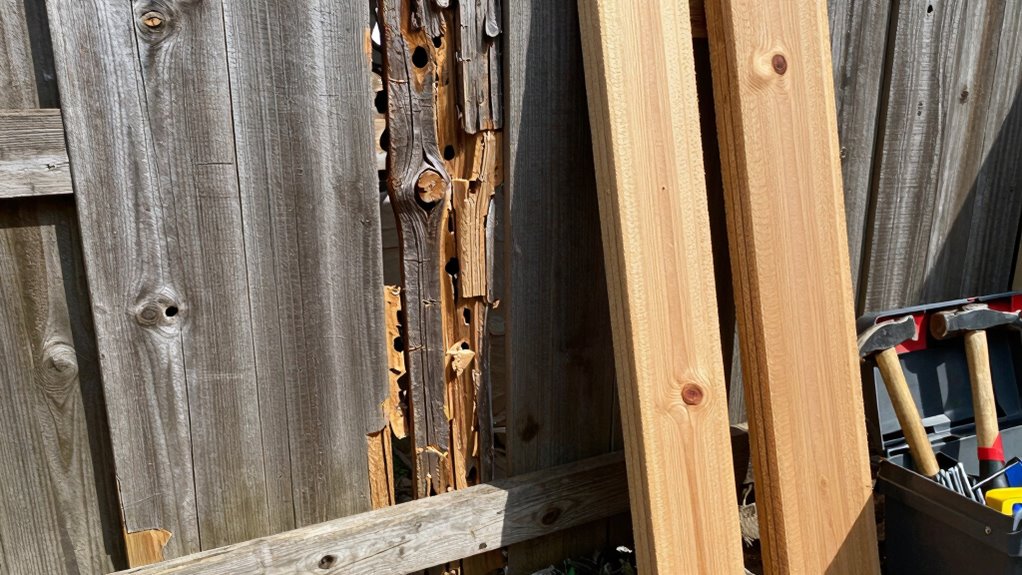
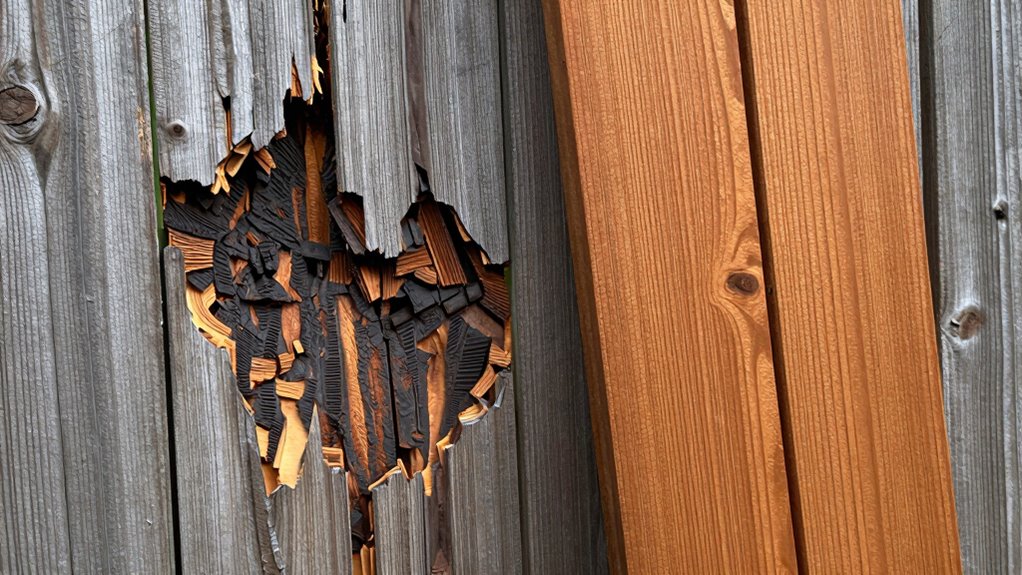
Stop Rot With These Simple Techniques
Wood rot compromises fence integrity quickly, especially in areas with high moisture or poor drainage. You must act immediately when you spot soft, crumbling wood or dark discoloration.
- Remove damaged material completely – Use a chisel and hammer to eliminate all punky wood until you reach solid material.
- Apply borate treatments – Soak affected areas with borate powder mixed with water to kill existing fungi and prevent new growth.
- Replace structural components – Cut out rotted posts or rails and install pressure-treated lumber for lasting durability.
Don’t wait for minor damage to become major failure. Regular inspection catches problems early.
Feel the wood with your knife tip – if it’s soft or crumbles easily, it’s time for action. Your fence depends on your attention to these details.
Protect New Repairs Against Moisture
After completing rot repairs, you must immediately protect new lumber from moisture to prevent recurrence.
Apply a quality wood preservative before installation, guaranteeing complete surface coverage. Don’t skip priming fresh-cut lumber – it’s vital for moisture resistance.
Install pressure-treated wood whenever possible, especially for ground-contact areas. Use galvanized or stainless steel fasteners to prevent rust stains and wood degradation.
Verify proper drainage around repaired sections by grading soil away from fence posts.
Create adequate ventilation behind panels to allow air circulation. This prevents trapped moisture buildup that leads to rot.
Check manufacturer specifications for treated lumber – some requires additional sealing despite chemical treatment.
Monitor weather conditions during installation. Avoid working in high humidity or rain. Wet wood won’t accept protective coatings properly, compromising your repair investment.
Which Sealers Work Best on Outdoor Wood?
Selecting the right sealer for outdoor wood requires understanding how moisture protection ties directly to long-term fence performance. You need proven products that withstand UV exposure, temperature fluctuations, and water penetration while maintaining wood integrity.
- Acrylic sealers provide excellent flexibility and UV resistance, ideal for horizontal surfaces exposed to direct sunlight and weather cycles.
- Oil-based polyurethane delivers superior durability and water resistance, perfect for high-traffic areas requiring maximum protection against moisture damage.
- Siloxane-based sealers penetrate deep into wood fibers, creating breathable barriers that prevent water absorption while allowing moisture vapor escape.
Choose sealers specifically formulated for exterior wood applications. Look for products with UV inhibitors and fungicides.
Apply according to manufacturer specifications using proper equipment. Quality sealers extend fence life considerably when correctly installed.
Schedule Fence Checks Like Clockwork
Because fence maintenance prevents costly repairs, you should establish a systematic inspection schedule that catches deterioration early.
Check your fence quarterly, focusing on high-risk areas like gate hinges, corner posts, and sections exposed to weather. Look for loose boards, rusted hardware, and wood rot.
Don’t skip seasonal inspections after severe weather events. Mark your calendar monthly for quick visual assessments, examining paint or stain condition, loose nails, and minor cracks.
Document findings with photos and notes, creating a maintenance log that tracks recurring issues. You’ll develop familiarity with your fence’s normal wear patterns, making abnormal deterioration easier to spot.
Consistent scheduling prevents small problems from becoming expensive replacements, keeping your fence functional and attractive. Regular checks demonstrate ownership pride while extending your investment’s lifespan considerably.
When to Hire a Pro Instead of DIY
You should call a professional when you encounter severe structural damage that compromises the fence’s integrity, such as rotting posts or cracked rails that require specialized equipment to replace.
Complex gate repairs involving hinges, latches, or automatic openers demand expertise you might lack, potentially saving you time and preventing costly mistakes.
Utility line interference requires professional assessment and proper permits to avoid safety hazards and legal complications.
Severe Structural Damage
Severe structural damage demands professional intervention when compromised posts, extensive rot, or foundational shifts exceed typical repair capabilities.
You’ll need expert assessment when multiple fence sections sag dramatically or when posts twist beyond thirty degrees from vertical alignment.
- Multiple failed anchor points requiring complete post replacement
- Extensive moisture damage penetrating deeper than six inches into structural members
- Visible foundation displacement causing uneven fence lines exceeding two inches
These conditions exceed basic homeowner repair skills.
Professional contractors bring specialized equipment like post-hole diggers and concrete mixers necessary for proper restoration.
Attempting complex structural repairs without adequate experience creates safety hazards and potential property damage.
You belong in the category of informed fence owners who recognize when expertise matters most.
Complex Gate Repairs
Complex gate repairs often require specialized knowledge that goes beyond basic fence maintenance skills.
You’ll encounter warped hinges, damaged latches, and compromised structural integrity that demands professional assessment.
When gates sag excessively or swing improperly, underlying frame issues typically exist. You might lack proper tools for precise alignment adjustments or replacement hardware specification.
Complex gate mechanisms involve spring tension, hydraulic components, or electronic access systems requiring certified technician expertise.
Attempting advanced repairs without adequate experience creates safety hazards and potential property damage. You’ll spend more time troubleshooting than executing effective solutions.
Professional gate repair specialists possess diagnostic capabilities and specialized equipment for efficient, lasting repairs. They understand load-bearing calculations, proper clearance measurements, and code compliance requirements.
When facing multifaceted gate problems, trusting qualified contractors guarantees peak functionality and prevents recurring issues. Your safety and property investment deserve professional handling.
Utility Line Interference
Utility line interference presents unique challenges that demand immediate professional intervention rather than standard fence repair approaches.
You can’t safely handle electrical, gas, or telecommunications lines without proper training and equipment. These situations require specialized knowledge that most homeowners lack.
- Electrical lines carry high voltage that can cause severe injury or death.
- Gas lines pose explosion and fire hazards when damaged.
- Telecommunications cables contain hazardous materials requiring certified disposal.
You should always call your local utility companies before starting any fence repair near buried or overhead lines. They’ll mark line locations free of charge.
Don’t risk your safety or violate local codes by attempting DIY repairs in these areas. Professional fence contractors understand utility clearance requirements and work safely around infrastructure.
Your family’s safety matters more than saving money on a repair job.
Repairs vs Full Replacement: What Saves Money?
When should you repair sections of your wooden fence rather than replace the entire structure? You save money when damage affects less than thirty percent of your fence’s length. Localized rot, cracked pickets, or loose fasteners don’t justify complete replacement.
Your fence’s foundation matters most – if posts remain solid and plumb, repairs work perfectly. However, widespread deterioration, structural instability, or multiple failed sections signal replacement.
Factor labor costs versus material expenses. Sometimes replacing deteriorated sections exceeds fifty percent of full replacement costs. Don’t let pride or attachment cloud your judgment.
Calculate objectively. You’re not admitting defeat by choosing replacement when repairs won’t restore functionality. Smart fence owners recognize when fighting a losing battle wastes both time and money.
Make decisions based on structural integrity, not emotional attachment.
Errors Even Experienced DIYers Make
You measure twice but cut wrong angles, wasting materials and compromising joint integrity.
You skip cleaning and drying wood surfaces before applying sealers, leading to premature failure.
These mistakes cost you time, money, and structural performance.
Common Measurement Mistakes
Even experienced DIYers frequently make critical measurement errors that compromise fence integrity and alignment.
You’ll find these mistakes creep into every project when you’re not meticulous about verifying distances and angles before cutting.
Accuracy matters because even small discrepancies compound across multiple fence sections, creating gaps, misaligned panels, and structural weaknesses that undermine your entire repair effort.
- Assuming existing fence lines are straight – You must measure and mark new layout lines rather than following old, potentially warped dimensions
- Measuring from the wrong reference point – Always measure from a fixed, verified starting point like a corner post or property line
- Relying on visual estimation between posts – You need precise measurements for consistent spacing, not “close enough” gaps that create uneven appearances
Precision separates professional results from amateur mistakes.
Skipping Essential Prep Work
Proper preparation prevents costly mistakes that undermine even the most carefully planned fence repairs. You must inspect every board thoroughly before cutting or replacing materials.
Check for hidden rot, loose nails, and structural weaknesses that aren’t immediately visible. Don’t assume surface-level damage represents the full extent of problems. Use a screwdriver to probe suspect areas and identify soft spots.
Remove old paint and stain completely before applying new finishes. Sanding isn’t optional – it guarantees proper adhesion and professional results. Clean debris from joints and gaps where moisture accumulates.
Measure twice, mark clearly, and label replacement pieces systematically. Experienced DIYers often skip these steps when rushing through projects. Avoid their mistakes by respecting the prep phase.
Your repaired fence will last longer and look professional when you invest time upfront. Preparation separates amateur work from craftsmanship quality.
Extend the Life of Every Repaired Panel
While repairing wooden fence panels addresses immediate damage, protecting these restored sections requires additional strategic measures. You need to implement preventive treatments that enhance longevity and maintain structural integrity across every repaired area.
Apply water-repellent sealers within 48 hours post-repair to prevent moisture penetration that causes warping and rot. Use copper naphthenate solutions for ground-contact sections to resist fungal decay and insect damage.
- Stain and seal annually – Maintain protective coatings to shield wood fibers from UV degradation and weather exposure
- Install proper drainage – Direct water away from fence bases to prevent moisture accumulation that compromises repairs
- Monitor fasteners regularly – Check and replace rusted screws or nails immediately to maintain structural stability
These practices guarantee your repaired panels perform at their best while extending overall fence lifespan markedly.
Conclusion
You’ve got this. Like a seasoned carpenter who’s seen a hundred fences, you know that proper maintenance prevents costly replacements. A well-repaired fence panel can last 15-20 years with regular upkeep. Don’t let small issues become big problems – inspect annually, address damage immediately, and use quality materials. Your fence is an investment; protect it like one.
