

You notice water stains spreading across your ceiling after the latest storm. Before grabbing a bucket, you need to pinpoint exactly where the leak originates. Check for damaged shingles, compromised flashing, or clogged gutters that might be redirecting water into your home. Once you identify the source, you can apply targeted temporary fixes using roof cement, tarps, and proper sealing materials. But first, you must locate the true entry point.
Spot the Exact Point Where Water Enters
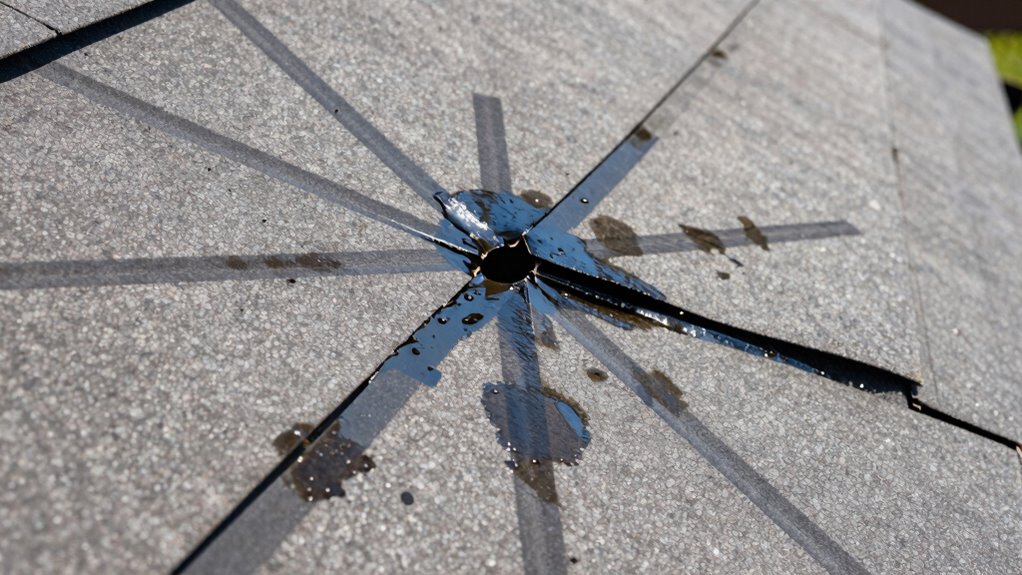
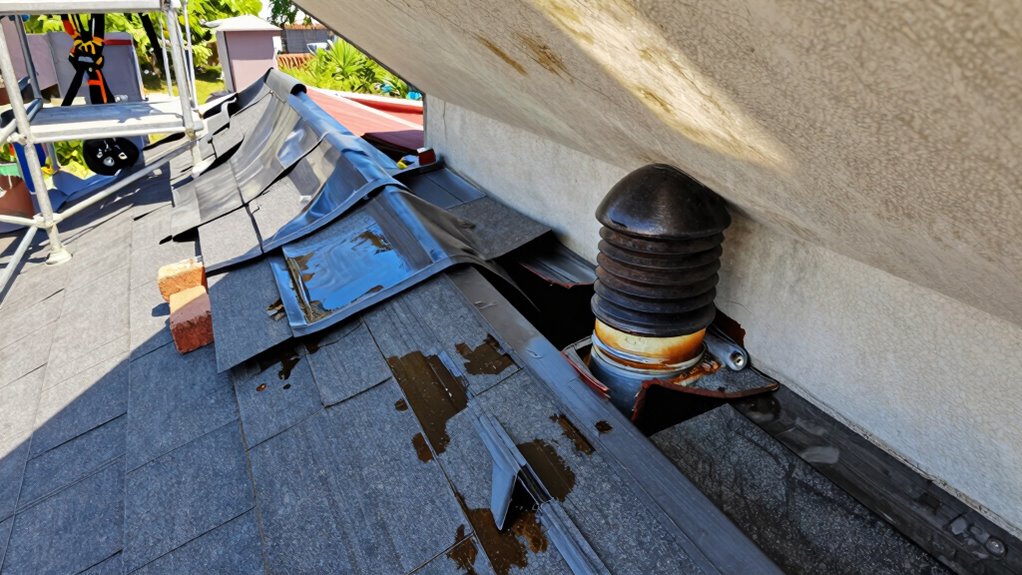
Where exactly does water penetrate your roof structure? You’ll need to identify the precise entry point before temporary repairs begin. Start by examining interior water stains, tracing them back to their source above. Water often follows structural pathways, so don’t assume the leak originates directly overhead.
Check around chimneys, vents, roof valleys, and flashing details where materials join. These connection points create natural pathways for moisture infiltration.
Look for damaged shingles, cracked sealant, or deteriorated flashing that allows water penetration. Interior evidence sometimes appears distant from actual entry points due to water traveling along rafters or sheathing before dripping through ceiling materials.
You’re not just looking for obvious holes; tiny gaps in protective barriers can cause significant leakage. Mastering this identification process makes you part of an experienced group who handles roofing challenges methodically and effectively.
Get Ready With Basic Emergency Supplies
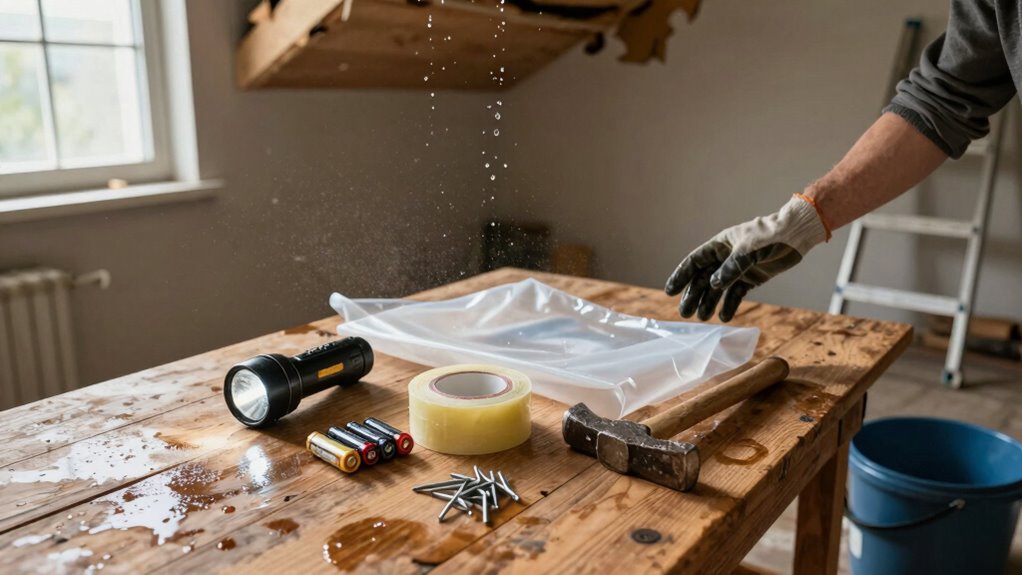
You’ll need to gather essential emergency supplies before water damage escalates.
Your toolkit should include heavy-duty tarps, rope, and waterproof tape for immediate tarpaulin installation. These materials enable you to implement water diversion techniques that redirect runoff away from vulnerable areas.
Emergency Tarpaulin Installation
When roof leaks occur unexpectedly, having a tarpaulin ready can prevent extensive water damage until permanent repairs are possible.
You should quickly assess the leak’s location and roof pitch before installation. Position the tarpaulin over the damaged area, extending at least three feet beyond the leak in all directions.
Secure the tarpaulin using rope or bungee cords, tying them to roof edges, gutters, or secure anchor points. Guarantee tight tension to prevent water pooling.
Work from the highest point downward, overlapping multiple tarps when necessary. Check that all edges are properly secured and won’t flap in wind conditions.
This temporary measure buys you time for permanent repairs.
Water Diversion Techniques
Having secured the tarpaulin over your roof leak, you’ll need to redirect water flow away from vulnerable areas inside your home. Position buckets, pans, and containers directly beneath active drips to catch falling water.
Use towels and absorbent materials to soak up puddles immediately. Channel water toward drains or exterior doors using brooms or squeegees.
Create makeshift barriers with sandbags or heavy objects around electrical outlets and valuables. Angle boards or cardboard pieces to guide water flow away from furniture and walls.
Monitor your diversion system continuously, emptying containers before overflow occurs. Keep backup absorbent materials ready for sudden shifts in water direction.
These techniques buy you time until permanent repairs are possible.
Seal Active Drips Using Roof Cement
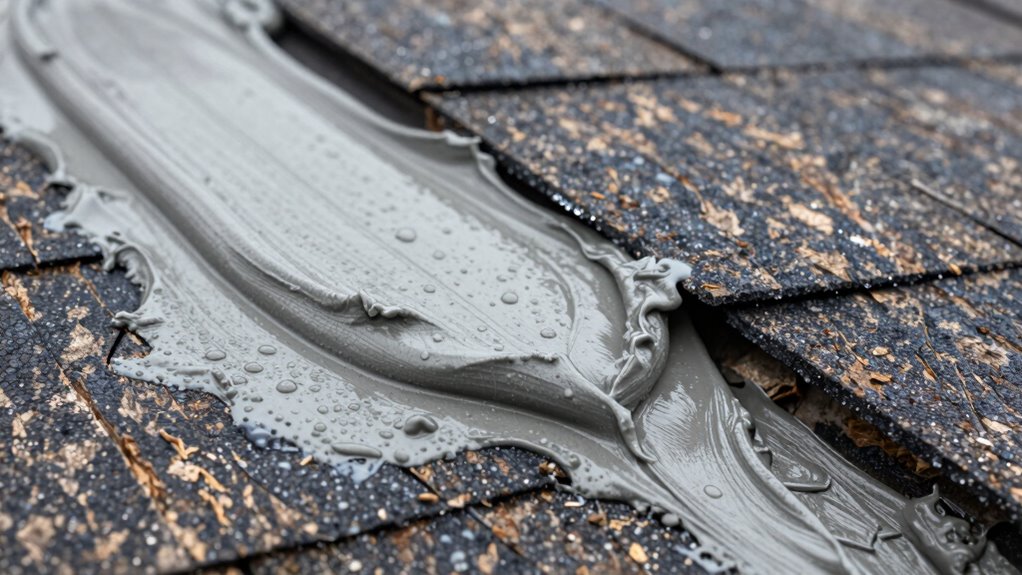
While roof cement won’t provide a permanent fix, it effectively stops active water infiltration until you can address the underlying issue. You’ll need to work quickly and precisely to seal dripping areas properly.
Apply roof cement using these vital techniques:
- Clean the leak area thoroughly, removing debris and loose material before application.
- Use a putty knife or trowel to force cement deep into cracks and gaps where water escapes.
- Apply cement in overlapping layers, extending several inches beyond the active drip zone.
- Press firmly to guarantee complete adhesion and eliminate air pockets that could compromise the seal.
Work methodically from the outer edges inward, maintaining consistent pressure.
Roof cement creates an immediate waterproof barrier that buys you essential time. This temporary solution prevents further interior damage while you plan extensive repairs.
Your quick action demonstrates homeowner competence and protects your property investment effectively.
Shield Wide Areas With a Secure Tarp
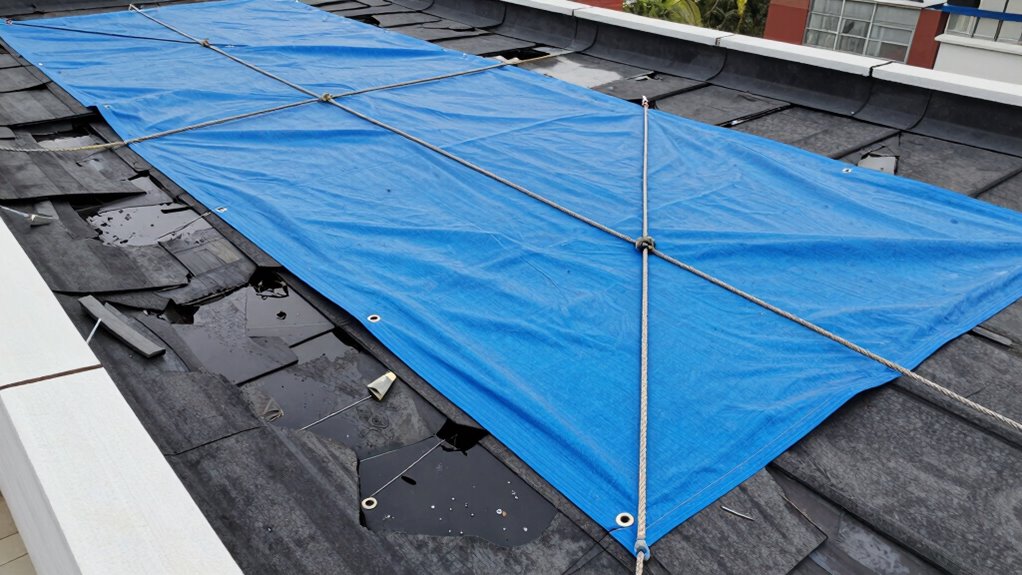
Although roof cement effectively seals active drips, you’ll need a more extensive solution to protect larger damaged areas from further water intrusion. Grab a heavy-duty tarp and position it over the compromised section immediately.
Secure the tarp using rope or bungee cords, ensuring tight attachment to prevent wind lift. Anchor all corners and edges firmly to surrounding roof structures. Check that the tarp extends beyond damaged areas by at least two feet on all sides.
Tighten loose sections and eliminate any pooling points where water might accumulate. You’re not looking for perfection—just effective temporary protection. This approach buys you time while preventing additional interior damage.
Make sure your tarp installation remains secure during weather changes. Your goal is maintaining dry conditions until permanent repairs are possible.
Close Tiny Penetrations With Flashing
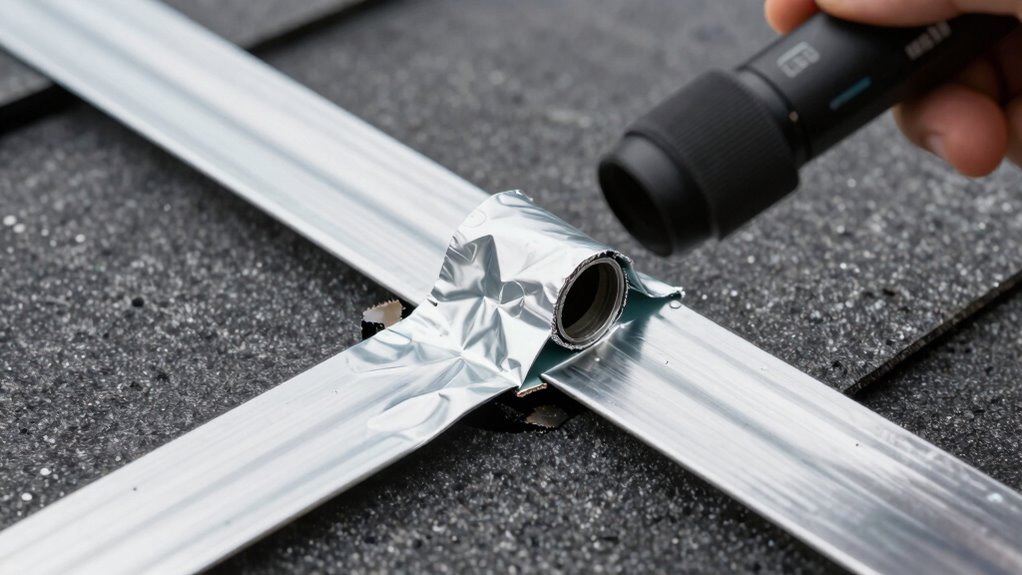
When small holes or gaps around roof penetrations let water seep through, you’ll need to seal these entry points effectively. Flashing provides a reliable temporary solution for these problematic areas.
You should address tiny penetrations immediately to prevent further damage.
Here’s what you need to know:
- Identify vulnerable spots around vents, pipes, and chimneys where water commonly enters
- Clean debris from around penetration points before applying any sealing materials
- Apply self-adhesive flashing tape directly over small gaps, ensuring proper adhesion to dry surfaces
- Use metal flashing pieces for larger penetrations, securing them with roofing cement
Properly sealed penetrations prevent water infiltration until permanent repairs are possible.
Don’t overlook these critical areas during temporary repairs.
Unblock Downspouts Causing Backups
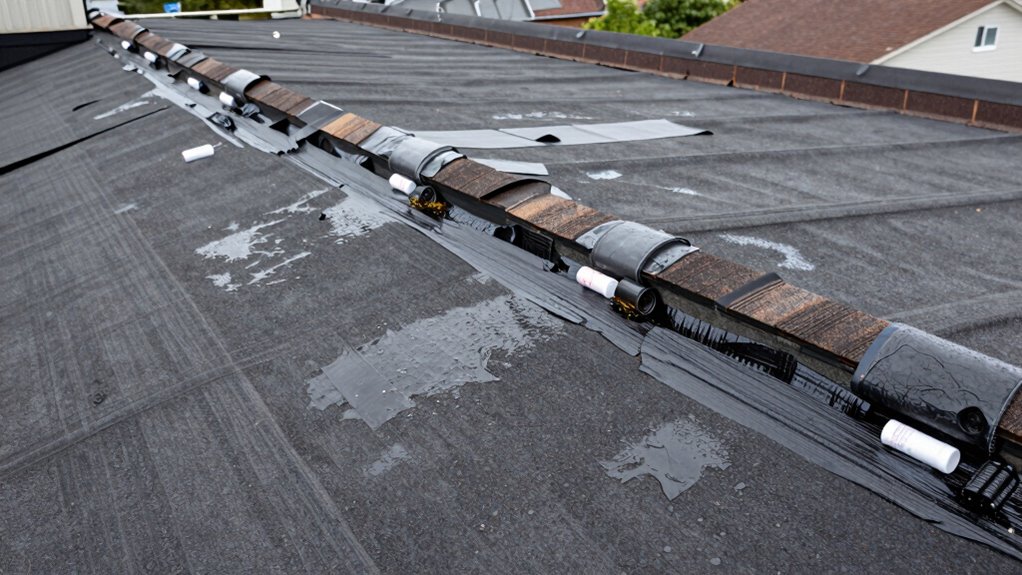
Clogged downspouts create immediate water backup issues that demand prompt attention.
You’ll need to clear debris blocking the vertical drainage pipes that carry roof water away from your home’s foundation. Start by examining the downspout openings where gutters connect. Remove leaves, twigs, and buildup using a plumber’s snake or pressure washer.
Check the entire length of each downspout for obstructions, paying special attention to elbows and joints where debris typically accumulates. Use a garden hose to flush remaining blockages downward.
Verify water flows freely through the entire system before proceeding. Properly functioning downspouts prevent overflow that can compromise your temporary roof leak repairs and cause additional water damage to your property’s exterior surfaces.
Guard Against Hidden Damage Inside
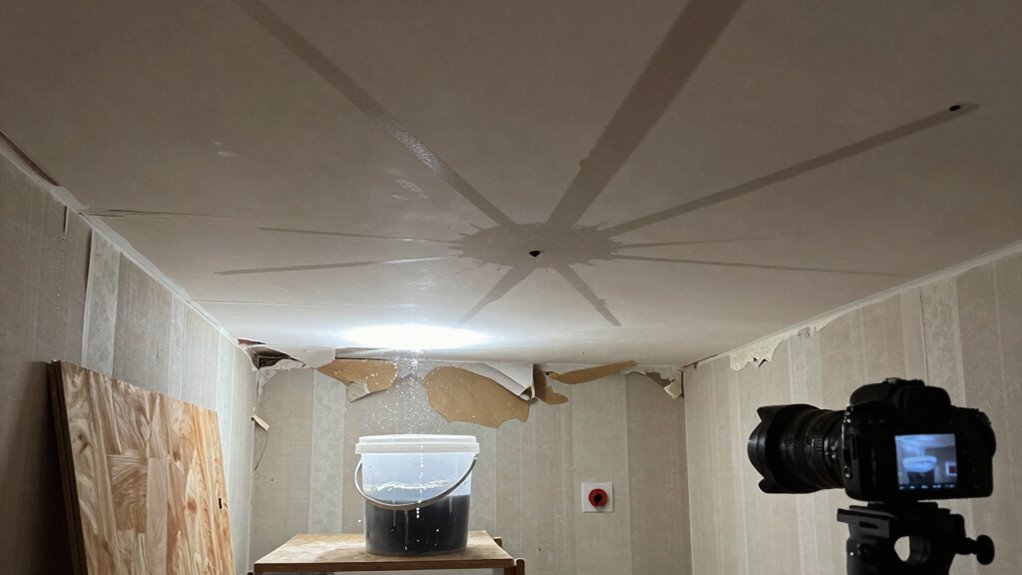
You must immediately check for water stains on ceilings and walls, as these indicate hidden moisture penetration that can compromise structural integrity.
Inspect all electrical systems for signs of water damage, including discolored outlets, loose connections, and malfunctioning fixtures.
Monitor insulation condition closely, since wet insulation loses R-value and creates mold risks that require professional remediation.
Check For Water Stains
While inspecting your attic or ceiling for water stains might seem straightforward, identifying hidden damage requires a systematic approach that can prevent costly structural issues down the road.
You need to look beyond obvious discoloration and check for subtle signs of moisture infiltration.
- Check ceiling drywall for soft spots or crumbling texture that indicate prolonged water exposure.
- Examine attic insulation for darkened areas or compressed sections that suggest repeated leaking.
- Look for peeling paint or wallpaper bubbles on interior walls near the ceiling.
- Inspect wood beams and trusses for warping, splitting, or fungal growth that compromising structural integrity.
Document any findings with photos and measurements.
These stains often appear brown, yellow, or black, depending on the material and moisture duration.
Don’t overlook areas around vents, chimneys, or roof intersections where leaks commonly occur.
Inspect Electrical Systems
Why should you ignore electrical hazards when water and electricity mix in unpredictable ways? You shouldn’t.
Water-damaged electrical systems create serious safety risks including short circuits, fires, and electrocution. Check all outlets, switches, and junction boxes near leak areas immediately. Look for corrosion, discoloration, or moisture buildup. Test GFCI outlets and replace any that won’t reset.
Examine wiring connections for loose or damaged components. Don’t overlook breaker boxes, transformers, or any electrical equipment exposed to water. If you’re unsure about system integrity, call a licensed electrician before restoring power.
Professional inspection prevents costly repairs and potential fatalities. Your family’s safety depends on addressing electrical issues promptly and thoroughly.
Monitor Insulation Condition
Regularly check insulation for moisture damage, as wet insulation loses effectiveness and promotes mold growth.
You need to stay vigilant about hidden water infiltration that compromises your home’s thermal performance.
Monitor these critical areas:
- Check attic insulation for dark spots, compression, or clumping that indicates water saturation
- Feel insulation surfaces for dampness or musty odors that suggest hidden moisture problems
- Inspect vapor barriers and seal any gaps where moisture might penetrate insulation layers
- Document insulation condition with photos monthly to track changes and identify deterioration patterns
Don’t wait for visible signs of damage.
Proactive monitoring prevents costly repairs and maintains your home’s energy efficiency.
Wet insulation creates health hazards and structural issues that escalate quickly.
You’re protecting your investment and family’s well-being.
Make insulation inspection part of your regular maintenance routine.
Early detection saves thousands in replacement costs and prevents extensive remediation work.
Decide If This Needs Expert Help
Although temporary roof leak repairs can save you money and prevent further damage, you should assess whether the problem exceeds your skill level or requires professional intervention.
You’re not alone in wanting to handle repairs yourself, but safety and effectiveness matter most. Check if the leak involves structural damage, electrical hazards, or areas above ceilings where you can’t see the full extent.
If water damage spreads beyond the immediate leak area, or if you’re uncomfortable working on your roof, don’t hesitate to call experts.
You’ll gain respect from professionals when you acknowledge your limits and prioritize proper repairs over temporary fixes that might worsen problems.
Conclusion
You’ve successfully implemented temporary roof leak repairs, but remember that 90% of roof failures occur due to inadequate maintenance. While your emergency fixes provide immediate protection, schedule professional inspection within 48 hours. Document all repair locations and material usage for permanent restoration. Monitor indoor humidity levels and electrical systems closely, as hidden moisture can cause structural damage costing thousands in unexpected repairs.
