

You’re ready to install a garden arch trellis, but first you’ll need to choose the right location and gather essential materials. Proper planning prevents common installation mistakes that waste time and money. Your success depends on understanding soil conditions, measuring accurately, and selecting appropriate climbing plants. What many people overlook during this process can compromise the entire structure’s stability and longevity.
Install a Garden Arch Trellis in 10 Steps
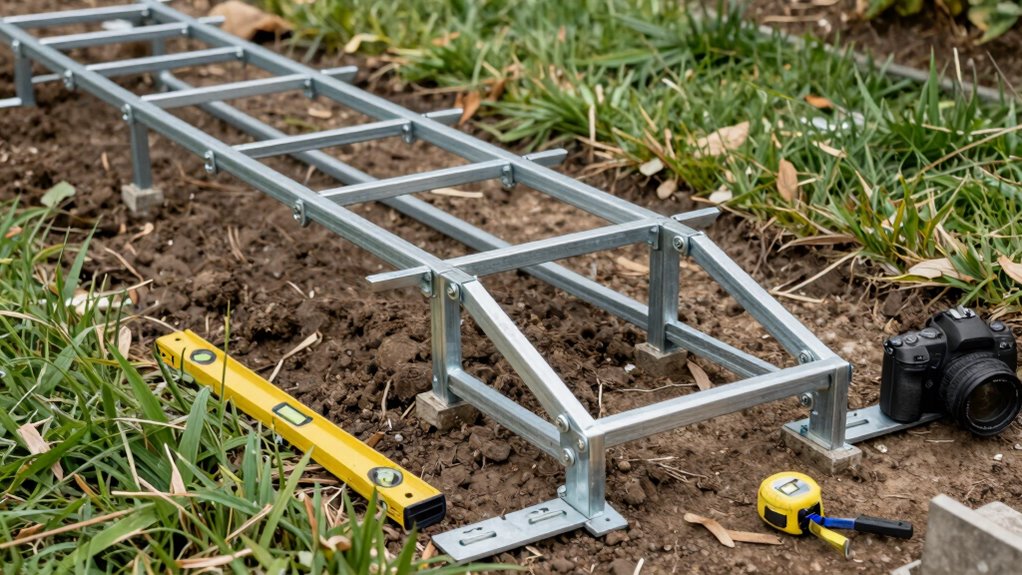
Installing a garden arch trellis requires careful planning and execution to guarantee proper support for climbing plants. You’ll need to measure your space accurately and choose appropriate materials.
Start by marking post locations with stakes and string. Dig holes twice as wide as your posts and deep enough for stability. Mix concrete according to package directions and set posts securely. Allow concrete to cure completely before attaching the arch.
Position the arch framework between posts and bolt connections tightly. Check that everything sits level and square. Attach wire mesh or slats where needed. Finally, backfill around posts with soil and water thoroughly.
Your trellis now provides sturdy support for climbing roses, clematis, or other vining plants while creating an attractive garden focal point.
Pick the Best Trellis Style for You
You should evaluate wooden versus metal trellis designs based on your garden’s aesthetic and durability requirements.
Consider your available space and the mature size of your climbing plants when selecting the appropriate dimensions and style.
Your choice must accommodate the specific climbing habits and weight of the plants you intend to grow.
Wooden Versus Metal Designs
Choosing between wooden and metal trellis designs requires careful consideration of your garden’s specific needs and long-term maintenance preferences.
Wooden trellises offer natural aesthetics that blend seamlessly with organic garden settings, but they demand regular staining or sealing to prevent weathering. You’ll need to budget time for periodic maintenance every few years.
Metal trellises, particularly those made from galvanized steel or aluminum, provide superior durability and minimal upkeep. They resist rot, insects, and weather damage effectively. However, metal conducts heat and may become too hot for plants during summer months. Consider your climate when making this decision.
Wooden options create warmer, more traditional appearances, while metal designs offer clean, contemporary looks. Your choice should reflect both practical requirements and visual harmony with existing landscape elements.
Size And Space Considerations
Several key factors determine the ideal trellis size and style for your garden space.
You’ll want to measure your available area carefully, considering both width and height restrictions. Standard arch trellises typically range from 4 to 8 feet wide and 5 to 7 feet tall. Your pathway or garden entrance should accommodate the structure without feeling cramped.
Consider your mature plant’s eventual spread and growth habit when selecting dimensions. Narrow spaces suit compact 4-foot designs, while larger areas can handle statement 8-foot installations.
You should also evaluate surrounding structures – make certain your trellis complements existing fences, walls, or garden features.
Think about maintenance access and viewing angles from different garden perspectives. Your trellis should enhance your space’s flow while providing adequate support for future plantings.
Climbing Plant Compatibility
Since different climbing plants have varying support needs, matching your trellis style to your chosen vegetation guarantees peak growth and structural integrity.
You should consider plant weight and growth habit when selecting your trellis. Heavy climbers like wisteria need sturdy wooden or metal frameworks with strong horizontal supports.
Delicate climbers such as clematis thrive on lighter mesh or bamboo structures. Twining plants including honeysuckle prefer vertical supports they can wrap around, while clinging varieties like ivy need textured surfaces for attachment.
Climbing roses benefit from horizontal crossbars spaced 12-18 inches apart. Annual vines like morning glory grow well on basic string or wire systems.
Your plant’s mature size determines spacing requirements. Research your specific plant’s growth characteristics before installation to ascertain proper support throughout its lifecycle.
Choose an Ideal Garden Location
You need to select a spot that receives adequate sunlight for your climbing plants while ensuring the location complements your garden’s overall design.
Check that the area gets at least 6 hours of direct sun daily and has stable, well-draining soil that can support the trellis structure.
Consider existing plants, foot traffic patterns, and future growth when making your final location decision.
Ideal Spot Selection
When selecting the perfect location for your garden arch trellis, consider how much daily sunlight the area receives since most climbing plants need at least six hours of direct light.
You should evaluate your garden’s microclimates by observing light patterns throughout different seasons. Check for overhead obstructions like tree branches or building shadows that might limit sun exposure.
Verify the spot has well-draining soil to prevent waterlogging around your trellis base. Consider proximity to walkways and viewing areas so you can enjoy your climbing plants’ beauty.
You’ll want to place your arch where it won’t interfere with utility lines or future landscaping plans. Wind exposure matters too, as excessive wind can damage delicate climbers.
Finally, choose a location that allows room for your plants to mature without overcrowding nearby structures or other garden elements.
Sunlight Exposure Requirements
While evaluating potential locations for your garden arch trellis, prioritize areas that receive abundant sunlight since most climbing plants thrive with six to eight hours of direct light daily.
You should observe your yard throughout different times to identify spots that meet these requirements. Morning sun exposure works best for many varieties, promoting healthy growth without harsh afternoon intensity.
Avoid placing your trellis under dense tree canopies or near tall structures that cast shadows. South-facing locations typically provide ideal light conditions.
Consider seasonal changes in sun patterns, as tree leaves may block light during summer months.
Plants like roses, clematis, and honeysuckle need this light exposure to bloom profusely. You want your climbing plants to establish strong root systems and produce vibrant flowers, so don’t compromise on adequate sunlight when selecting your trellis location.
Soil Stability Assessment
Before installing your garden arch trellis, assess the soil stability at your chosen location to confirm it can support the structure’s weight and withstand environmental pressures.
You’ll need to determine if your soil is firm enough by performing a simple compression test. Dig a small hole near your proposed installation site and squeeze a handful of soil. If it crumbles, your soil lacks adequate stability.
Clay soils typically provide better support than sandy or loamy types. Check for proper drainage by observing how quickly water disappears after rainfall. Poor drainage creates unstable conditions.
You should also examine the area for underground utilities or tree roots that might interfere with installation. Consider consulting your local extension office for soil testing services.
If your soil proves inadequate, you’ll need to amend it with compost or consider alternative locations. Stable soil confirms your trellis remains secure for years.
Gather Required Tools and Materials
Several essential tools and materials are necessary for successfully installing your garden arch trellis. You’ll need a post-hole digger or shovel, level, tape measure, and wooden or metal posts rated for ground contact.
Concrete mix or gravel provides stable anchoring. Gather galvanized screws or bolts, drill with bits, and wrench set for secure assembly. Don’t forget safety equipment including work gloves and safety glasses.
Your trellis kit should include mounting hardware, but verify contents before starting. Consider having wooden stakes and string handy for alignment assistance.
Quality materials guarantee your arch trellis withstands weather and time while supporting climbing plants. Having everything ready prevents frustrating trips mid-installation.
Check your specific trellis model’s requirements, as sizes and hardware needs vary between manufacturers.
Measure and Mark Spot Accurately
You’ll need to measure the distance between your posts carefully to guarantee proper placement of the arch trellis.
Mark the center point clearly using a pencil or marker, making certain your measurement accounts for the trellis width.
Check that your marks are level and properly aligned before proceeding with installation.
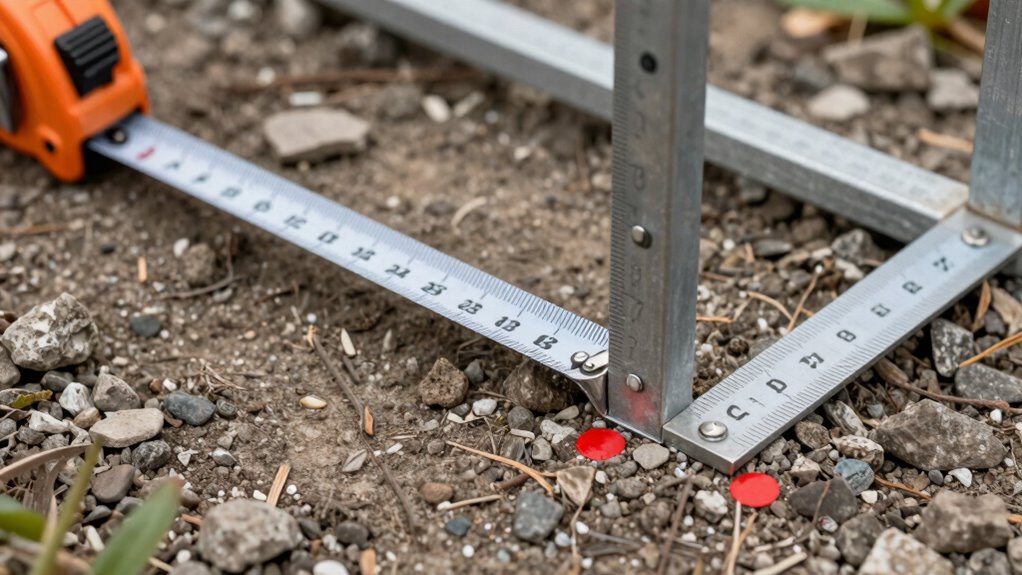
Measure Distance Between Posts
Accurate measurement marks the foundation of your garden arch trellis installation.
You’ll need to determine the exact distance between your posts to guarantee proper fit and stability. Grab your tape measure and extend it from one post’s center point to the other. Record this measurement carefully, as even small errors affect your arch’s alignment.
Standard garden arches typically span 4 to 6 feet, but your specific design might require different dimensions. Double-check your measurement by taking it twice to prevent mistakes.
Consider the arch’s width when measuring, guaranteeing adequate space for plants to grow. Mark these measurements clearly on both posts using a pencil.
You’re creating the precise framework that’ll support your trellis structure effectively.
Mark Center Point Clearly
Having established the precise distance between your posts, the next step focuses on identifying and marking the exact center point where your garden arch trellis will be positioned.
You’ll want to measure the total span between posts and divide by two to find this midpoint. Use a measuring tape stretched taut from one post to the other, confirming accuracy.
Mark this center location clearly with a pencil or marker on the ground. Consider using a small stake or spray paint for enhanced visibility during installation. This center mark serves as your primary reference point for positioning the trellis base correctly.
Double-check your measurement before proceeding to confirm proper alignment. A precise center mark prevents costly mistakes and guarantees your arch sits perfectly balanced between posts.
Take time to verify accuracy now.
Check Level And Alignment
Before proceeding with the installation, verify your marked center point is perfectly level and properly aligned with both posts.
Use a carpenter’s level to check horizontal alignment across the top of your posts. Adjust your marks if necessary to guarantee they’re exactly even.
Sight down the length of the posts to confirm vertical alignment. Your center point should create a straight line from one post to the other.
Double-check measurements from each post to verify equal distances. Mark any adjustments clearly with a pencil.
Take time to get this right because proper alignment guarantees your garden arch trellis installs smoothly and looks professional. Incorrect leveling will cause fitting problems later.
Make final corrections before moving forward with the next installation steps.
Check for Buried Utility Lines
Why should you contact your local utility companies before digging? You need to avoid damaging buried infrastructure that could cause serious injuries, expensive repairs, and service disruptions. Call 811 or your local utility marking service at least 48 hours before starting your project.
- Underground utilities include gas, water, electricity, and telecommunications lines that aren’t always visible from the surface.
- Professional locators use specialized equipment to accurately mark utility line locations with colored flags or paint.
- Legal requirements vary by location but most areas mandate utility line clearance before any digging activities.
You’ll receive a utility map showing exact line locations and depths. This information prevents accidental strikes during installation.
Wait for complete marking before proceeding with your garden arch placement. Your safety and your neighbors’ service reliability depend on this vital step.
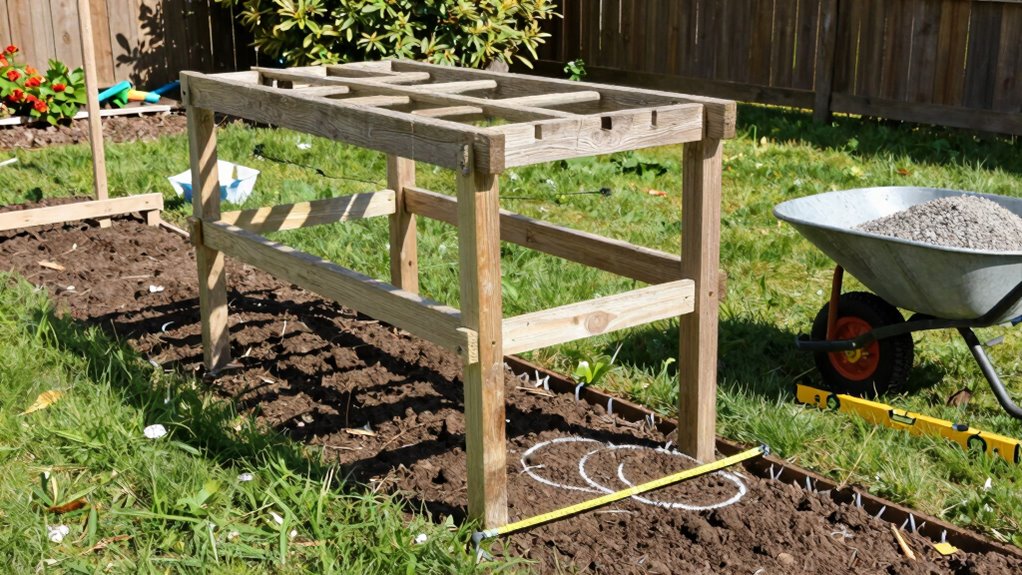
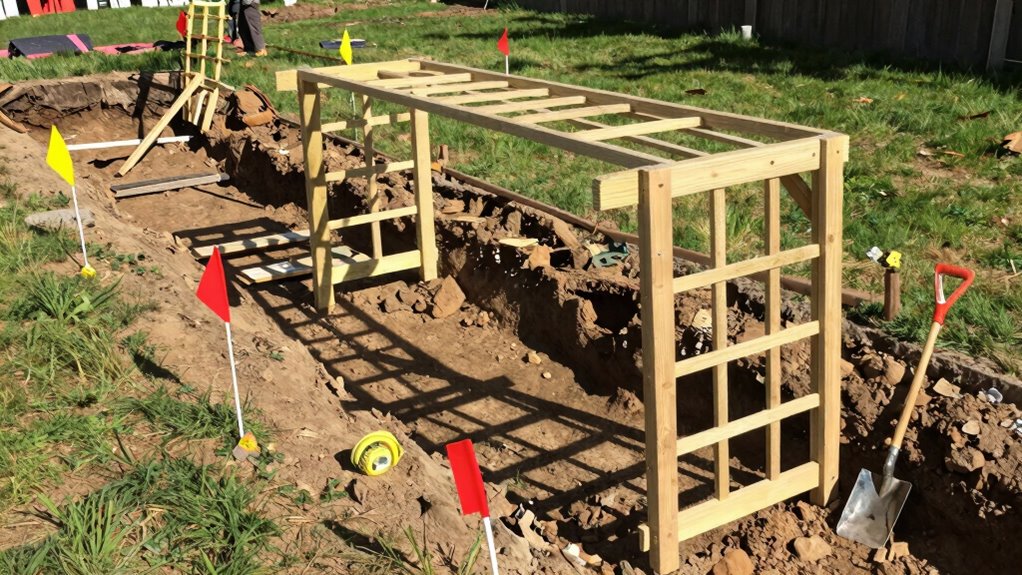
Dig Deep and Stable Holes

Two critical factors determine your garden arch trellis stability: hole depth and structural integrity.
You’ll need to dig holes that extend below the frost line in your area, typically 18-24 inches deep, to avoid shifting during freeze-thaw cycles. Width matters too – make holes three times wider than your post diameter for proper backfilling. Use a post hole digger or auger for clean edges that won’t collapse inward.
Check soil conditions carefully; clay soils may require additional drainage considerations. Remove all loose soil and debris from each hole before proceeding.
Mark hole locations precisely using string lines and measuring tools to guarantee perfect alignment. Your future trellis structure depends entirely on these foundational preparations.
Don’t rush this step – take time to get each hole exactly right. Proper excavation prevents costly corrections later.
Secure Posts in Concrete Mix
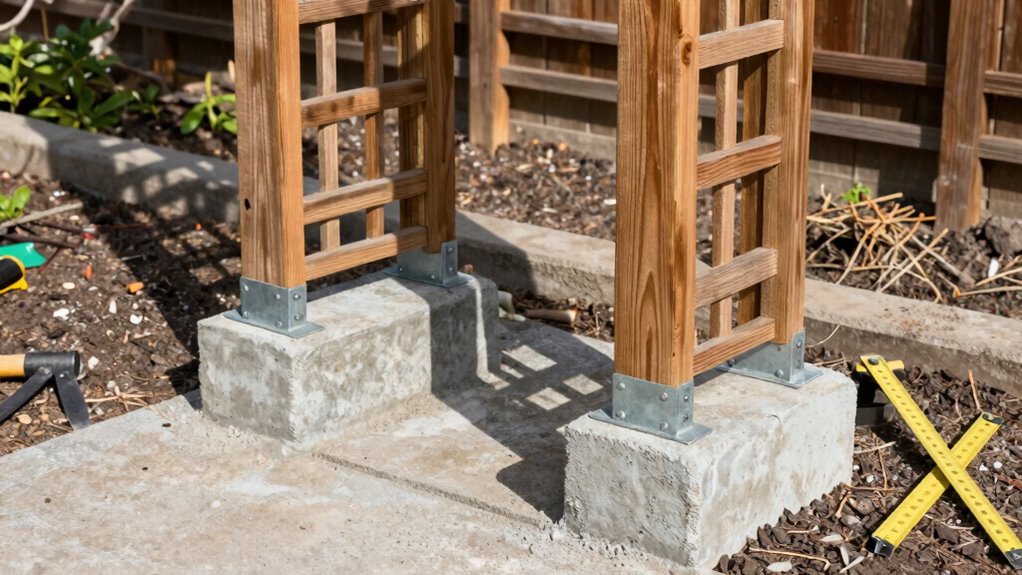
One essential step guarantees your garden arch trellis posts remain stable for years: properly securing them in concrete mix.
You’ll want to mix concrete according to package directions, making certain it’s thick enough to provide solid support without being too runny. Carefully position each post vertically before pouring concrete around it, checking alignment with a level frequently.
- Mix consistency matters – Too thin and it won’t support posts adequately; too thick and you’ll struggle with proper placement.
- Check alignment constantly – Small adjustments now prevent major corrections later.
- Allow proper curing time – Rushing this step compromises your entire installation’s stability.
Fill holes gradually, tamping concrete gently to eliminate air pockets. Leave concrete slightly mounded above ground level for better water drainage.
Wait at least 24 hours before attaching any trellis components to make certain proper setting.
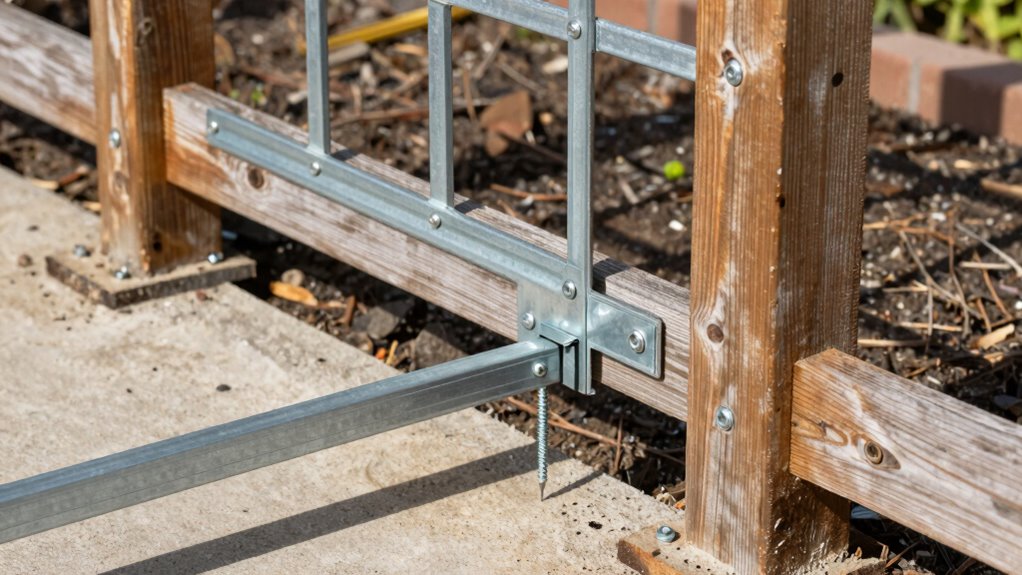
Add Support Brackets or Rails
Several support brackets or rails provide essential reinforcement for your garden arch trellis structure.
You’ll want to install these components after securing your posts but before finalizing the arch placement. Position brackets at strategic points where the arch meets the posts, typically 6-8 inches from the top.
Use galvanized metal brackets for durability against weather conditions. Attach them using 2.5-inch galvanized screws or bolts for maximum holding power.
Consider adding horizontal rails between posts for additional stability, especially for wider structures. These rails help distribute weight evenly and prevent sagging.
Make certain bracket placement allows for proper arch alignment. Check that all connections feel solid and secure.
Properly installed support brackets guarantee your trellis remains stable throughout seasons of growth and weather exposure.
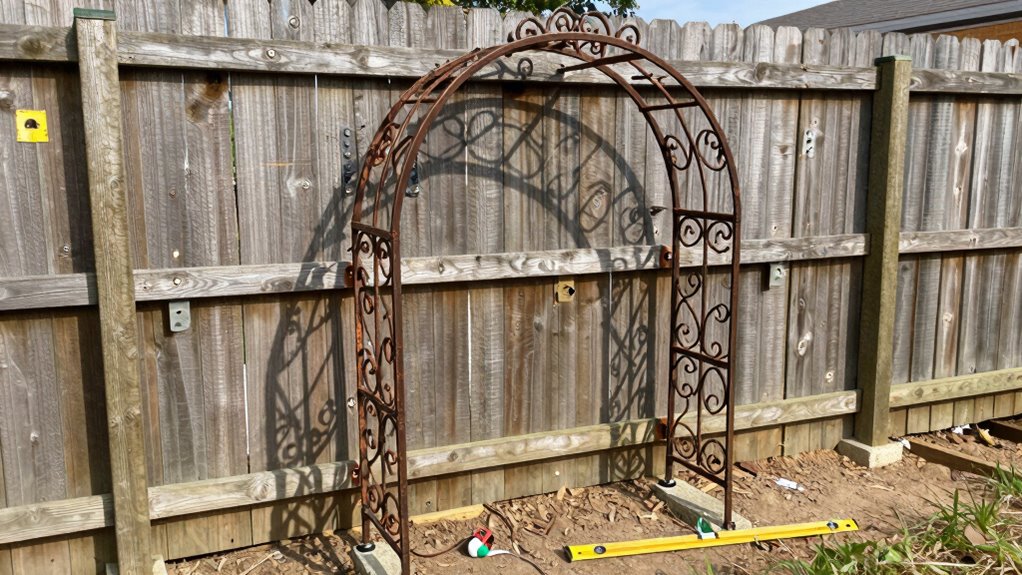
Make Sure It’s Level and Square
Proper alignment certifies your garden arch trellis functions effectively and looks professional. You’ll want to verify everything sits perfectly before proceeding.
- Check horizontal level – Place your level across the top of the arch or on horizontal rails to confirm no tilting occurs left or right.
- Verify vertical plumb – Hold your level against vertical posts or brackets to establish they’re straight up and down, not leaning.
- Measure corner-to-corner – Take diagonal measurements from each corner to the opposite corner; these should match exactly for a perfect square or rectangle.
Adjust as needed until all measurements align.
This precision work certifies your trellis installation looks intentional and provides proper support for climbing plants while contributing to your garden’s overall aesthetic appeal.
Wait for Concrete to Dry
After confirming your garden arch trellis is perfectly level and square, you’ll need to secure it permanently by waiting for the concrete to dry completely.
Concrete typically requires twenty-four to forty-eight hours to cure properly, depending on weather conditions and mix type. Avoid disturbing the structure during this critical period.
Check manufacturer specifications for exact drying times. Ideal curing occurs at temperatures between fifty and seventy-five degrees Fahrenheit.
High humidity actually helps the concrete set properly. If rain threatens, cover the area with plastic sheeting secured by rocks or bricks.
Resist temptation to test stability prematurely. The concrete continues strengthening for several days beyond initial set time.
Proper patience guarantees your trellis remains stable for years ahead.
Protect Frame With Finish Coats
Once the concrete has fully cured and your garden arch trellis stands solidly in place, you’ll want to protect the frame with finish coats to prevent weather damage and extend its lifespan.
Apply primer first to create a strong bonding surface and prevent rust on metal components. Sand any rough spots lightly before priming for better adhesion.
- Choose weather-resistant paint or stain specifically designed for outdoor use to guarantee long-lasting protection against moisture and UV rays.
- Apply thin, even coats allowing each layer to dry completely before adding the next one to prevent drips and achieve professional results.
- Focus on all joints and welds where moisture typically collects, guaranteeing complete coverage for maximum protection.
Finish with two coats for durability.
Start Planting Climbing Vines
Choose suitable climbing vines that thrive in your local climate and plant them at the base of your garden arch trellis to begin creating a living canopy.
Select varieties like clematis, honeysuckle, or jasmine that complement your region’s growing conditions. Space plants according to their mature width, typically eighteen to twenty-four inches apart.
Dig holes twice as wide as root balls and plant at the same depth they grew previously. Water thoroughly after planting and apply mulch around base areas to retain moisture.
Consider flowering times and foliage colors that blend harmoniously with your existing garden palette. These vines will eventually envelop your structure, creating an inviting focal point that enhances your outdoor living space while providing seasonal interest.
Show Plants How to Climb
You’ll need to select appropriate climbing plants that thrive on trellises, such as clematis or honeysuckle.
Installing a sturdy support structure guarantees your plants have something reliable to climb.
Guide their growth patterns by gently tying stems to the trellis and training them upward.
Choose Climbing Plants
Selecting the right climbing plants for your garden arch trellis requires understanding how different species attach themselves to structures.
You’ll want to choose plants that naturally climb and won’t overwhelm your trellis framework.
- Twining climbers like clematis and honeysuckle wrap their stems around supports, so they need thin, flexible branches or wires to grip onto effectively.
- Tendril climbers such as sweet peas and grapes use specialized appendages to grab onto structures, preferring mesh or lattice patterns they can easily penetrate.
- Self-clinging climbers like ivy and climbing hydrangea produce adhesive pads or roots that stick directly to surfaces, making them ideal for solid trellis panels.
Consider your climate zone, sun exposure, and desired bloom time when making your final selections.
These plants will create the living canopy you’re aiming for.
Install Support Structure
Now that you’ve chosen appropriate climbing plants for your garden arch trellis, it’s time to prepare the structure itself to support their growth patterns.
You’ll need to install horizontal wires or wooden slats every 12-18 inches along the arch’s vertical supports. Use galvanized wire for durability, stretching it taut between posts and securing with cable ties or staples.
For wooden slats, pre-drill holes to prevent splitting and attach with weather-resistant screws. Guarantee spacing allows your chosen plants’ tendrils or stems to easily grasp the support system.
Check that all connections are secure and can bear the mature weight of your plants. This framework creates the foundation your climbing plants need to thrive.
Guide Growth Patterns
While your support structure provides the foundation for climbing plants, training them to use it effectively requires hands-on guidance during their early growth stages.
You’ll need to direct stems and tendrils toward the trellis framework, gently securing them with soft plant ties or twine.
- Check your plants weekly during the first month, repositioning any growth that veers away from the support structure.
- Prune competing shoots that grow outward instead of upward, channeling energy into vertical growth patterns.
- Rotate containers or redirect ground-level vines monthly to guarantee even coverage across the entire trellis surface.
Consistent attention during this establishment period creates successful climbing habits.
Your plants will eventually self-support, but initial guidance determines their long-term success.
You’re building more than just plant support—you’re fostering growth patterns that create beautiful, thriving garden features others will admire.
Secure Vines With Soft Ties
When training vines on your garden arch trellis, you’ll want to use soft ties to avoid damaging the plant stems.
Choose flexible materials like cloth strips, nylon pantyhose, or specialized garden tape that won’t cut into growing vines. Tie loosely enough to allow stem expansion while maintaining secure attachment to the trellis structure.
Position ties every 6-8 inches along the vine’s length, securing them to the trellis framework rather than wrapping tightly around the plant.
Check ties regularly during growing season, adjusting as stems thicken. Remove old ties carefully when repositioning vines.
Soft ties prevent scarring and promote healthy growth patterns while keeping your plants properly supported on the trellis.
Keep Trellis Clean and Trim
Regular maintenance keeps your garden arch trellis looking attractive and functioning properly throughout the growing season.
You should clean debris and fallen leaves from around the base regularly to prevent moisture buildup. Trim overgrown vines and stems that obscure the trellis structure or block walkways.
- Remove dead plant material – Clear away枯萎 or diseased growth immediately to maintain hygiene.
- Prune excess foliage – Cut back vigorous shoots that overwhelm the trellis framework.
- Clean supporting structures – Wash dirt and mildew from metal or wooden posts with appropriate solutions.
Stay consistent with these tasks monthly during peak growing periods.
Your efforts guarantee the trellis remains a beautiful focal point while supporting healthy plant development throughout your garden space.
Prevent Rot and Rust Issues
You should select pressure-treated lumber or metal components that resist moisture damage from the start.
Apply weatherproof sealants or coatings annually to protect your trellis from harsh outdoor conditions.
These preventive measures save you time and money by extending your garden arch’s lifespan considerably.
Choose Pressure-Treated Materials
Because garden arch trellises are constantly exposed to outdoor elements, selecting pressure-treated materials becomes vital for preventing premature deterioration.
You’ll want materials that withstand moisture, insects, and weather cycles effectively.
When choosing pressure-treated lumber, focus on these key considerations:
- Select lumber rated for ground contact – This guarantees maximum protection against soil-borne insects and moisture absorption that causes rot.
- Look for ACQ or CA-treated wood – These chemical treatments provide superior protection compared to older CCA treatments while remaining safe for garden environments.
- Check treatment retention levels – Higher retention rates mean longer-lasting protection, especially important for structural components supporting plant weight.
Pressure-treated materials cost slightly more but save replacement expenses later.
You’re investing in durability that protects your garden investment while ensuring your trellis remains sturdy and attractive for years.
Apply Weatherproof Coatings
While pressure-treated materials provide excellent foundational protection, applying weatherproof coatings adds an extra layer of defense against moisture and UV damage that can compromise your garden arch trellis over time.
You should choose marine-grade spar urethane or exterior acrylic sealers specifically designed for outdoor wood applications. Apply coatings immediately after installation while the wood is still clean and dry. Use a quality brush or sprayer to apply thin, even coats, allowing each layer to dry completely before adding the next.
Focus on all exposed surfaces, joints, and cut ends where moisture typically penetrates first. Reapply coatings annually or biannually depending on your climate conditions.
Don’t forget metal hardware – use rust-inhibiting primer on any steel components. Regular maintenance prevents costly repairs and extends your trellis lifespan greatly.
Fix Common Assembly Mistakes
Several common errors can occur during garden arch trellis assembly, but most are easily corrected with proper attention to detail.
You’ll want to address these issues before they become bigger problems.
- Misaligned mounting holes – Check that all pre-drilled holes line up perfectly before tightening bolts. If they don’t align, loosen connections and realign the sections carefully.
- Over-tightened fasteners – Don’t crank down bolts excessively, as this can strip threads or crack wood. Tighten just enough to create secure, stable joints.
- Incorrect post spacing – Measure twice to verify posts are equidistant and level. Uneven spacing creates structural weakness and affects the trellis appearance.
Take your time during assembly.
These corrections will guarantee your garden arch trellis stands strong and looks professional for years.
Conclusion
Your garden arch trellis installation journey doesn’t end with the last screw—like building Rome, it takes time and patience. Regular maintenance keeps your structure strong and your climbing plants thriving. Don’t let small issues become major problems; address repairs promptly. With proper care, your trellis will provide beauty and function for years, creating the perfect backdrop for your garden’s starring plants.
