

You’ll need basic tools and materials before starting your shelf project. Gather wood boards, screws, a drill, and measuring tape. Choose wood type based on your space and style preferences. Measure twice to avoid costly mistakes when cutting. Consider shelf depth and length carefully. Don’t forget wall anchors if mounting into drywall. What’s your biggest concern when building shelves?
Gather Tools and Materials
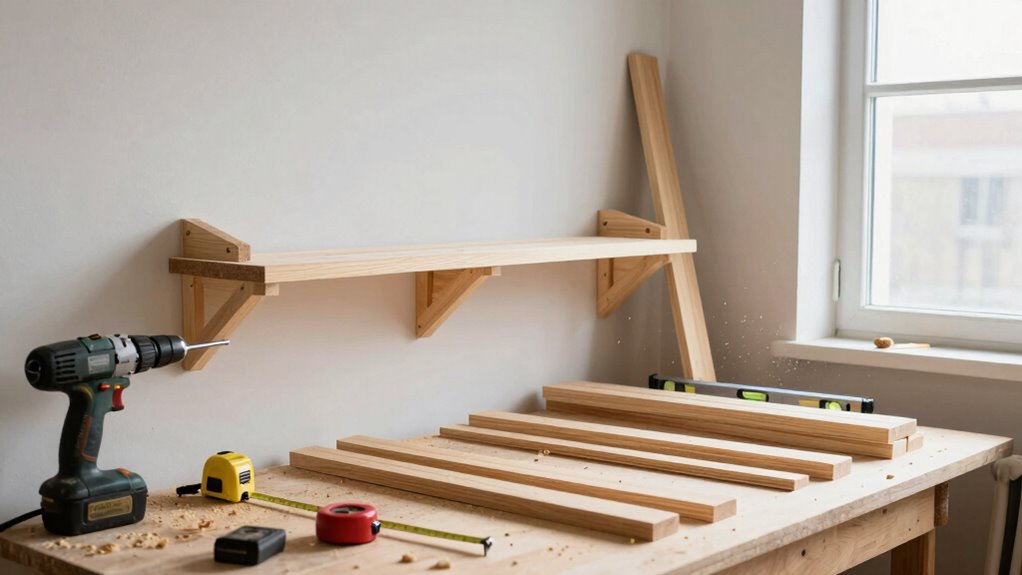
Building a wooden shelf requires careful preparation before you start cutting or assembling anything.
You’ll need a circular saw or miter saw for clean cuts, a drill with bits for pilot holes and screws, a level to guarantee straight installation, and a tape measure for accuracy.
Gather your materials including lumber boards, wood screws, wall anchors, and sandpaper. Choose plywood or solid wood based on your weight requirements and budget.
Don’t forget safety equipment like safety glasses and work gloves. Having a stud finder helps locate wall supports.
Keep your workspace clean and organized. Place tools within easy reach.
Check that all items are present before beginning. This preparation prevents frustration later.
You’re creating something functional that’ll last years with proper setup.
Measure for a Perfect Fit
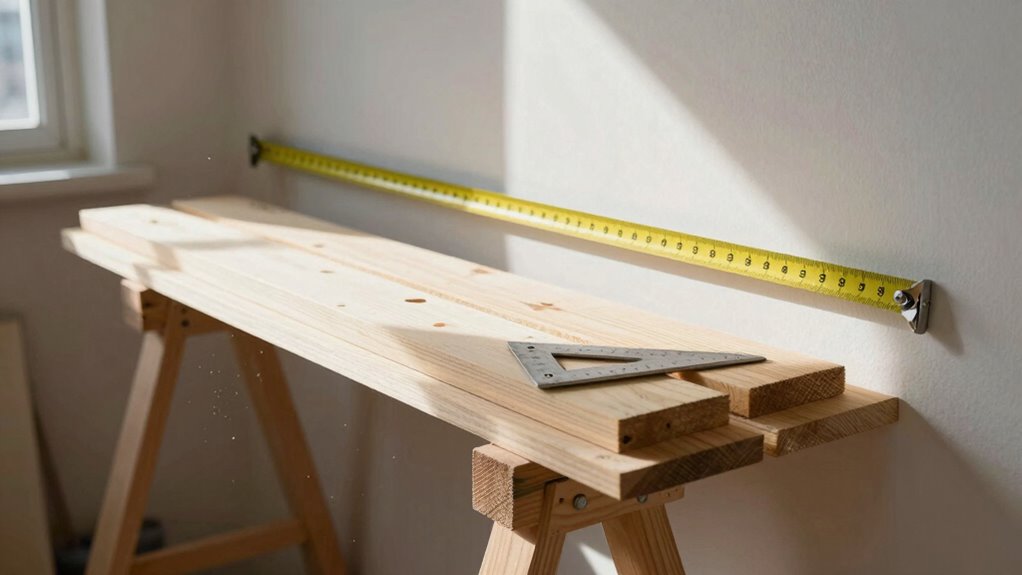
Measure twice, cut once—this classic carpentry rule becomes essential when you’re cutting shelf boards to fit your specific space.
Grab your tape measure and determine your shelf’s exact width, height, and depth measurements. Check for wall obstacles like outlets or switches that might affect placement. Mark your measurements clearly on the wood with a pencil. Double-check every measurement before making cuts. Use a reliable straight edge to guarantee accurate lines.
Remember that shelves need clearance space above and below for items. Take time measuring—rushing leads to mistakes. Your future self will thank you for precise measurements. Proper fitting shelves create professional results that make any space feel cohesive and intentional.
Accuracy matters more than speed.
Select the Best Wood Type

Choosing the right wood type determines your shelf’s durability, appearance, and cost. You should consider plywood for budget-friendly projects, as it’s stable and resists warping.
Solid pine works well for light items and accepts paint beautifully. Hardwoods like oak or maple provide superior strength for heavy books and dishes. Don’t overlook reclaimed wood for character and sustainability.
Check your local lumber yard for straight, knot-free boards. Consider the wood’s grain pattern and color variation. Softwoods are easier to work with but dent more easily. Hardwoods last longer but cost more.
Match the wood type to your intended use. Think about maintenance requirements. Sand smooth surfaces before finishing. Your wood choice reflects your personal style while serving practical needs.
Cut Your Shelf Boards
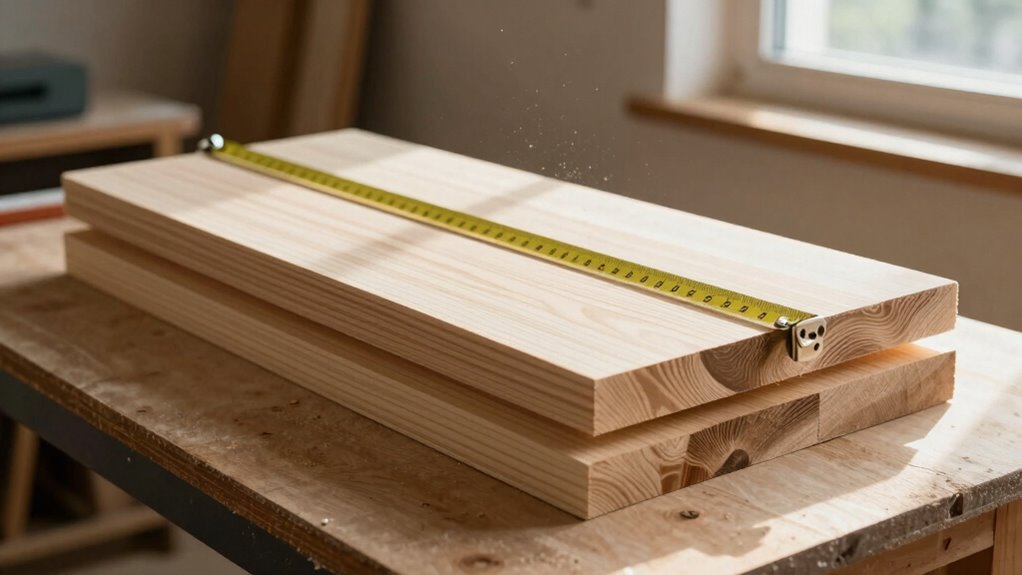
You’ll need to measure your shelf boards twice before making any cuts to avoid costly mistakes.
Select the proper wood type based on your shelf’s intended load and location, then mark your cutting lines clearly with a pencil.
After cutting, sand all edges smoothly with 120-grit followed by 220-grit sandpaper for a professional finish.
Measure Twice Cut Once
Before you make any cuts, double-check all your measurements against the shelf design you’ve planned. Accuracy prevents costly mistakes and guarantees your shelf fits perfectly in its intended space.
Use these essential measuring and cutting practices:
- Mark measurements clearly with a pencil, using a straight edge for precision
- Measure from the same reference point consistently throughout the project
- Verify cuts with a measuring tape before making them, then cut slowly and steadily
- Account for saw blade width by measuring to the blade’s edge, not its center
Take your time with measurements because rushing leads to errors.
Your shelf deserves careful attention to detail. These habits separate amateur builders from skilled craftspeople.
Remember that precise cuts create professional results that you’ll proudly display in your home.
Choose Proper Wood Type
Selecting the right wood type determines your shelf’s strength, appearance, and longevity.
You should consider plywood for affordability and stability, especially for longer spans.
Solid wood like pine offers natural beauty but requires more skill to prevent warping.
MDF works well for painted finishes and holds screws securely.
Hardwoods like oak or maple provide superior strength but cost more.
Your choice affects how much weight your shelf can safely hold.
Consider your skill level too – softer woods are easier to cut and shape.
Check your local lumber yard for quality boards without significant knots or splits.
Don’t forget to factor in grain direction when cutting – this impacts both strength and visual appeal.
Proper wood selection prevents future sagging or failure.
Sand Edges Smoothly
Smooth your shelf boards’ edges with careful sanding to eliminate rough spots and splinters. This step guarantees your shelves feel professional and safe to touch.
Start with 120-grit sandpaper to remove major imperfections, then progress to finer grits for a polished finish.
- Begin with coarse grit: Use 120-grit sandpaper to tackle rough cuts and visible splinters on all edges.
- Progress to fine grit: Switch to 220-grit sandpaper for smooth, polished edges that won’t catch clothing.
- Sand with the grain: Always follow wood grain direction to prevent cross-grain scratches and maintain structural integrity.
- Check for smoothness: Run your fingers along edges to feel for remaining rough spots before finishing.
Your sanded edges should feel completely smooth and ready for staining or painting.
Sand for a Smooth Finish
You’ll need to select the proper sandpaper grit starting with 80-120 for rough sanding and finishing with 220-320 for a smooth surface.
Apply even pressure while sanding in long, consistent strokes following the wood grain to avoid gouging. Check your progress frequently by running your hand over the surface to verify that all rough spots are eliminated.
Choose Right Sandpaper Grit
The right sandpaper grit makes all the difference between a rough surface and a professional-looking shelf.
You need to select grits that progressively smooth your wood without leaving scratches or uneven spots.
Start with coarser grits to remove imperfections, then work your way to finer grits for that polished finish you’ll be proud to display.
Each grit serves a specific purpose in transforming rough lumber into furniture-quality wood.
Choose grits based on your wood’s condition and desired smoothness.
Lower numbers mean coarser sandpaper that cuts faster but leaves visible marks. Higher numbers create smoother surfaces but require more time and effort.
- 80-120 grit removes rough spots and saw marks
- 150-180 grit smooths surfaces between coats
- 220 grit creates final smooth finish
- 320+ grit achieves ultra-smooth surface for staining
Sand With Even Pressure
Applying consistent pressure while sanding guarantees uniform surface preparation and prevents uneven wood removal. You should grip the sandpaper or sander firmly but not tightly, letting the tool’s weight do most work.
Move in smooth, overlapping strokes following wood grain direction. Keep your hand steady and maintain constant contact with surface. Don’t press harder on high spots or lighter on low areas. Let the sandpaper cut evenly across entire surface.
Work systematically from coarse to fine grits. Check your pressure periodically by feeling tool movement. Too much force creates dips and scratches. Too little leaves rough patches. Find that sweet spot where sandpaper cuts consistently.
Your hands should move rhythmically, not erratically. This technique guarantees professional results every time.
Check Surface Smoothness
Smooth surfaces require careful inspection after sanding to guarantee even wood removal and proper preparation for finishing. You should run your hand across the entire surface to feel for any rough spots or uneven areas that need additional attention.
- Use a strong light source to spot scratches, dents, or remaining rough patches you might miss in normal lighting.
- Feel for smoothness by dragging your fingertips lightly across the wood grain in multiple directions.
- Check corners and edges where sanding pressure often varies, creating inconsistent smoothness.
- Look for consistent sheen across the surface, indicating uniform sanding progression through grits.
Don’t rush this step. Taking time to verify smoothness prevents finishing issues later.
If you find rough areas, sand them again with fine-grit paper until they match the surrounding surface quality.
Stain or Paint for Style
Before you decide between stain or paint, consider how each option will transform your wooden shelf’s appearance and durability.
Stain penetrates wood fibers, enhancing natural grain patterns while providing moderate protection. You’ll see wood texture clearly, creating a warm, traditional look that fits seamlessly into existing furniture collections.
Paint completely covers wood grain, offering superior moisture resistance and easy cleaning. Choose semi-gloss or satin finishes for practical durability. Light colors make spaces feel larger, while darker tones add sophistication.
Consider your room’s existing color scheme and lighting conditions. Test samples on scrap wood first.
Both options require proper surface preparation and primer for lasting results. Your choice reflects personal style while ensuring your shelf complements your home’s aesthetic.
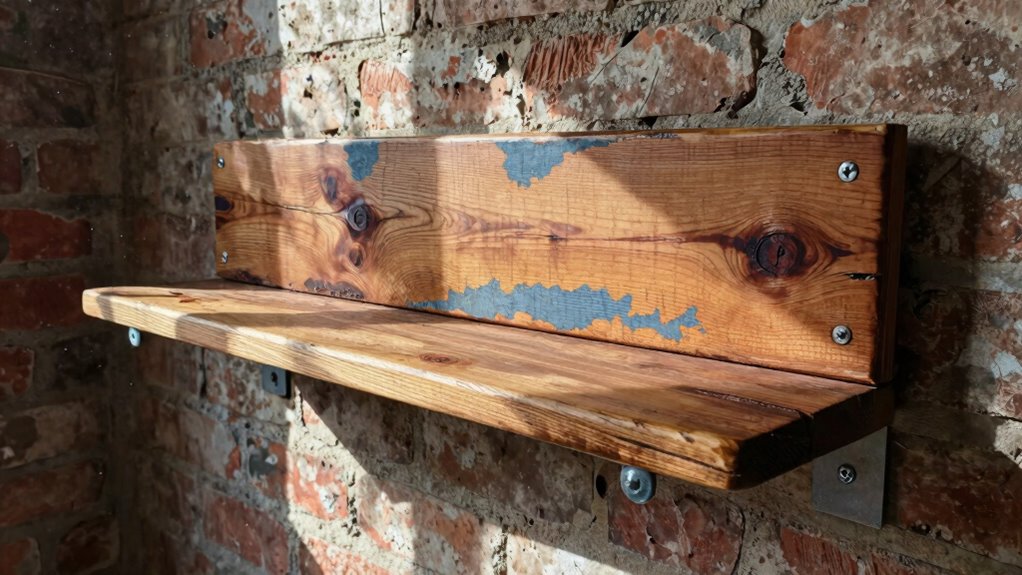
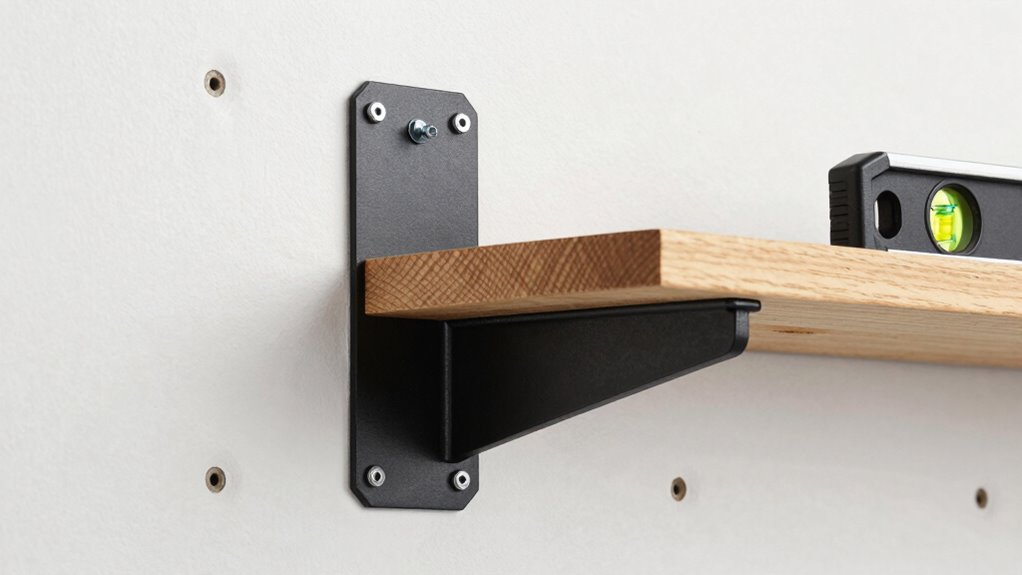
Mount Brackets Firmly
Three key steps guarantee your shelf brackets stay secure for years. You’ll need proper preparation, quality hardware, and precise installation technique.
- Mark bracket positions accurately using a level and measuring tape to confirm perfect alignment.
- Choose appropriate anchors that match your wall type – toggle bolts for hollow walls, wood screws for studs.
- Pre-drill pilot holes slightly smaller than your screws to prevent wood splitting and confirm tight fits.
- Tighten all connections gradually by hand first, then with tools, checking alignment throughout.
Don’t rush this step. Your shelf’s stability depends entirely on how well you secure these brackets.
Take time to verify measurements twice. Feel confident knowing your brackets won’t sag or fail later. Proper mounting creates that satisfying, rock-solid installation you’ll be proud to show off to friends and family.
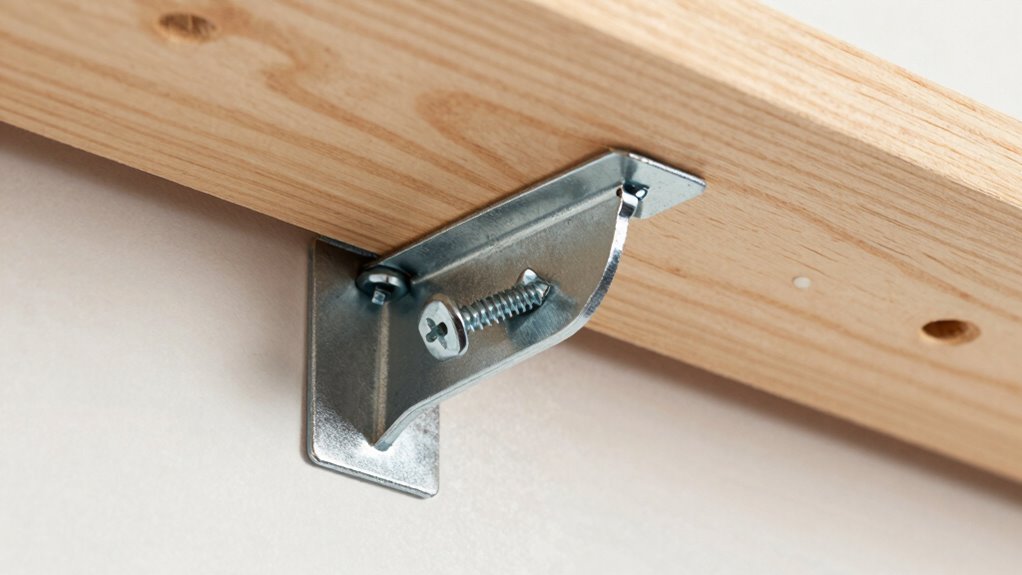
Attach Shelf Board to Brackets
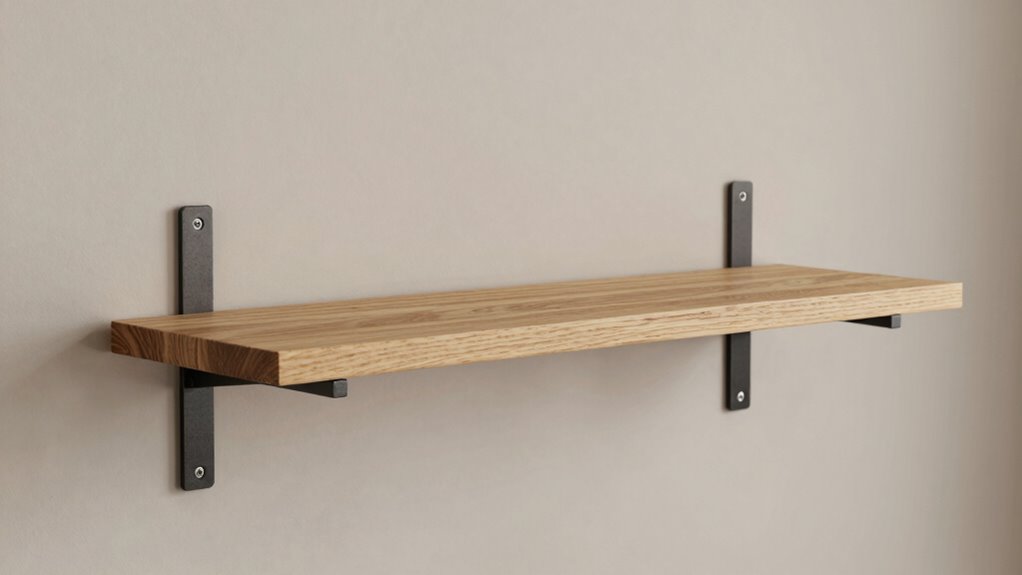
You’ll position your shelf brackets evenly along the wall, making sure they’re perfectly level before securing them in place.
Next, you’ll carefully place the shelf board onto the brackets, checking that it sits flush and centered on each support.
Finally, you’ll secure the board to the brackets using appropriate fasteners, ensuring everything remains level and stable throughout the installation.
Positioning Shelf Brackets
Once you’ve measured and marked the bracket locations on your wall, position each bracket so its mounting holes align with the marks you’ve made. Hold the bracket against the wall and check that it sits level before proceeding.
- Use a level tool to guarantee each bracket sits perfectly horizontal
- Double-check your measurements before marking permanent mounting points
- Account for bracket depth when measuring to avoid shelf board gaps
- Test bracket spacing with your shelf board before final positioning
Make sure everything lines up correctly – your future shelf stability depends on proper bracket placement.
Take your time with this step.
Securing Board To Supports
With your brackets properly positioned and secured to the wall, it’s time to attach the shelf board to create a stable, level surface.
Place the board onto the brackets, ensuring it sits flush against the wall and extends evenly on both sides. Use a drill to drive screws through the bracket holes into the board’s underside. Pre-drill pilot holes to prevent wood splitting.
Tighten each screw securely, but don’t overtighten. Check that the board doesn’t rock or shift. If your brackets have adjustable slots, you can fine-tune the board’s position.
Make sure all connections feel solid before adding weight. This step creates the foundation for your shelf’s strength and stability.
Ensuring Level Installation
Although your brackets are now secured to the wall, confirming your shelf board is perfectly level requires careful attention to detail during installation. You’ll want to double-check everything before final attachment.
- Place your shelf board onto the brackets and check levelness with a spirit level.
- Adjust bracket height incrementally until bubble sits centered in the level’s vial.
- Use shims or wooden wedges underneath brackets if needed for fine-tuning.
- Verify levelness across entire shelf length, not just at bracket attachment points.
Taking time to confirm proper alignment prevents wobbly shelves that look amateurish.
Your friends will notice the difference when they see your perfectly installed shelf. This attention to detail shows you care about quality craftsmanship, creating something both functional and visually appealing that belongs in any well-appointed space.
Align Brackets Evenly
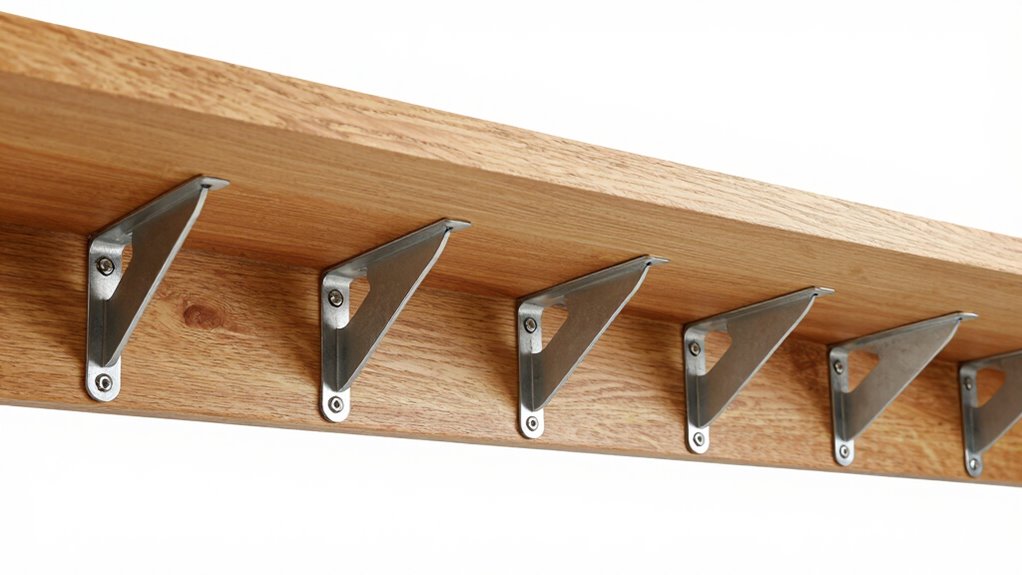
Three brackets need precise placement to guarantee your wooden shelf sits level and secure. Measure your shelf’s length and mark bracket positions at equal intervals. Use a pencil to lightly mark where each bracket’s mounting holes will go. Don’t eyeball this—measure twice and mark carefully.
Check that your marks are perfectly aligned horizontally using a level or straight edge. Adjust any marks that seem off before drilling. Space brackets evenly, typically positioning the outer brackets six inches from each end. The center bracket should sit exactly halfway between them.
Hold each bracket against its marked position and make sure it sits flat. Verify alignment with adjacent brackets before proceeding.
This careful preparation prevents wobbles and guarantees your shelf looks professional. Take your time here—rushing leads to mistakes you’ll regret later.
Secure Mounting to Any Wall
You’ll need to identify your wall type before selecting appropriate mounting hardware, since different materials require specific fasteners and installation techniques.
Choose anchors, screws, or bolts that match your wall’s composition and the shelf’s weight capacity.
Your installation method will vary depending on whether you’re working with drywall, concrete, brick, or wood studs.
Wall Type Considerations
Since different wall materials require specific mounting approaches, you’ll need to identify your wall type before securing any shelf brackets. Proper identification guarantees your shelf stays firmly attached and prevents costly mistakes.
- Drywall: Most common in modern homes, requires toggle bolts or anchors for heavy loads
- Plaster: Older homes often have this thicker material, needs masonry anchors and careful drilling
- Concrete/Masonry: Requires specialized drill bits and concrete anchors, extremely durable when properly mounted
- Wood Studs: Offer strongest support, locate with stud finder and use wood screws directly into framing
You should tap walls lightly to distinguish between hollow drywall sounds and solid stud locations.
Mark your findings clearly before drilling any holes.
Mounting Hardware Selection
Selecting the right mounting hardware guarantees your wooden shelf stays securely attached to any wall type.
For drywall, use toggle bolts or molly anchors that expand behind the surface. Concrete and brick require masonry anchors with appropriate drill bits. Wooden studs accept wood screws directly, but always verify stud location with a stud finder.
Choose hardware rated for your shelf’s weight capacity plus extra safety margin. Heavy shelves need multiple anchor points distributed evenly. Consider using French cleats for maximum support on finished walls.
Wall anchors should match your wall material exactly. Don’t mix metal and plastic anchors randomly. Check hardware thickness matches your shelf bracket holes.
Spring-loaded anchors work well for lightweight shelves, but heavier loads need expansion anchors. Always pre-drill holes to prevent wall damage and ascertain proper anchor seating.
Installation Technique Options
When mounting your wooden shelf, matching your installation technique to the wall type guarantees a secure, lasting hold.
Different walls require specific approaches to assure your shelf stays put without damaging the surface.
- Drywall installation requires wall anchors or toggle bolts for proper support.
- Wood stud mounting lets you drive screws directly into the stud for maximum strength.
- Concrete or masonry walls need masonry bits and appropriate concrete anchors for secure fastening.
- Plaster walls demand careful pre-drilling and specialized anchors to prevent cracking.
Choose your technique based on wall composition and shelf weight requirements.
Always use a level during installation and consider having someone assist you for larger shelves.
Proper technique prevents future sagging or detachment issues.
Strengthen Brackets for Weight Support
The brackets you choose and how you install them directly determine your shelf’s weight capacity.
Select brackets made from 16-gauge steel or thicker for maximum support. Thicker metal resists bending better than thin alternatives.
Position brackets every 16 inches along the shelf length to distribute weight evenly. Install brackets directly into wall studs whenever possible, as drywall anchors won’t support heavy loads. Use lag bolts or wood screws at least 2.5 inches long for secure attachment.
Angle brackets should have both vertical and horizontal mounting holes filled with screws. Don’t rely on decorative brackets alone – they’re often purely cosmetic.
Consider adding a center support bracket for shelves longer than 36 inches. Your books, collectibles, and everyday items deserve reliable support that won’t fail unexpectedly.
Avoid Sagging and Uneven Mounting
One key factor that determines your shelf’s long-term performance is how well you prevent sagging and uneven mounting during installation.
You must guarantee proper support spacing and level attachment points to maintain structural integrity.
- Measure bracket spacing accurately – Use a level and measuring tape to mark equal distances between supports, preventing weak spots that cause sagging over time.
- Check wall stud placement – Locate studs with a stud finder and anchor brackets directly into them for maximum weight-bearing capacity and stability.
- Use shims for uneven surfaces – Place thin wood or metal shims behind brackets to compensate for warped walls or irregular mounting surfaces.
- Test levelness frequently – Check alignment multiple times during installation with a bubble level, adjusting brackets immediately when you notice any tilt.
These steps guarantee your shelf remains straight, sturdy, and capable of handling intended loads without compromising safety or appearance.
Customize Design Before Assembly
Why settle for generic shelf dimensions when you can tailor every aspect to fit your specific needs and space constraints?
You should measure your intended space carefully, noting exact width, height, and depth requirements. Consider the items you plan to store – books, plants, or decorative objects – and adjust shelf spacing accordingly.
Decide on the number of shelves needed and mark their positions on your side panels before cutting. Think about overhang preferences, whether you want shelves flush with edges or extending slightly beyond.
Determine if you need adjustable shelves for future flexibility. Customizing now prevents fitting frustrations later.
You’ll create something that truly belongs in your space, reflecting your personal style while serving your exact storage needs perfectly.
Add Finishing Touches Quickly
Now that your shelf’s dimensions and design match your space exactly, don’t overlook the final details that make your project look professionally crafted.
These finishing touches transform your DIY effort from amateur to expert-quality craftsmanship that you’ll proudly display.
Quickly enhance your shelf with these essential final steps:
- Sand all surfaces lightly with fine-grit paper, then wipe away dust completely
- Apply wood stain or paint in long, smooth strokes following grain direction
- Install quality shelf brackets that complement your room’s existing hardware
- Add protective felt pads to bottom corners preventing wall scratches
These simple techniques guarantee your handmade shelf looks like it came from a professional carpenter.
You’re creating something that belongs in your home permanently.
Conclusion
You’ll find that building a shelf is simpler than maneuvering through IKEA instructions. Gather your tools, measure twice, and cut once—because nothing says “perfect shelf” like a crooked cut. Sand those edges smooth, mount securely, and watch your wall-hanging masterpiece sag dramatically. Irony aside, follow these steps precisely, and you’ll create something sturdy that won’t embarrass your DIY skills.
