

Most people don’t realize that chickens need about 2-3 square feet of indoor space per bird to stay healthy and productive. You’ll want to choose a well-draining spot in your yard that gets morning sun but has afternoon shade. Before you start framing, make sure you’ve got your local building codes checked and your materials ready.
Why Build a Chicken Coop?

While you might think chickens can survive without proper shelter, building a chicken coop is essential for keeping your flock healthy and productive.
You need protection from predators that view your birds as easy meals. Weather extremes hurt egg production and stress your chickens unnecessarily. A proper coop gives you control over feeding, nesting, and roosting areas.
You’ll collect eggs easier when hens have designated laying spots. Disease spreads rapidly in crowded, dirty conditions, so adequate shelter prevents costly losses.
Your neighbors expect you to contain your flock properly. Insurance companies won’t cover damages if chickens roam freely. Building codes often require enclosed structures for livestock.
A good coop increases property value while providing fresh eggs daily. You’re investing in your family’s food security and creating a sustainable homesteading foundation that benefits everyone involved.
How Much Space Each Chicken Needs
You need to plan adequate space for your flock before building your coop.
Each chicken requires a minimum of 2-3 square feet of floor space inside the coop and 8-10 square feet in an outdoor run.
These space requirements guarantee your birds stay healthy and productive while preventing overcrowding issues.
Space Requirements Per Bird
When planning your chicken coop, determining adequate space per bird prevents overcrowding and maintains flock health.
You’ll need four square feet of coop space per standard-sized chicken, though bantam breeds require only three square feet.
Don’t forget about roosting space either – provide eight inches of roosting bar per bird. Your chickens need room to move, eat, drink, and exhibit natural behaviors without stress.
Overcrowding leads to aggressive pecking, disease spread, and poor egg production.
Consider your flock’s future growth and potential additions when calculating space requirements.
Adequate room keeps your birds comfortable and productive while making daily coop maintenance easier for you.
Proper spacing creates a harmonious environment where every bird belongs.
Minimum Floor Area Needed
Each chicken requires a minimum of four square feet of floor space in the coop, though bantam breeds can manage with three square feet.
Don’t overcrowd your flock because chickens need room to move, roost, and maintain healthy social dynamics. Standard-sized hens and roosters won’t thrive in cramped conditions. You’ll face behavioral issues and health problems if you skimp on space.
Calculate your total flock size before building. Five chickens need twenty square feet minimum. Ten birds require forty. Remember that larger breeds like Jersey Giants demand even more room.
Provide adequate space from day one. Chickens that feel crowded become stressed, stop laying eggs, and develop aggressive tendencies. Your coop’s floor plan must accommodate every bird comfortably.
Plan extra room for feeding areas and nesting boxes. Space equals happy, productive chickens.
Outdoor Run Space Guidelines
While adequate indoor space keeps your flock healthy, outdoor run space guidelines demand equal attention for truly happy, productive chickens. You need at least ten square feet per bird in your outdoor run area. This space allows natural behaviors like scratching, pecking, and dust bathing.
Don’t overcrowd your chickens – it leads to stress, aggression, and health issues. Provide more space if you can, especially for larger breeds. Consider your flock’s size when planning the run dimensions.
Standard chickens require minimum ten by ten feet for ten birds. Add extra room for feeders, waterers, and shelter areas. Secure fencing keeps predators out while giving chickens freedom to roam safely.
Remember that adequate outdoor space prevents boredom and keeps your hens laying consistently. Plan generously for your flock’s wellbeing.
Pick the Best Spot in Your Yard
Choose a location that receives morning sunlight and has good drainage, since your chickens will spend most of their time outdoors.
Avoid low-lying areas where water pools after rain. Look for spots protected from strong winds but still allow air circulation.
Keep the coop away from your house to prevent noise complaints, but close enough for daily monitoring. Ascertain easy access to electricity and water sources nearby.
Consider your neighbors’ proximity and property lines. Pick level ground to simplify construction and prevent structural issues.
Morning sun helps dry dew and keeps chickens warm during colder months. Good drainage prevents muddy conditions that harbor bacteria and parasites.
Wind protection reduces stress on your flock while maintaining proper ventilation. Think about future expansion possibilities in your chosen area.
Select Affordable and Durable Materials
Since you’ve already picked the perfect spot for your chicken coop, now you’ll need to select materials that won’t break the bank while standing up to weather and wear.
Start with pressure-treated lumber for the frame – it’s affordable and resists rot. Choose plywood for walls, but avoid treated wood where chickens roost.
Hardware cloth costs more than chicken wire, but it keeps predators out effectively. Buy roofing materials locally to save money on delivery fees. Salvaged materials work great if they’re still structurally sound.
Check Craigslist and Facebook Marketplace for discounted lumber. Don’t skimp on hinges and latches – cheap ones fail quickly.
Visit farm supply stores for bulk discounts on wire and fasteners. Your chickens deserve a safe, well-built home that lasts years without constant repairs.
Design Coop Layout Step-by-Step
Your coop layout starts with three essential zones: sleeping quarters, feeding areas, and outdoor access.
Plan your sleeping area with 2-3 square feet per chicken, placing roosts higher than nesting boxes. Position feeders and waterers in the feeding zone, away from roosting areas to prevent contamination. Create a smooth traffic flow between all zones.
Consider your flock’s natural behaviors. Chickens need dust bathing spots near their outdoor access. Place nesting boxes in quiet, darker corners of the sleeping area. Ascertain roosting bars accommodate your birds’ breed size.
Think about daily routines. You’ll want easy access for egg collection and cleaning.
Position doors and windows for proper ventilation while protecting against drafts. Keep pathways wide enough for comfortable movement.
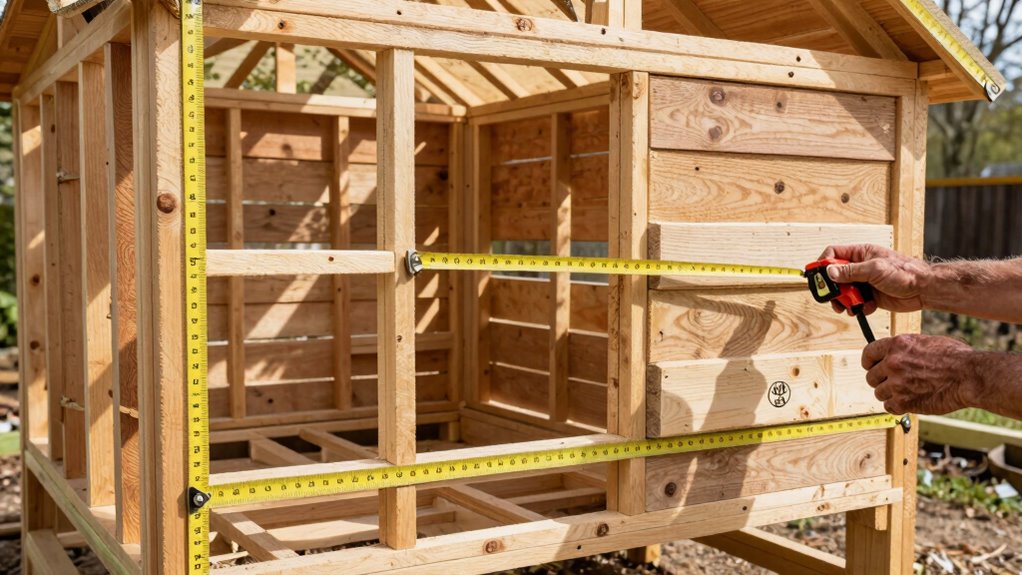
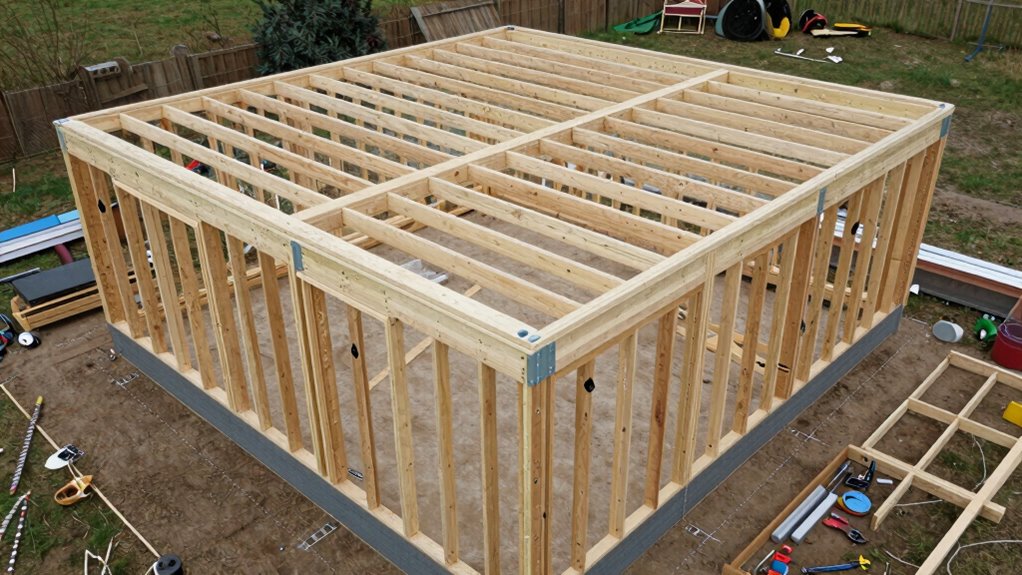
Frame Your Coop Like a Pro
When you’re ready to frame your chicken coop, start by gathering your materials and tools before cutting any lumber.
You’ll need pressure-treated 2x4s, galvanized screws, a drill, circular saw, and measuring tape.
Cut your base frame pieces first, ensuring they’re square and level. Build wall frames separately, spacing studs sixteen inches apart for maximum strength. Don’t forget corner braces for stability.
Attach bottom plates to your foundation using concrete screws. Raise each wall frame carefully, checking for plumb with a level. Secure walls together at corners with metal brackets.
Frame openings for doors and windows according to your design plans. Remember that proper framing creates the backbone of your coop’s durability and your flock’s safety.
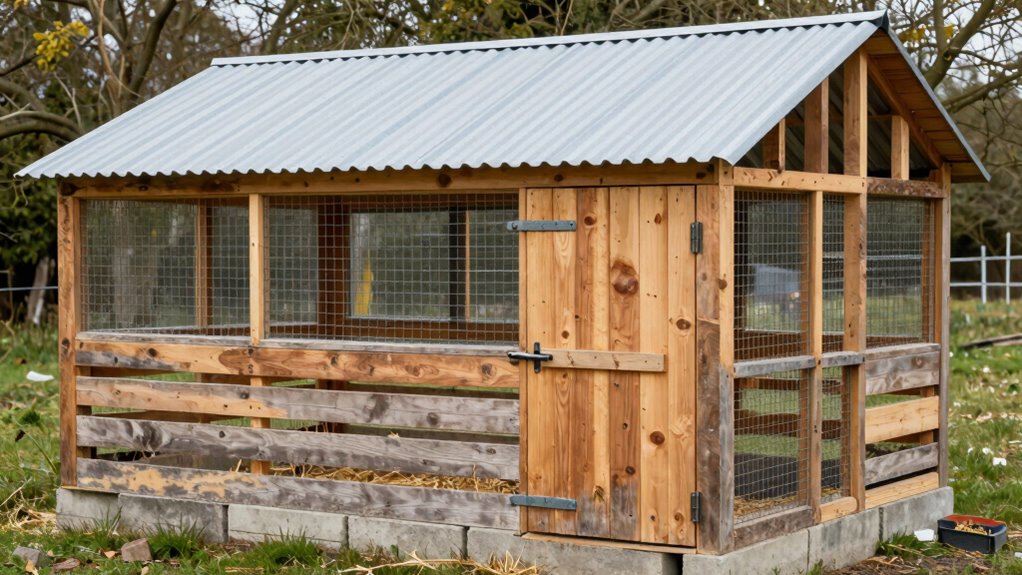
Build a Sturdy and Sloped Roof
You’ll need to choose durable roofing materials that can withstand weather and predators while keeping your chickens dry.
Design your roof with a proper slope angle to guarantee water runs off efficiently and doesn’t pool on the surface.
Install secure roof framing that connects firmly to your coop’s walls to prevent collapse during storms.
Choose Durable Roofing Materials
Since chickens need protection from weather extremes, choosing durable roofing materials becomes essential for your coop’s longevity.
You’ll want materials that withstand rain, snow, and UV damage while keeping your flock safe and dry.
Don’t overlook these critical roofing options:
- Metal panels – Lightweight, rust-resistant, and excellent for shedding water quickly
- Asphalt shingles – Cost-effective, widely available, and provide good insulation
- Plywood with roofing felt – Budget-friendly base layer that works under other materials
- Corrugated plastic – Translucent option that lets in natural light while blocking rain
- Rubber roofing membranes – Flexible, waterproof sheets that handle temperature changes well
Select materials based on your climate and budget.
Your chickens deserve reliable shelter that lasts years.
Design Proper Slope Angle
While choosing durable roofing materials protects your chickens from the elements, designing the proper slope angle guarantees water sheds effectively and prevents pooling that leads to leaks. You should aim for a minimum 4:12 pitch, meaning the roof rises four inches for every twelve inches of horizontal run. Steeper angles work better for areas with heavy rainfall or snow.
Measure carefully and mark your cuts precisely before assembling rafters. Don’t forget to account for overhangs that extend beyond the coop walls. Proper slope guarantees rainwater flows cleanly off the roof instead of seeping through seams.
Check your angle multiple times during construction. A level and speed square help you verify measurements accurately. Remember that inadequate slope causes water damage and costly repairs down the road.
Install Secure Roof Framing
Building on the proper slope angle you’ve established, installing secure roof framing requires cutting and positioning rafters that maintain that 4:12 pitch or steeper angle.
You’ll need to measure and cut each rafter precisely, ensuring they’re all identical length. Position them evenly across the top plate, typically 16 inches apart. Secure each rafter with galvanized nails or screws driven through the top plate.
Don’t forget to add a ridge board at the peak for extra stability.
- Cut rafters with identical lengths using a circular saw
- Space rafters exactly 16 inches apart for standard coverage
- Use hurricane ties for additional rafter-to-plate security
- Install temporary braces until you complete the roof sheathing
- Check each rafter’s angle matches your predetermined pitch
Install Windows, Vents, and Insulation
Although you’ve framed the walls and roof, don’t overlook the importance of proper ventilation and insulation before finishing your chicken coop.
Install windows on the south-facing wall for natural light and cross-ventilation. Use hardware cloth instead of glass for safety. Add vents near the roofline to allow hot air escape while preventing drafts.
Install insulation in walls and ceiling using rigid foam or fiberglass batting. Make sure your coop stays warm in winter and cool in summer. Chickens need consistent temperatures between 65-75°F.
Don’t forget to seal gaps around windows and vents to keep predators out. Proper ventilation prevents respiratory issues and moisture buildup that causes mold. Your flock depends on you creating this comfortable environment.
Add Easy-to-Clean Coop Flooring
Proper ventilation and insulation create the right climate for your chickens, but you’ll also need to focus on the flooring to maintain a clean, healthy environment.
Your coop’s floor should drain well and resist moisture buildup that leads to ammonia smells and bacterial growth.
Consider these flooring options:
- Concrete with drain holes – Durable and easy to hose down
- Plywood with removable boards – Cost-effective and simple to replace
- Wire mesh flooring – Allows droppings to fall through naturally
- Rubber mats – Comfortable for chickens and quick to clean
- Interlocking plastic tiles – Modular design makes cleaning effortless
Choose materials that won’t rot quickly and sanitize easily.
Avoid using dirt floors since they’re difficult to keep clean.
Your chickens deserve a hygienic space where they can thrive.
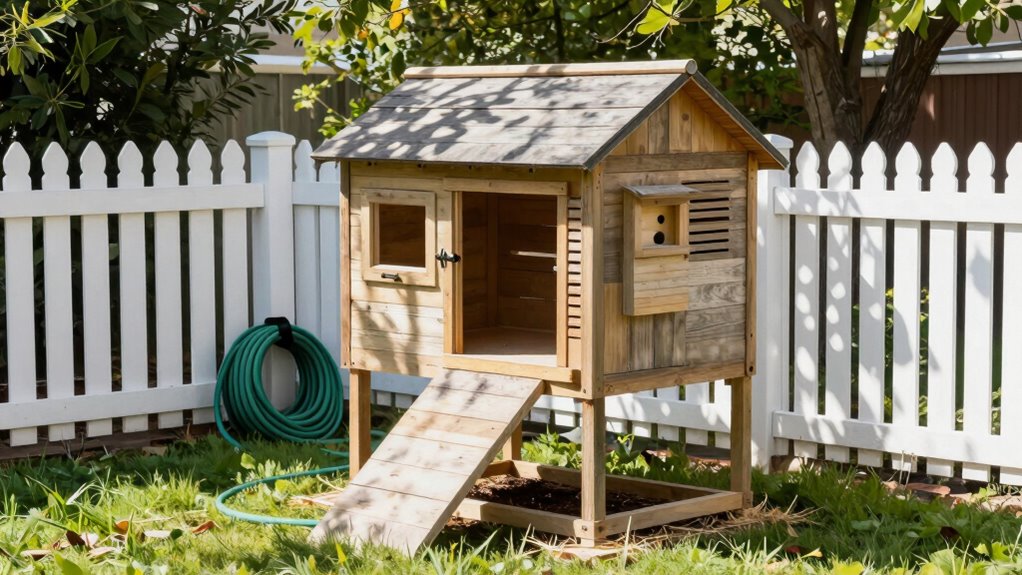
Choose Coop Doors That Keep Chickens Safe
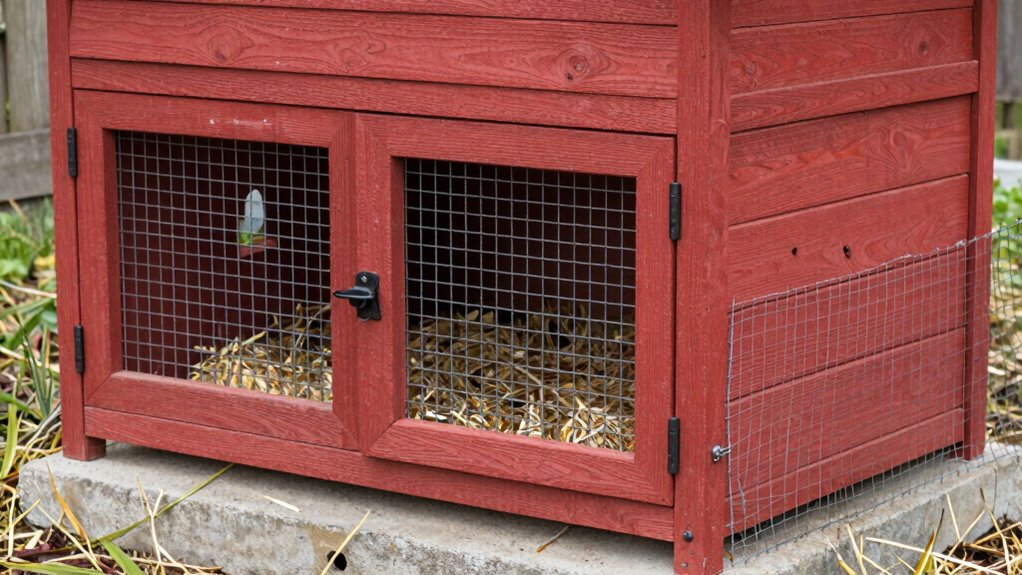
While you’re designing your chicken coop, don’t overlook the importance of well-placed, secure doors that protect your flock from predators and harsh weather.
You’ll want sturdy hardware cloth or welded wire mesh covering all door openings, not just the main entrance. Install spring-loaded latches that predators can’t open, and consider adding a secondary latch for extra security.
Position doors away from nesting areas to minimize stress during egg collection. Sliding doors work well for smaller coops, while hinged doors provide easier access to larger spaces.
Make sure doors swing outward to prevent chickens from getting trapped inside. Weatherproof seals around door frames keep drafts out and maintain proper ventilation.
You should also install a small door or pop hole for chickens to access their outdoor run safely.
Install Nesting Boxes and Roosting Bars Properly
You’ll need to install nesting boxes and roosting bars early in your coop construction process since these elements determine how your chickens will use the space.
Position nesting boxes 18-24 inches off the ground, lined with straw or shavings for comfort. Install one box per three to four hens to prevent overcrowding and egg fighting.
- Roosting bar height: Place bars 2-4 feet high, allowing dominant chickens top spots
- Spacing requirements: Provide 8-10 inches of roosting space per bird
- Box dimensions: Build 12×12 inch boxes for standard breeds
- Location strategy: Position boxes in darker, quieter coop corners
- Accessibility: Make certain you can easily collect eggs and clean boxes
Chickens instinctively seek elevated sleeping spots and enclosed nesting areas. Proper installation creates a natural pecking order while maximizing your coop’s functionality.
Don’t overlook these essential elements.
How to Predator-Proof Your Chicken Coop
You need to secure your coop’s perimeter with sturdy fencing that extends underground to prevent digging predators from getting in.
Install motion-activated lighting around the coop to scare off nocturnal threats like raccoons and foxes.
Don’t forget to use hardware cloth barriers over vents and openings to keep smaller predators like snakes and rats out.
Secure The Perimeter
Predators can quickly turn your chicken coop into a disaster zone if you don’t properly secure the perimeter.
You need to create a fortress that keeps your flock safe while giving you peace of mind.
Focus on these essential security measures:
- Bury hardware cloth at least 12 inches deep around the entire perimeter to stop digging predators
- Install sturdy locks on all doors and latches that predators can’t manipulate
- Use 1×1 inch wire mesh for all windows and ventilation areas
- Seal gaps around pipes, vents, and where walls meet the foundation
- Add an overhang or roof extension to prevent climbing animals from gaining access
These steps protect your investment and guarantee your chickens stay safe.
Don’t skip any of these critical security measures.
Install Motion-Activated Lighting
Installing motion-activated lighting around your chicken coop creates an effective deterrent that surprises and confuses potential predators.
You should mount LED floodlights at strategic points around the coop perimeter, focusing on areas where predators typically approach. Choose lights with adjustable sensitivity settings so you can customize detection range.
Battery-powered solar lights work well for remote locations without electrical access. Position lights high enough that predators can’t easily knock them down.
Test motion sensors during installation to guarantee proper coverage. The sudden illumination startles raccoons, foxes, and other nighttime threats, often scaring them away before they can cause harm.
You’ll sleep better knowing your flock stays protected while you maintain peace of mind about their safety.
Use Hardware Cloth Barriers
While hardware cloth barriers require more upfront investment than chicken wire, they provide superior protection that actually keeps predators out. You’ll appreciate this decision when raccoons, foxes, and other threats can’t chew through or tear apart your coop defenses.
Hardware cloth features smaller, stronger wire mesh that predators can’t penetrate. Unlike chicken wire, it won’t stretch or break under pressure. Install it around all potential entry points including windows, vents, and underneath your coop.
- Choose 1/2-inch mesh for ideal predator protection
- Secure with staples or screws every 6 inches for durability
- Cover all openings including underside gaps where predators dig
- Use galvanized material for weather resistance and longevity
- Check connections regularly to guarantee no gaps form over time
Your flock deserves this extra security.
Add Feeders and Waterers Inside
One essential step you’ll need to tackle is adding feeders and waterers inside your chicken coop.
Place these near the entrance for easy access during daily chores. Choose gravity-fed waterers that stay clean longer and reduce refilling frequency.
Hang them at beak height to prevent spillage and keep bedding dry. Install multiple feeders if you have several chickens to prevent bullying at mealtime.
Use sturdy mounting hardware to secure everything firmly. Position feeders away from roosting areas to avoid contamination from droppings.
Check waterers daily for leaks or blockages. Clean and refill containers weekly to maintain hygiene.
Consider automatic systems for larger flocks, though manual options work fine for smaller setups. Your chickens need consistent access to fresh food and water.
Pick Safe and Affordable Bedding
Straw and wood shavings are your best options for coop bedding. These materials absorb moisture well and provide comfortable nesting areas for your chickens.
You’ll want to avoid cedar shavings since they can cause respiratory issues.
- Straw works great for winter insulation and lets hens scratch naturally.
- Pine shavings offer excellent odor control and are easy to clean.
- Avoid hay because it molds quickly and suffocates chicks.
- Sand works well in warm climates but doesn’t insulate.
- Recycled paper bedding is eco-friendly but needs frequent changing.
Layer bedding four inches deep initially. Check weekly and add fresh material as needed.
Deep bedding methods work well for experienced keepers.
Your chickens will thank you for choosing comfortable, safe options that support their natural behaviors.
Paint or Seal for Weather Protection
Since your coop will face constant exposure to rain, sun, and temperature swings, protecting it with paint or sealant is essential.
You should choose exterior-grade paint or sealant specifically designed for outdoor use. Latex paint works well for most wooden coops and dries quickly. Apply two thin coats rather than one thick coat for better protection.
Don’t forget to paint all surfaces, including the underside and roof. If you prefer a natural look, use clear sealant or stain instead. Both options prevent moisture damage and extend your coop’s lifespan.
Avoid using toxic paints or chemicals that could harm your chickens. Check your local hardware store for pet-safe options.
Reapply protection every few years when you notice fading or wear. Your chickens deserve a safe, weatherproof home.
Essential Tools for Coop Construction
Having protected your coop with proper paint or sealant, you’ll need the right tools to construct it effectively.
Don’t underestimate how much smoother building goes when you’ve got everything organized and ready. Your tool selection makes the difference between frustration and satisfaction.
- Circular saw or miter saw for clean, precise cuts on lumber
- Drill with various bits for screwing joints and drilling ventilation holes
- Measuring tape and carpenter’s square to guarantee accurate dimensions
- Level and chalk line for straight edges and proper alignment
- Staple gun with heavy-duty staples for securing hardware cloth and roofing
These tools handle ninety percent of your construction tasks efficiently.
How to Save Money Building Your Coop
You can cut coop building costs considerably by choosing affordable materials like plywood instead of expensive lumber, using recycled items such as old pallets and metal roofing, and timing your purchases during hardware store sales.
These simple strategies help you stretch your budget further without compromising the quality of your chickens’ new home. Smart shoppers can save hundreds of dollars by combining these cost-saving approaches with careful planning.
Choose Affordable Materials
One smart approach to cutting coop construction costs involves selecting materials that won’t break your budget.
You don’t need expensive lumber or fancy hardware to build a functional chicken coop that’ll serve your flock well.
Focus on these affordable options that work just as well:
- Pine boards instead of cedar or pressure-treated lumber
- Plywood sheeting for walls and roofing
- Basic hinges and latches from any hardware store
- Chicken wire or hardware cloth for ventilation
- Concrete blocks for foundation support
These materials cost considerably less while still providing durability and protection your chickens need.
Use Recycled Items
Recycled materials can greatly reduce your coop-building expenses while maintaining structural integrity.
You should scavenge pallets from local businesses for framing and flooring. Old fencing works perfectly for chicken wire alternatives.
Salvaged roofing materials like corrugated metal or leftover shingles save money. Check construction sites for discarded lumber pieces.
Your neighbors might donate unused bricks or concrete blocks. Repurpose old windows for ventilation. Use reclaimed doors as coop entrances.
Even discarded bathtubs make excellent nesting boxes. Don’t overlook scrap hardware stores for hinges, screws, and fasteners. These items often cost pennies compared to new materials.
You’ll feel proud knowing your coop represents resourcefulness and environmental consciousness. Other backyard chicken keepers will appreciate your creative approach.
Your flock deserves a home built with care, not necessarily brand-new materials.
Build During Sales
Building your chicken coop during sales periods can greatly reduce material costs without compromising quality. You’ll find better deals on lumber, hardware, and roofing materials when stores run promotions.
- End-of-season clearance: Buy lumber and materials in fall when retailers discount inventory.
- Holiday sales: Take advantage of Black Friday and Memorial Day deals on building supplies.
- Closeout items: Purchase discontinued or overstock materials at deep discounts.
- Bulk purchasing: Join buying groups or coordinate with neighbors to qualify for wholesale prices.
- Salvage outlets: Check demolition supply stores for discounted reclaimed materials.
Planning your purchase timing matters more than you think. Smart shopping during sales lets you allocate saved money toward better coop features while staying within budget.
What Not to Do While Building
When you’re constructing your chicken coop, avoid using pressure-treated lumber near areas where chickens will roost or nest, as the chemicals can leach into their environment.
Don’t skimp on proper ventilation either – chickens need fresh air circulation to stay healthy.
Avoid placing the coop in low-lying areas where water pools, as this creates muddy conditions and attracts pests.
Don’t forget to account for future expansion; build with growth in mind.
Skip cheap hardware cloth for predator protection; invest in sturdy 1/4-inch hardware cloth instead.
Don’t ignore local zoning laws or HOA restrictions before starting construction.
Avoid making roosting bars too wide or too smooth; chickens need grip and comfort.
Don’t place feeders and waterers where droppings can contaminate them easily.
How to Clean Your Coop Each Month
You should establish a monthly cleaning schedule that works with your coop’s size and your flock’s needs.
Remove old bedding, droppings, and soiled materials regularly to prevent ammonia buildup and keep your chickens healthy.
Proper waste removal techniques will save you time and effort while maintaining a clean environment for your birds.
Monthly Coop Cleaning Schedule
While monthly cleaning might seem like a straightforward task, establishing a consistent schedule guarantees your chickens stay healthy and your coop remains odor-free.
You’ll quickly discover that regular maintenance prevents bigger problems down the road.
Create your monthly routine by focusing on these essential tasks:
- Check and replace bedding material throughout the coop
- Scrub roosting bars and nesting boxes with disinfectant
- Sweep out old feed and debris from floor areas
- Inspect ventilation systems and clear any blockages
- Disinfect water containers and refill with fresh supplies
Stick to this schedule and you’ll maintain a clean environment that keeps your flock thriving.
Consistency matters more than perfection.
Proper Waste Removal Techniques
One essential aspect of monthly coop maintenance involves removing waste material efficiently and thoroughly.
You’ll want to clear out all bedding and droppings completely. Use a sturdy shovel or pitchfork to scrape every corner clean.
Don’t forget underneath roosting bars where chickens tend to deposit waste. Remove nesting box materials too, even if they appear clean.
Dispose of waste properly by composting it in a designated area away from your garden. Fresh chicken manure needs time to decompose fully before using as fertilizer.
Consider wearing gloves and a mask during cleanup to avoid inhaling dust particles.
Replace old bedding with fresh straw or wood shavings. Guarantee adequate ventilation remains unobstructed.
Clean waterers and feeders while you’re at it. This thorough approach keeps your flock healthy and your coop odor-free.
Conclusion
You’ve got this! Building your chicken coop is simpler than you think. Don’t let perfect be the enemy of good – start with basic materials and improve over time. Your chickens will thank you for a safe, clean home. Remember, the way to a chicken’s heart is through consistent care and a well-built shelter. Happy building!
